# Content
# How do we set up Content?
### **1. Overview**
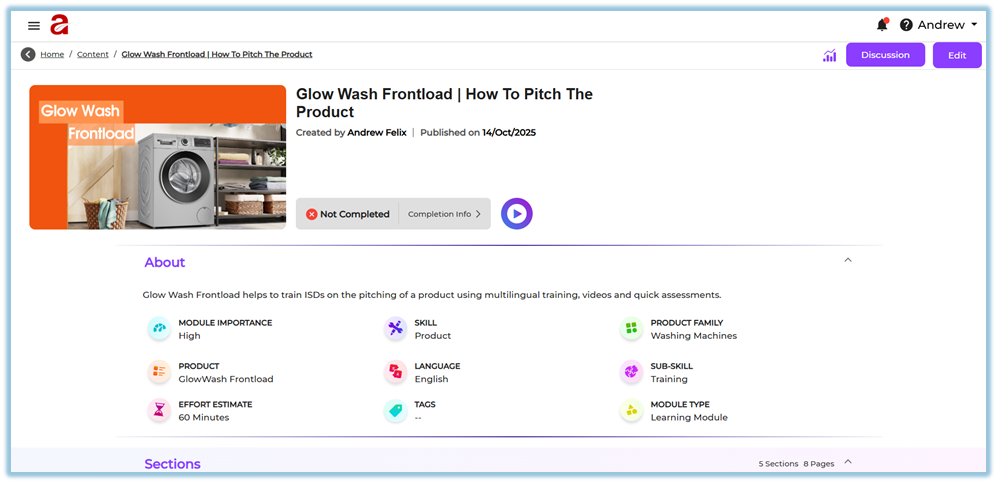
Bsharp Converse Content is a smart tool that lets you quickly create structured training modules from documents, images, videos, and quizzes. With its AI tool, Learnbee, you can instantly convert PDFs into interactive content and publish them with the right user targeting, rules, and reminders.
Module Deployment is the complete process of creating and launching a learning module in Converse. It consists of four core steps:
1. **Module Details** → Define all metadata
2. **Content** → Build the training structure and upload learning materials
3. **Add Users** → Select the learners who will receive the module
4. **Settings & Publish** → Configure notifications and launch the module
Organizations need a scalable way to:
- Create structured training content
- Target specific users or teams
- Track completion and compliance
- Maintain consistent, high-quality learning formats
- Deliver training using multiple channels (in-app, email, WhatsApp, Google Chat)
### **2. When to Use?**
Use the module deployment process when you need to:
- Launch a structured training program
- Upload learning materials such as PDF, video, quiz, text
- Enforce completion rules (mandatory pages, minimum view time)
- Roll out training to selected teams or regions
- Run compliance, onboarding, product training, or certification programs
- Track completion and engagement reports
Use this feature if:
- You want a structured module instead of ad-hoc files
- You need to track completion
- You want sequential learning (locks)
- You want to reach specific target groups
- You want automated reminders
- You want reporting at module, page, or quiz level
### **3. Concepts**
##### Module
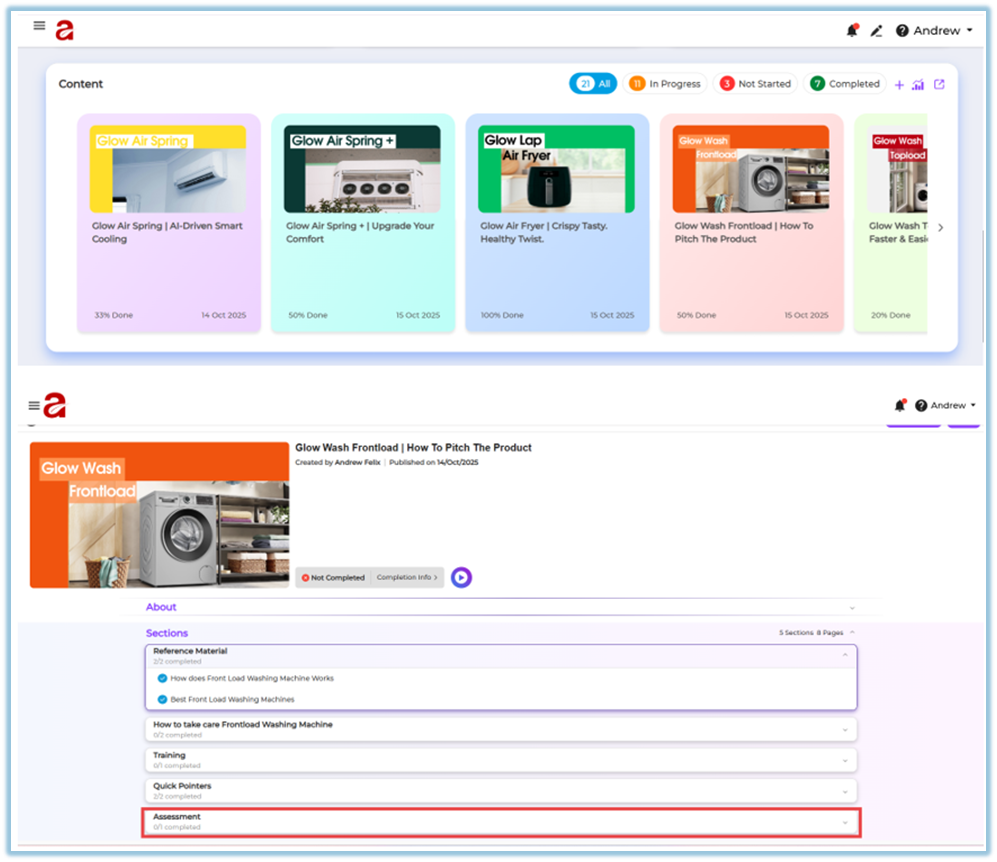
A complete learning unit consisting of sections, pages, and content.
##### Section
Top-level grouping inside a module (e.g., Intro, Core Offering, Summary).
##### Page
A learning block within a section containing content items.
##### Content Item (Card)
Individual learning material:
Text, Image, PDF, Video, Quiz, LearnBee content, SCORM.
##### Skill / Sub-skill
Categorization tags fully configurable via admin settings.
##### Product Family / Product
Mapping used for product-based learning setups.
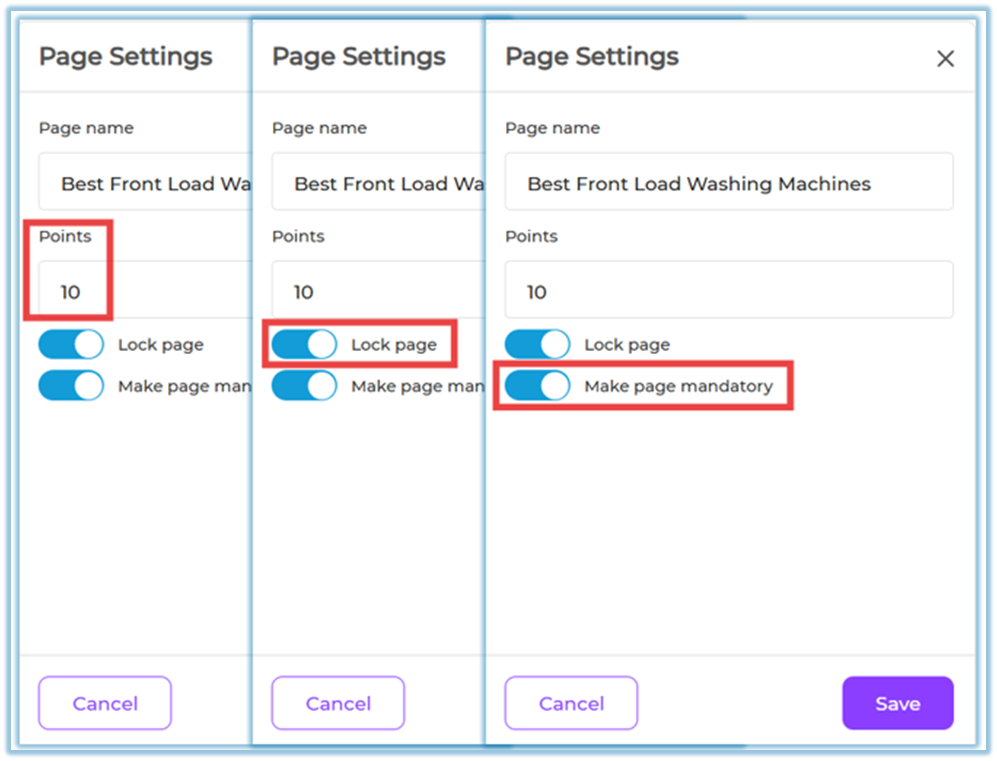
##### Mandatory Page
Learners must complete this to finish the module.
##### Lock Page
Learners must complete the previous page before unlocking the next.
##### Minimum View Time
Timer on PDFs/videos that ensures enough viewing is done.
##### Attribute Group
Automatically assigns modules based on user properties (country, department, etc.).
##### Assigned Notification
Message sent when a module goes live.
##### Reminder Alert
Follow-up messages sent only to users who haven’t completed training.
### **4. How to Set It Up / Configure It**
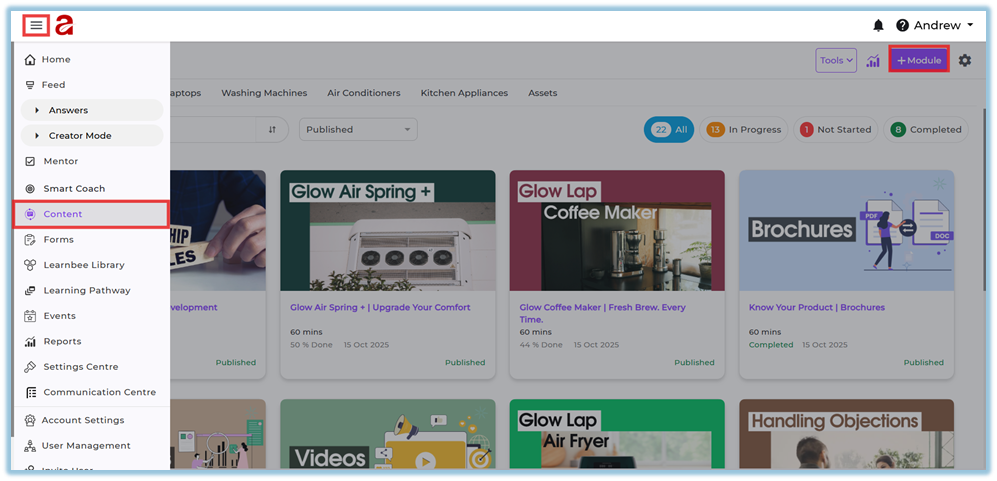
To start setting up Content:
1. Click the **menu icon** on the top-left.
2. Select **Content** from the left-side menu.
3. Click **+ Module** on the top-right of the Content page.
The deployment process is divided into **four guided steps**.
### STEP 1 — MODULE DETAILS
*(Define metadata and classification)*
### Setup Steps
1. Enter module name and description
2. Choose Skill and Sub-skill
3. Select Product Family & Product
4. Add Tags (optional)
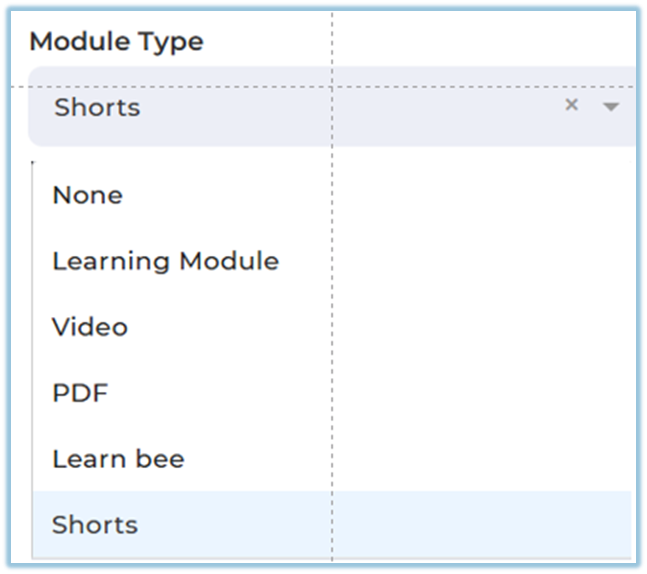
5. Choose Module Type (Training, Policy, Certification, etc.)
6. Select Importance (High/Medium/Low)
7. Select Language
8. Enter Duration
9. Upload Thumbnail image
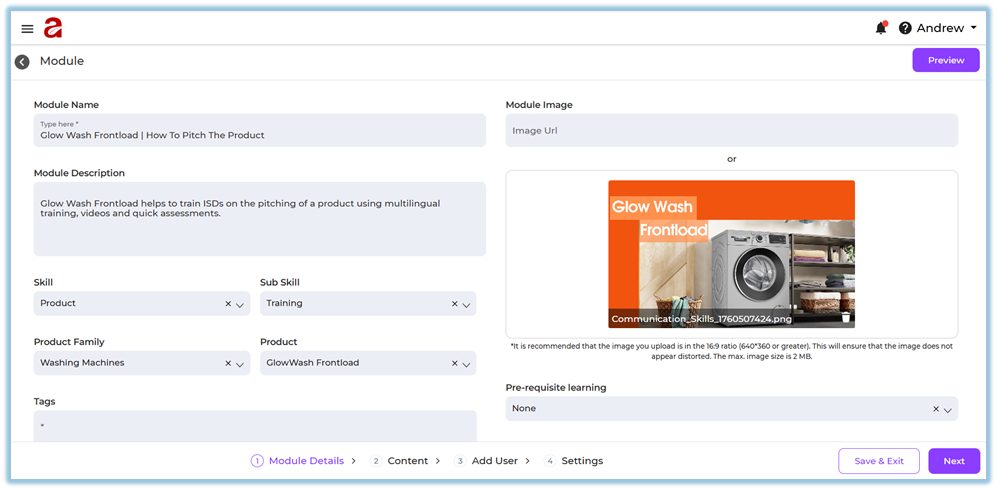
10\. Set **Pre-requisite Module**
A pre-requisite module is a module the learner must complete first before starting the current module.
This ensures the learner follows the correct learning order.
Only **one** module can be added as a pre-requisite module.
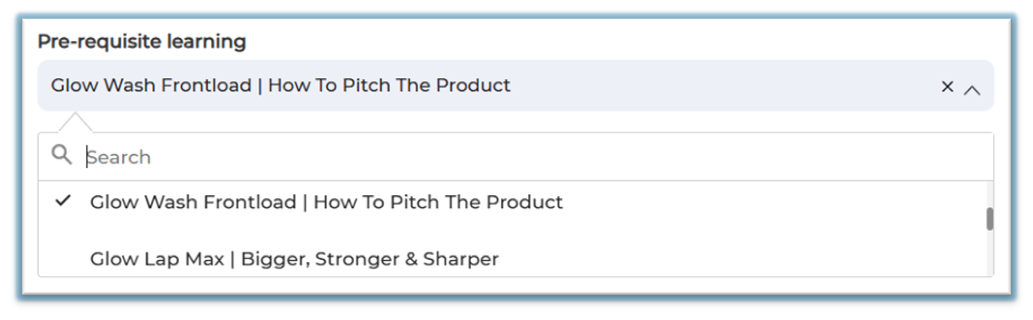
**Example:**
If there are two modules:
- Module – Part 1
- Module – Part 2
Here, **Part 1** is the pre-requisite module for **Part 2**.
When a learner opens **Part 2**, the system will ask them to complete **Part 1** first.
This is because Part 1 contains the basic information needed before moving to Part 2.
11\. Set ****Equivalence Module****
An equivalence course is another module that teaches the **same learning content**.
If two modules are equivalent, completing **either one** will count as completing **both**.
Only **one** module can be added as a Equivalence module.
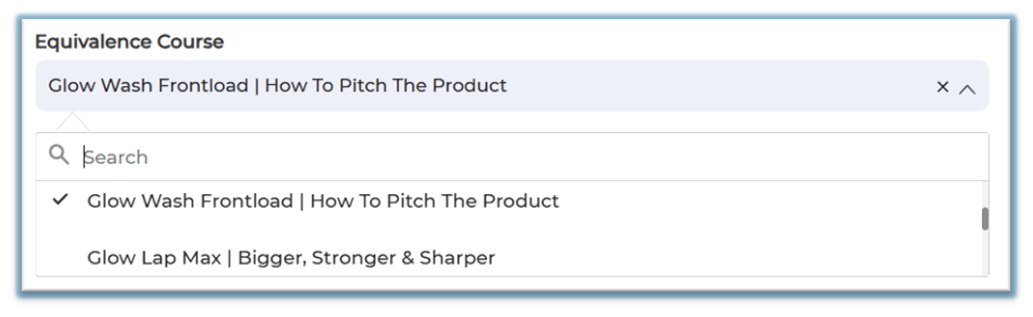
Example:
If you have:
- **Module A – Glow Air Fryer Overview (PDF)**
- **Module B – Glow Air Fryer Overview (Video)**
You can set Module B as the **equivalent** of Module A.
This means:
- - If the learner completes the **video**, the **PDF** version also shows as completed.
- And if they complete the **PDF**, the **video** version will also be marked completed.
➡ All configuration options referenced here come from admin settings pages.
(Example: Skills, Languages, Product Families, and Module Types)
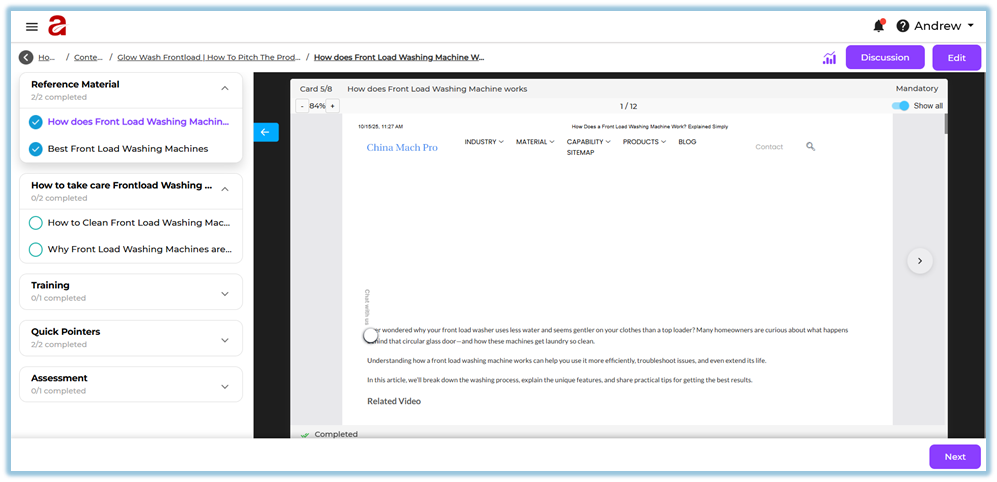
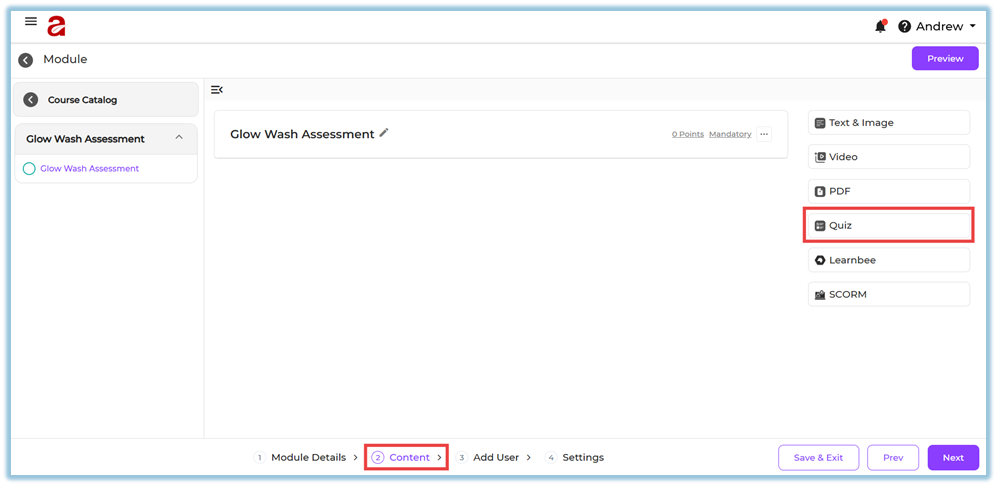
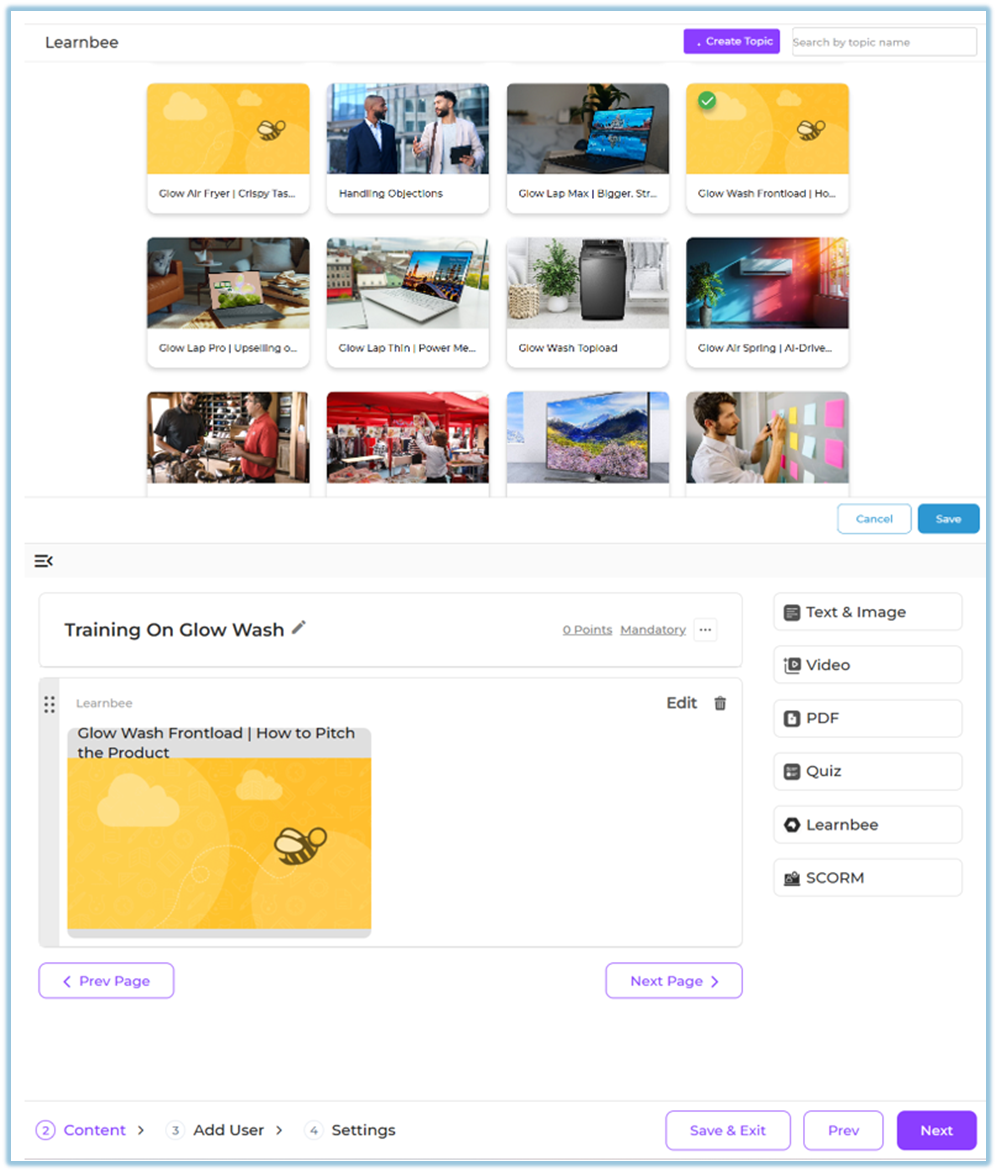
### STEP 2 — CONTENT
*(Build the actual training journey)*
#### Structure Overview
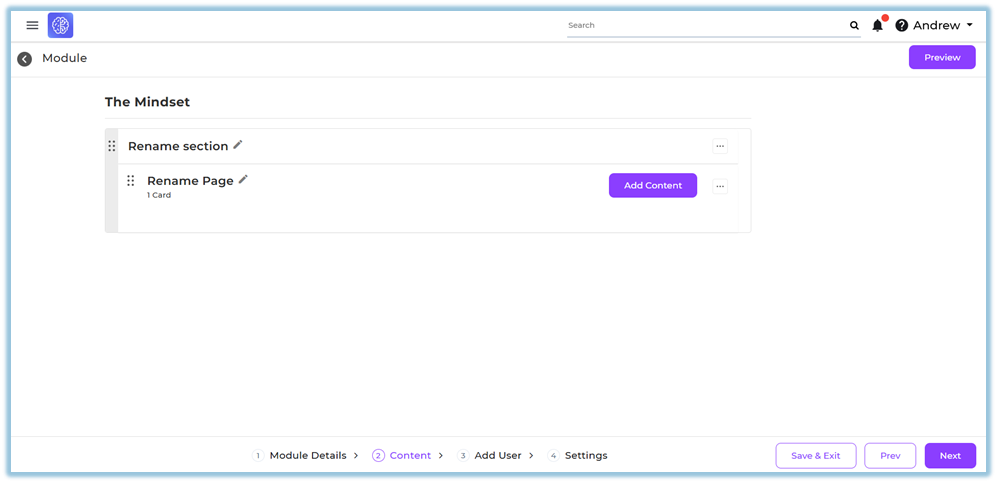
A module → contains **Sections** → each contains **Pages** → each holds **Content Items**.
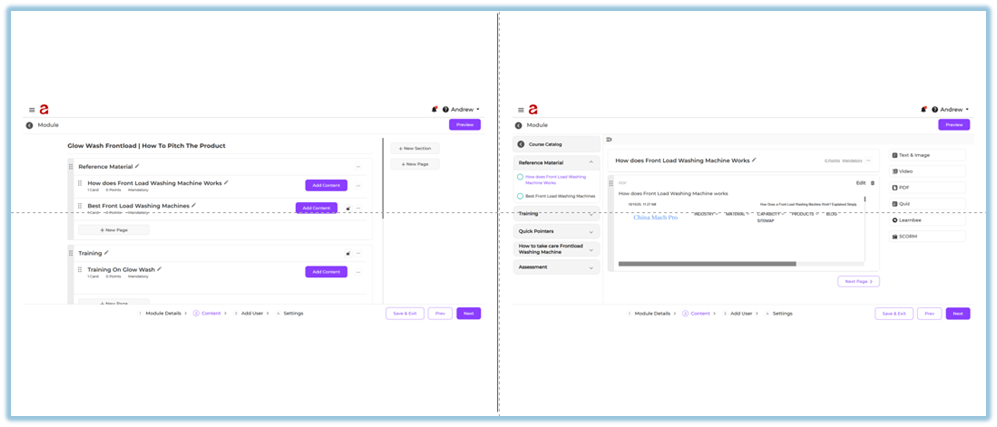
### Setup Steps
1. Create Sections (Intro, Core Concept, Summary)
2. Create Pages inside each section
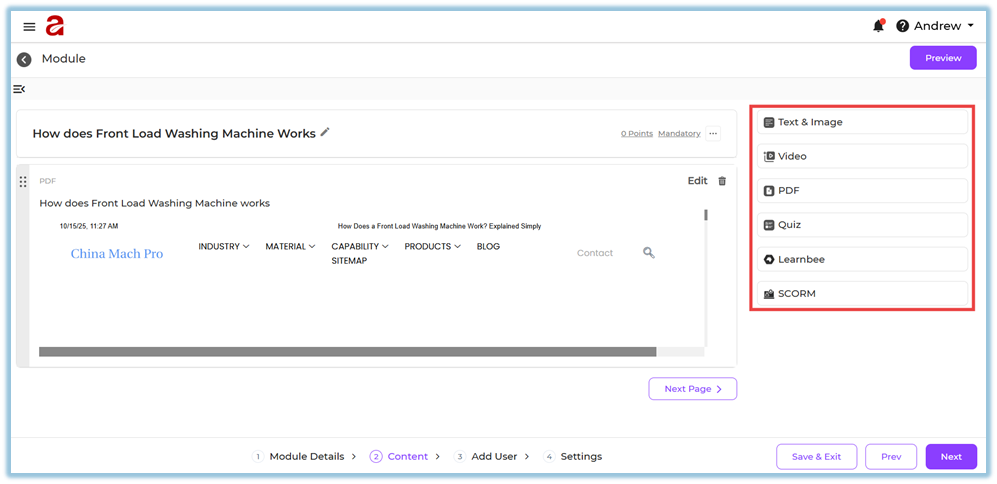
3. Add content items:
- Text & Image
- PDF (with download control + minimum view time)
- Video (upload or YouTube link)
- Quiz (single/multi-select, shuffle)
- LearnBee content
- SCORM packages
1. Reorder content by dragging
2. Configure Page settings:
- Mandatory
- Lock
- Points
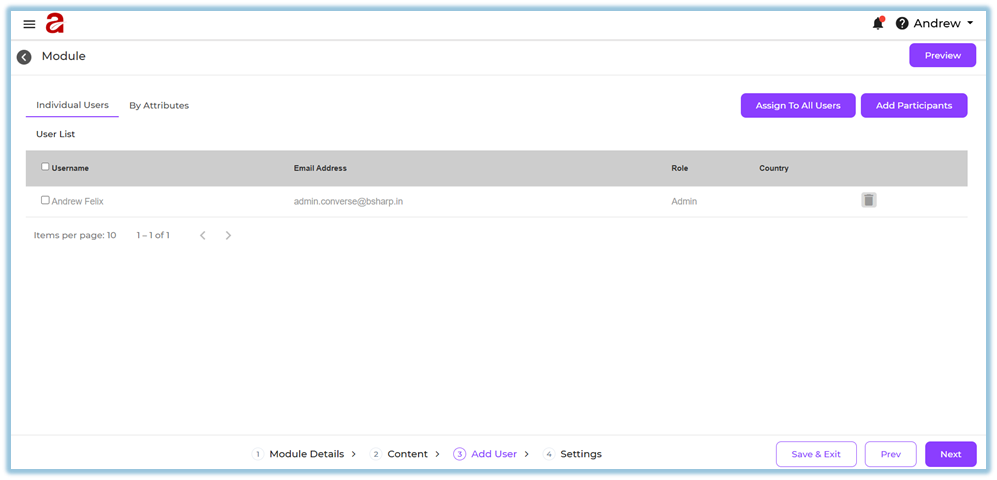
### STEP 3 — ADD USERS
*(Choose who should receive the module)*
You can assign modules using three methods:
#### 1. Individual Assignment
Pick specific users manually.
#### 2. Assign to All Users
Visible to everyone who has ever logged in.
#### 3. Attribute Assignment (Dynamic)
Create an attribute group such as:
- Country = India
- State = Karnataka
- City = Bangalore
OR
- Department = Sales
- Role = Manager
Newly joined users who match attributes are **automatically assigned**.
#### Setup Steps
1. Go to Add Users
2. Select method (Individual / All / Attributes)
3. For attributes → create group rules
4. Save
5. Review user count
### STEP 4 — SETTINGS & PUBLISH
*(Configure notifications & launch training)*
#### Setup Steps
1. Choose channels for **Assigned Notification**:
WhatsApp, Google Chat, Email, In-App
2. Enable **Reminder Alerts** for incomplete users
3. If needed, send **Manual Reminder**
4. Preview module
5. Click **Publish**

#### System Behavior
- Notification goes out immediately after publish
- Reminders go only to incomplete learners
- Cannot unpublish a module
- Use versioning if changes are required
---
### **5. User View**
#### Module Details
Learners see:
- Title
- Description
- Duration
- Thumbnail
- Language
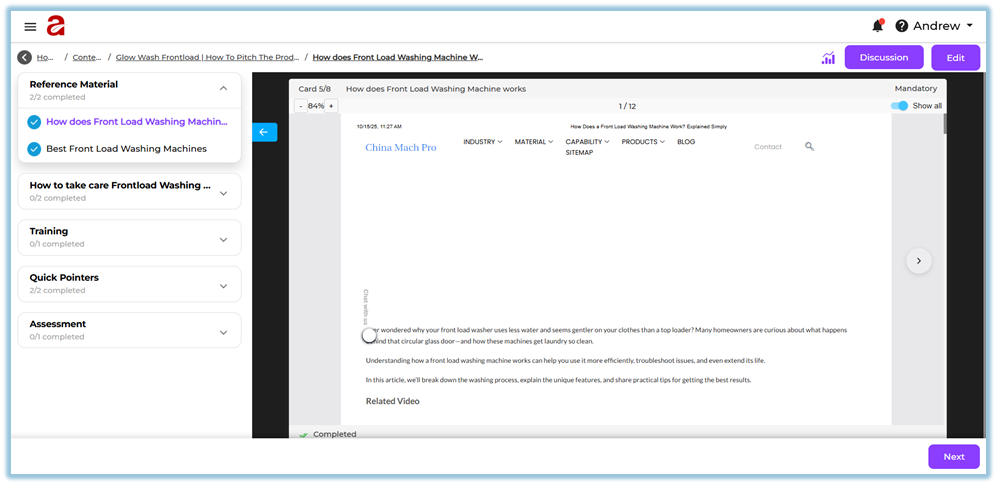
#### Content Experience
Learners see:
- Section and Page names
- Cards in sequence
- Locked or mandatory indicators
- Minimum view time prompts
#### Assignment
Learners see the module in their **Learning Hub** once published.
#### Notifications
Sent on selected channels with module title and link.
#### Reminders
Appear only if learners haven’t completed the module.
### **6. Reporting**
Reports show:
#### Module-level
- Total assigned
- Completed
- Pending
- Not started
- Average time spent
#### Page-level
- Page completion
- Locked/unlocked status
- Minimum view time completion
#### Content-level
- Quiz scores
- Document views
- Video completion
#### Filters
- Skill
- Product
- Region
- Designation
- Attribute-based groups
For deeper analysis, cross-link to Reporting pages inside your helpdesk.
### **7. Best Practices**
#### Structuring Content
- Use 3–5 sections maximum
- Keep pages short and focused
- Add quizzes after heavy content
#### Assignment Strategy
- Use attributes for large and growing teams
- Use Individual only for pilots
#### Engagement Strategy
- Use 2 reminder channels minimum
- Send manual reminders before deadlines
#### Compliance Strategy
- Use locked pages for linear learning
- Use minimum view time sparingly
- Ensure mandatory pages are clearly marked
### **8. Troubleshooting / FAQs**
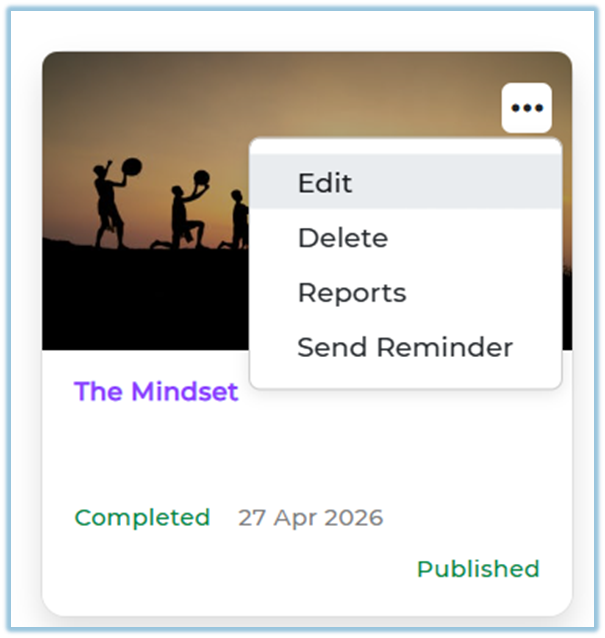
**Module not visible**
**Cause:** Wrong assignment method
**Fix:** Check Individual/Attributes/Assign to All
**PDF not marking complete**
**Cause:** Minimum view time not finished
**Fix:** Reduce time or remove timer
**Page not unlocking**
**Cause:** Locked + mandatory content incomplete
**Fix:** Complete previous page fully
**Reminders not sending**
**Cause:** Reminder channels disabled
**Fix:** Enable channels in Settings → Reminder Alerts
**Users not receiving WhatsApp notifications**
**Cause:** Integration not configured
**Fix:** Check WhatsApp integration provider
**Cannot publish**
**Cause:** Missing mandatory fields
**Fix:** Verify Module Details and Content setup
### **9. Version Notes**
Last Updated: 12 Dec 2025
# What are the functions of Quiz
### **1. Overview**
Quiz is a content item in Bsharp Converse used to assess learner understanding within a training module. It allows administrators to create structured assessments with different question types, scoring rules, timers, and evaluation settings, and to control how learners attempt and complete assessments.
### **2. When to Use**
Use Quiz when:
- You need to assess learner knowledge after training content
- You want to validate understanding before allowing learners to proceed
- You need scored assessments for compliance or certification
- You want to control attempts, pass percentage, or exam behavior
### **3. Concepts**
- **Quiz** – An assessment added inside a module page
- **Question Types** – Supported formats for quiz questions
- **Scoring & Points** – Marks assigned to questions and options
- **Partial Scoring** – Split scores for partially correct answers
- **Question Timer** – Time limit at question level
- **Quiz Pool** – Randomized question selection from a set
- **Quiz Bank** – Central repository of reusable questions
- **Quiz Settings** – Rules controlling attempts, feedback, and behavior
### **4. Set Up Guide**
##### Step 1: Add Quiz Content
1. Go to the **Content** step while creating or editing a module.
2. Open a **Section** and select a **Page**.
3. Click **Add Content**.
4. Select **Quiz**.
##### Step 2: Create a Quiz
1. Enter the **Quiz Name**.
2. Use **Add** Section to start adding questions.
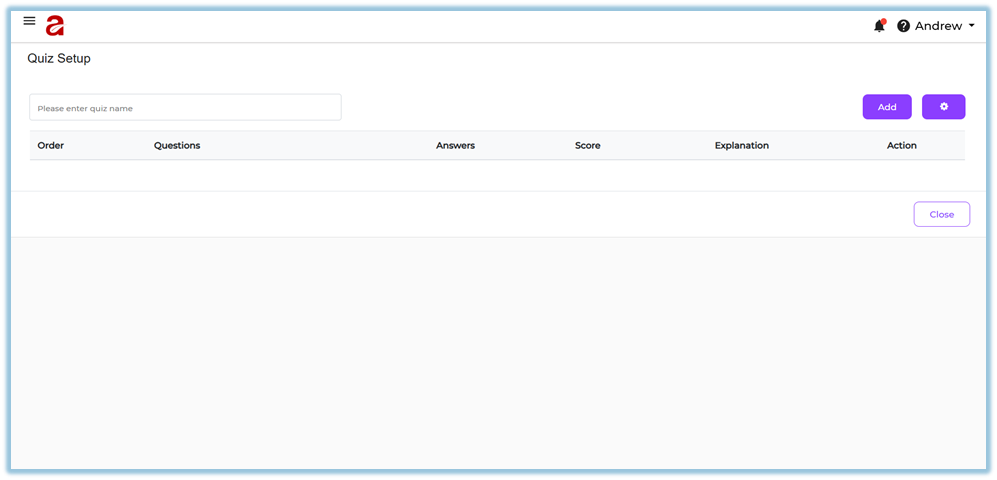
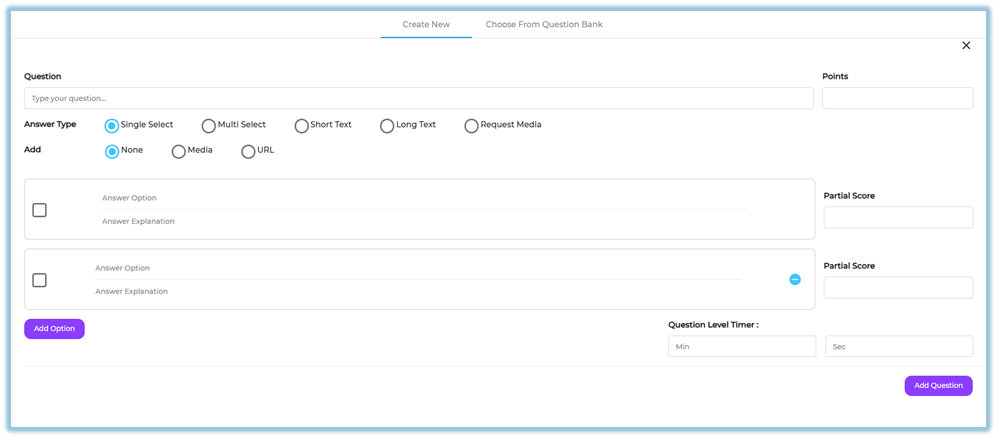
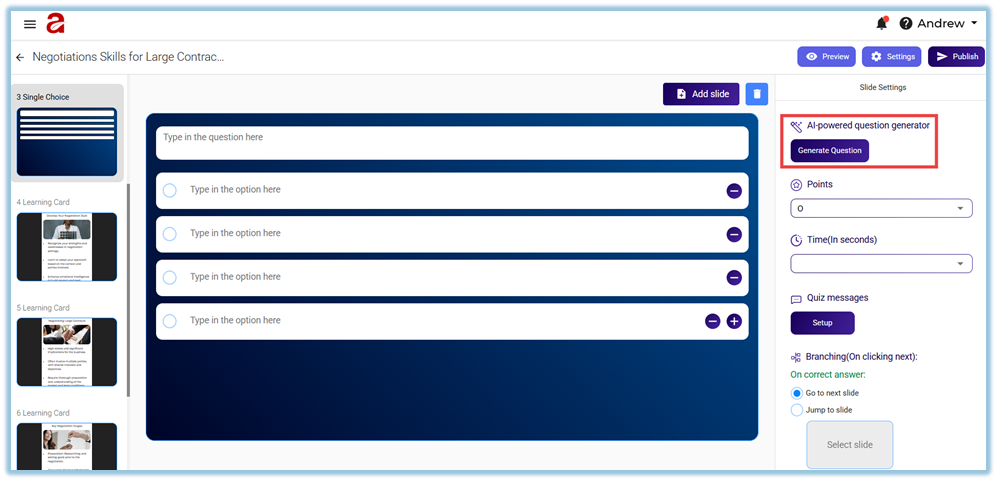
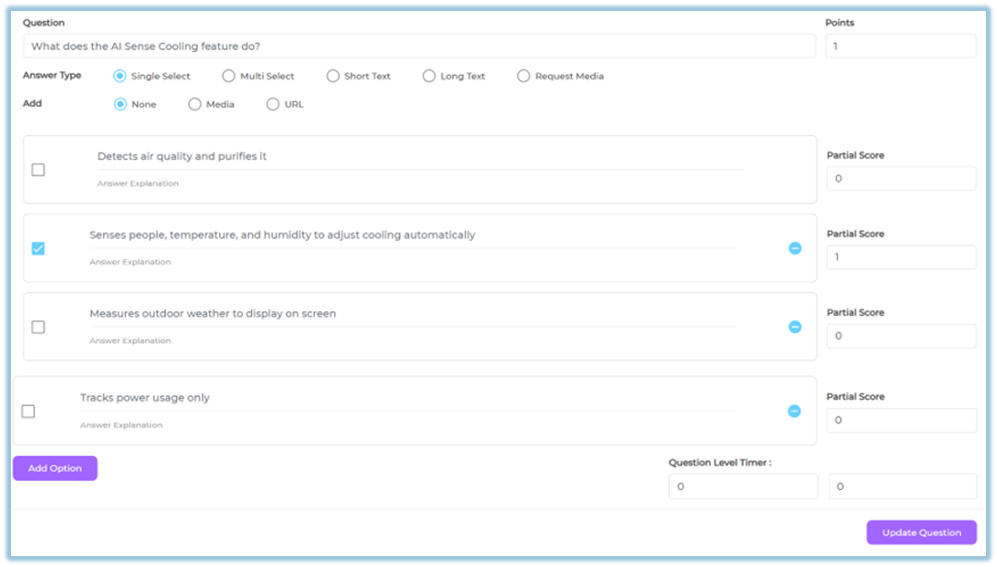
##### Step 3: Add Questions Manually
1. Click **Add Question**.
2. Enter the **question text**.
3. Select the **Answer Type**:
- Single Select
- Multi Select
- Short Text
- Long Text
4. Add **Options** where applicable.
5. Select the **correct answer(s)**.
6. Add **Answer Explanation** if required.
7. Assign **Points** for the question.
8. Configure **Partial Scoring** if needed.
9. Set the **Question-level Timer** (seconds or minutes).
10. Click **Add Question** to save the question.
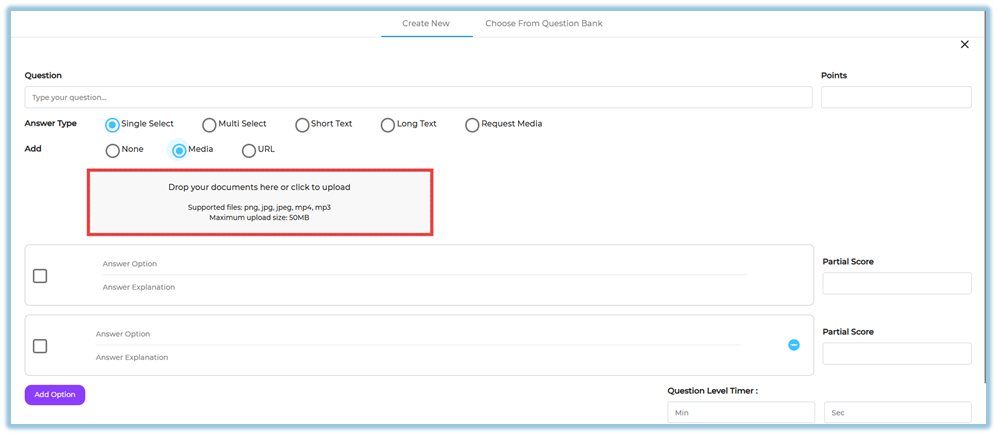
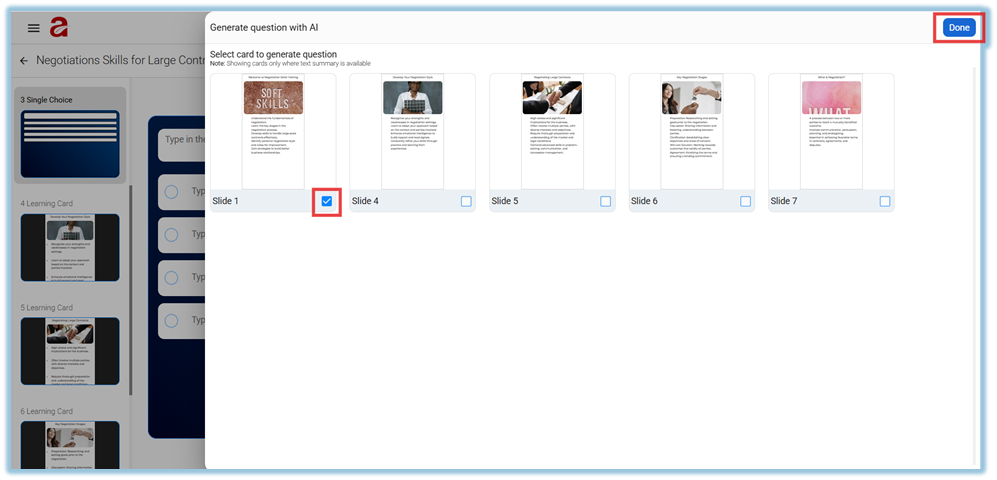
##### Step 4: Add Media to Questions (Optional)
1. In **Request Media**, choose:
- Image
- Video
- Document / PDF
2. Upload or attach the required media.
3\. Click **Choose from Question Bank**.
1. View all quiz assessments that were previously created across different modules.
2. Use **Search** to find a required assessment if needed.
3. Select the assessment by checking the checkbox.
4. Review the list of available questions.
5. Click **Done**.
6. The selected questions are added to the current quiz.
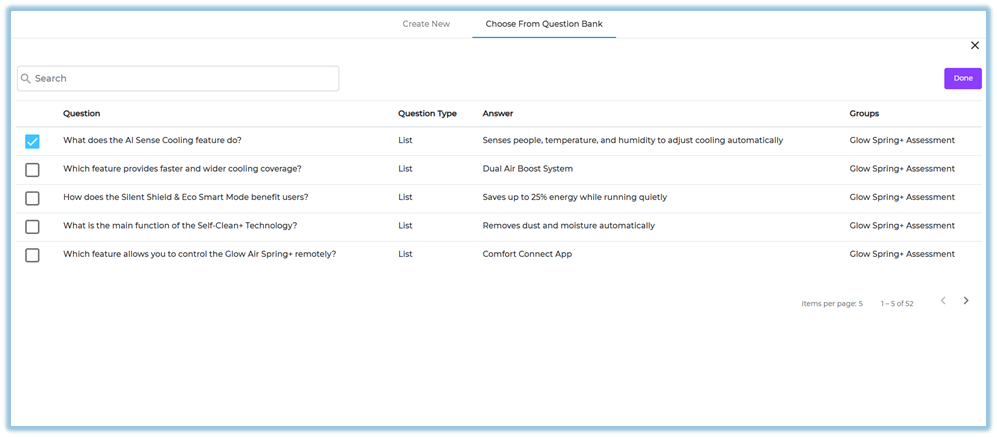
This allows you to reuse existing quiz questions without creating them again.
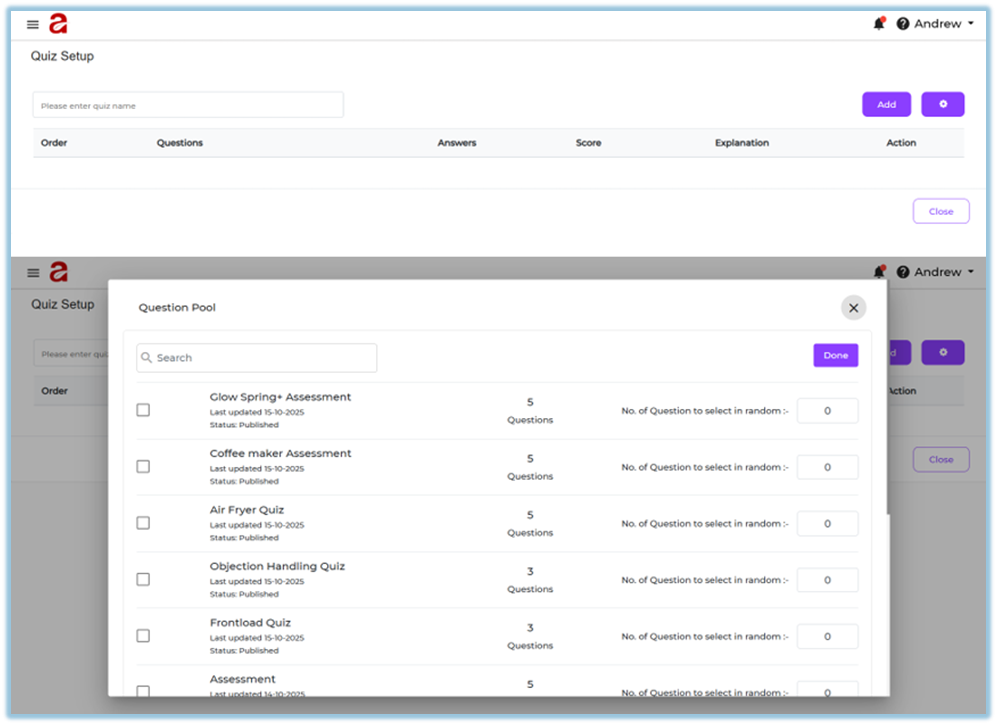
##### Step 5: Use Quiz Pool (Random Questions)
1. Click **Quiz Pool**.
2. Search and select an existing quiz from the **Question Pool**.
3. View the total number of available questions.
4. Enter how many questions should be selected **randomly**.
5. Click **Done**.
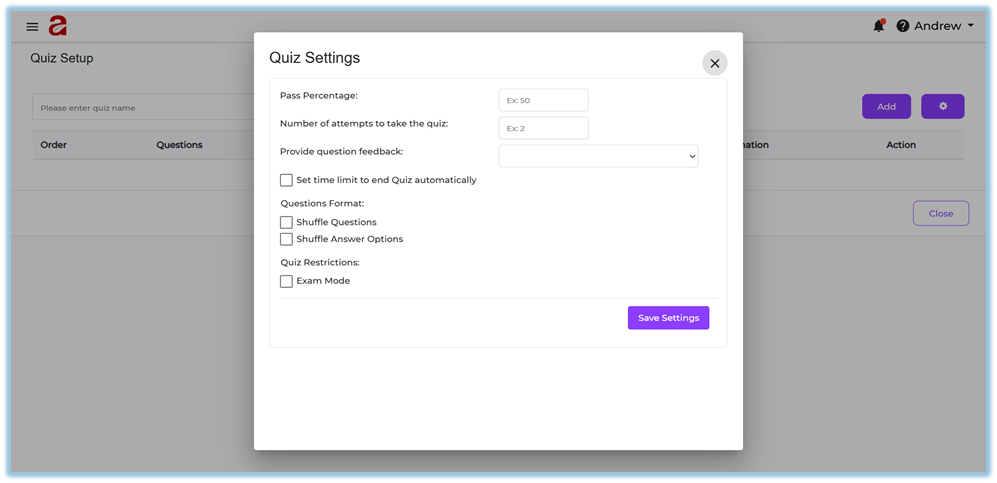
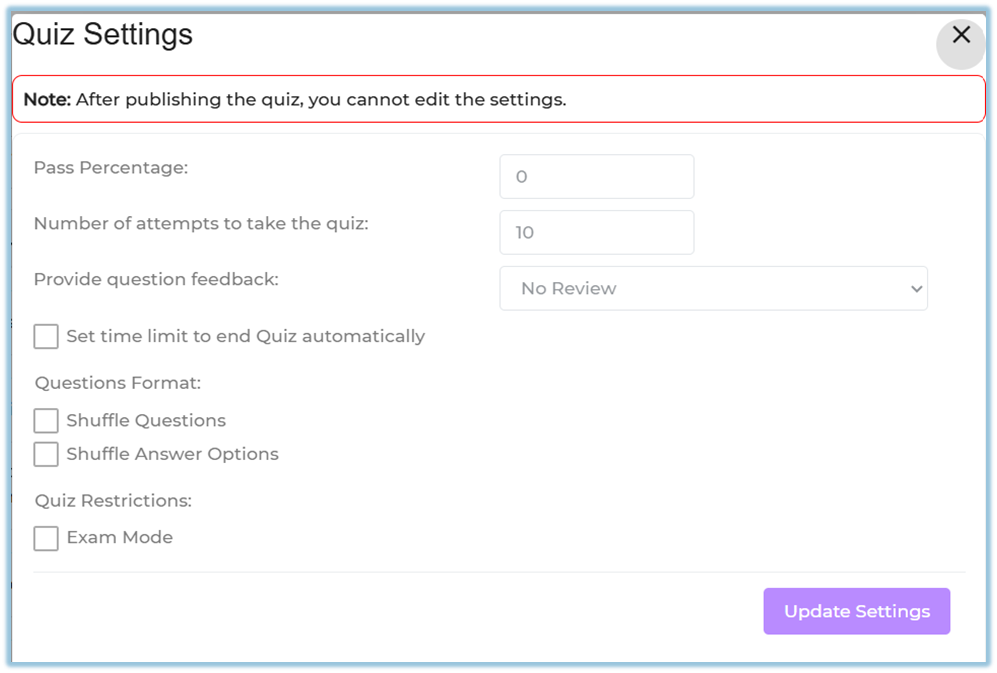
##### Step 6: Configure Quiz Settings
1. Open **Quiz Settings**.
2. Set **Pass Percentage**.
3. Set **Number of Attempts**.
4. Configure **Question Feedback**:
- After each question
- After completion
- No review
5. Enable **Time Limit** for the quiz (optional).
6. Configure:
- Shuffle questions
- Shuffle answer options
- Exam mode
7. Click **Save Settings**.
##### Step 7: Save and Continue
1. Close the quiz setup.
2. Click **Next** to proceed with **Add Users** or **Settings & Publish**.
### **5. User View**
- Learners see quiz questions one by one during module consumption.
- Question timers are shown if enabled.
- Learners select or enter answers based on the question type.
- Feedback is shown based on quiz settings.
- Quiz completion status contributes to module completion.
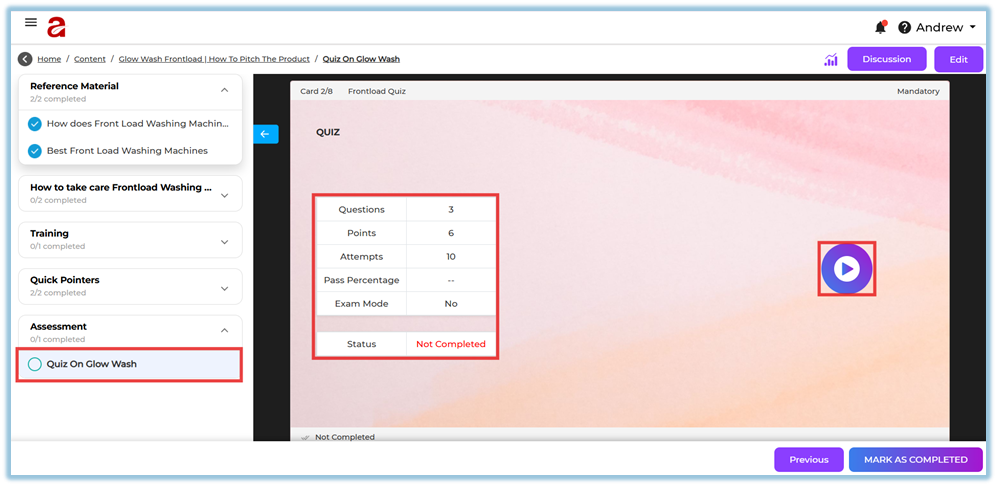
### **6. Reporting**
Quiz-related reports show:
- Quiz completion status
- Scores achieved by learners
- Question-level responses
- Pass or fail status based on pass percentage
Reports are available in the **Reports** section with module and user filters.
### **7. Best Practices**
- Place quizzes after key learning content
- Use partial scoring only when appropriate
- Keep question timers reasonable
- Use quiz pools for large assessments to avoid repetition
- Clearly define pass percentage for compliance modules
### **8. Related Links / FAQs**
**Q: Can learners retry a quiz?**
A: Yes, based on the number of attempts configured in quiz settings.
**Q: Can quizzes be randomized?**
A: Yes, using Quiz Pool and shuffle options.
### **9. Version Notes**
**Last Updated:** 18 Dec 2025
# Make content for Training in Learnbee
### **1. Overview**
Learnbee allows admins to create structured training content using slides, documents, quizzes, and AI-generated learning cards. Training content created in Learnbee can be multilingual and is later used inside **Content modules** for learner assignment, tracking, and completion.
### **2. When to Use**
Use Learnbee training content when:
- You want to create structured training instead of sharing raw files
- You need multilingual learning for regional or global users
- You want to include cards, flashcards, voice-overs, and quizzes
- You plan to reuse the same content inside Content modules
### **3. Concepts**
- **Learnbee Library** – Central place to create and manage training topics
- **Topic** – A complete Learnbee training unit
- **Slide** – Individual learning card inside a topic
- **Voice-over** – Audio narration for slide content
- **Multilingual Content** – Same slide available in multiple languages
- **Quiz Slide** – Knowledge check added between or after content
- **Publish** – Makes the topic available for selection in Content
### **4. Set Up Guide**
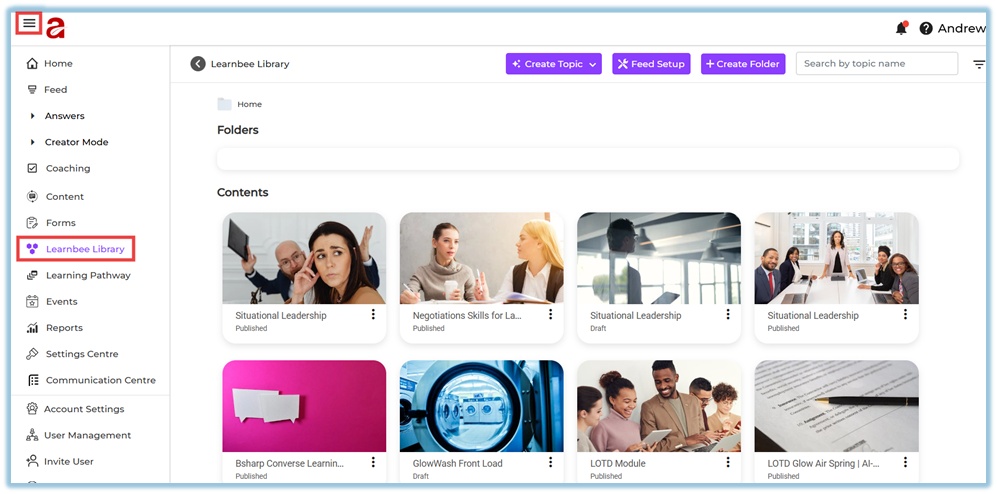
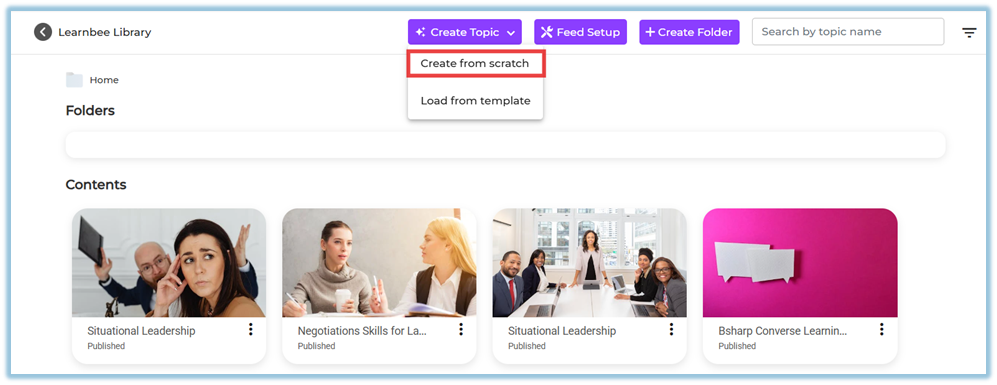
##### Step 1: Open Learnbee Library
1. Click the **menu bar**.
2. Select **Learnbee Library**.
3. View all existing Learnbee topics.
##### Step 2: Create a New Topic
1. Click **Create Topic**.
2. Choose one option:
- **Create from scratch**
- **Load from template** (used only if a template exists in another account)
##### Step 3: Configure Topic Settings
1. Enter the **Topic name**.
2. Add a **Topic image**:
- From library, or
- Upload from system.
3. Add a **description** (optional).
4. Select the **layout**:
- Landscape or Portrait.
5. Configure **Voice-over settings**:
- Select voice type (Male / Female).
- Choose base language.
- Add additional languages (up to **6 per card**).
6. Click **Save**.

##### Step 4: Add Learning Content (Slides)
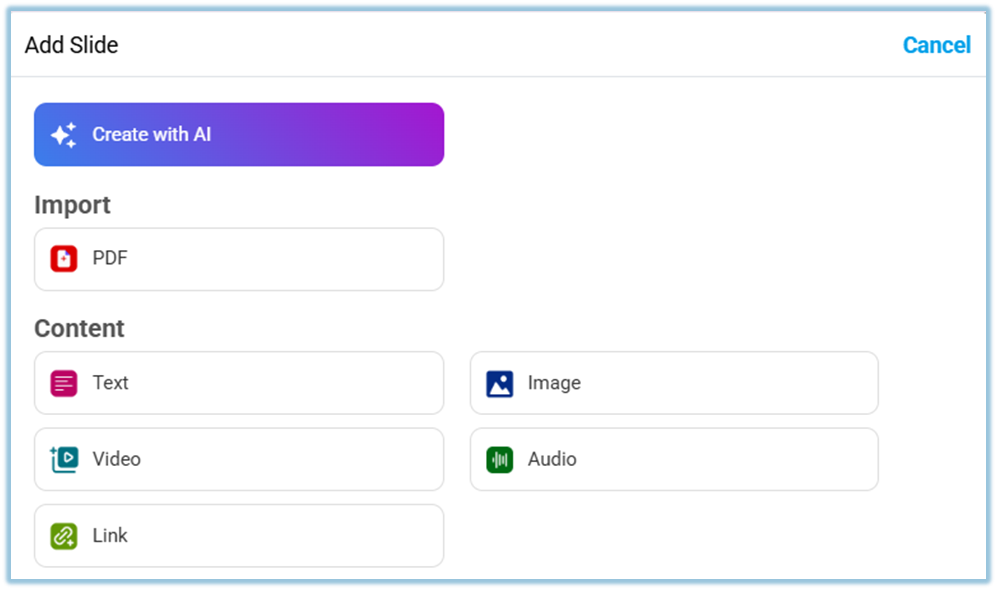
1. Click **Add slide**.
2. Choose how to add content:
- **Create with AI**
- **PDF import** (up to 30 slides)
- **Text**
- **Image**
- **Video**
- **Audio**
- **Link**
****
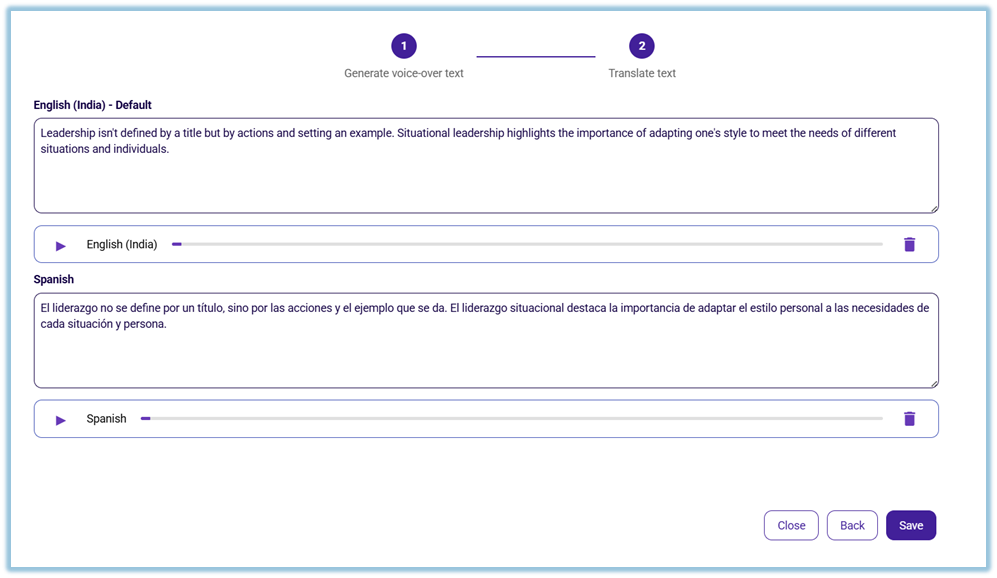
##### Step 5: Add Multilingual Voice-over Content
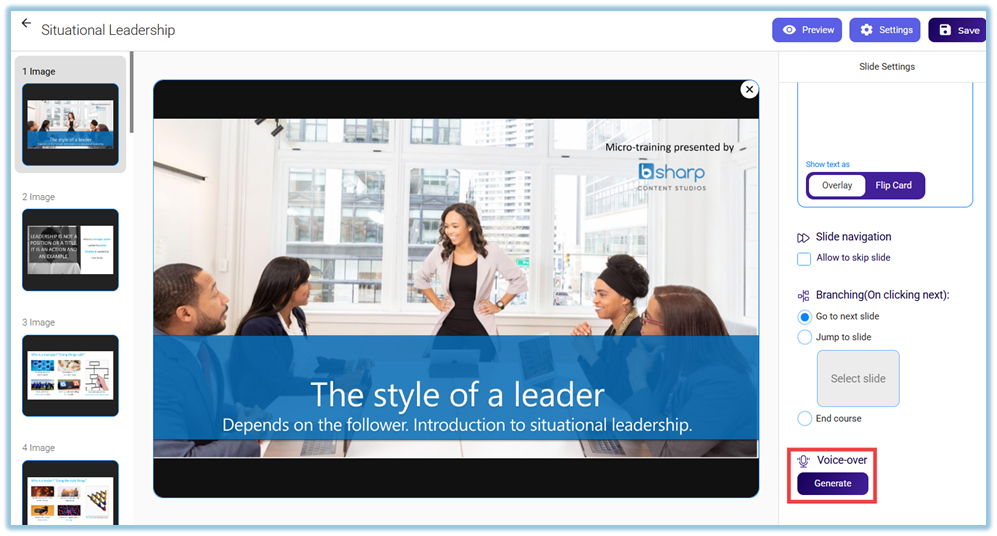
1. Open a slide.
2. Click **Generate Voice-over**.
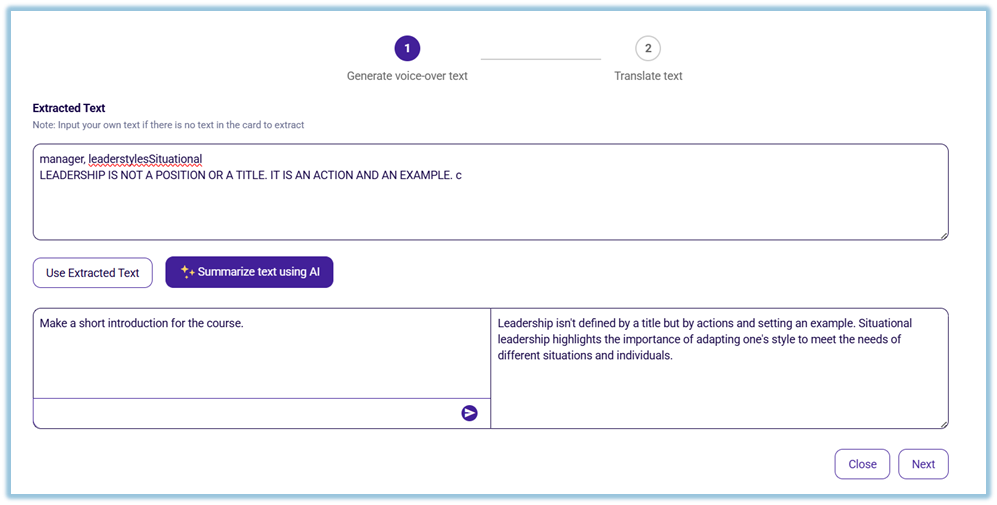
3. Step 1 – Generate voice-over text:
- Use extracted text or summarize using AI.
4. Step 2 – Translate text:
- Translate into selected languages.
- Edit translated text if required.
5. Click **Generate Voiceover** for each language.
6. Preview audio and click **Save**.
##### Step 6: Add Quiz Slides
1. Click **Add slide → Quiz**.
2. Choose quiz type:
- Single Choice
- Multiple Choice
- Text Based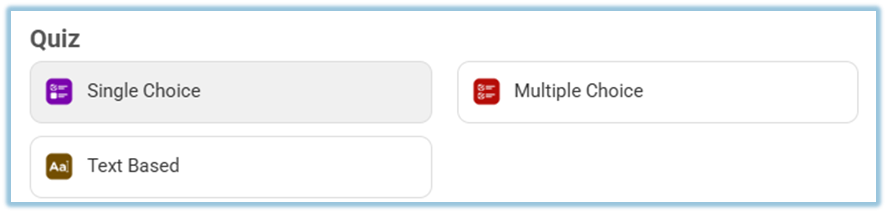
3. Add questions:
- Manually, or
- Click **Generate Question** (AI-based).
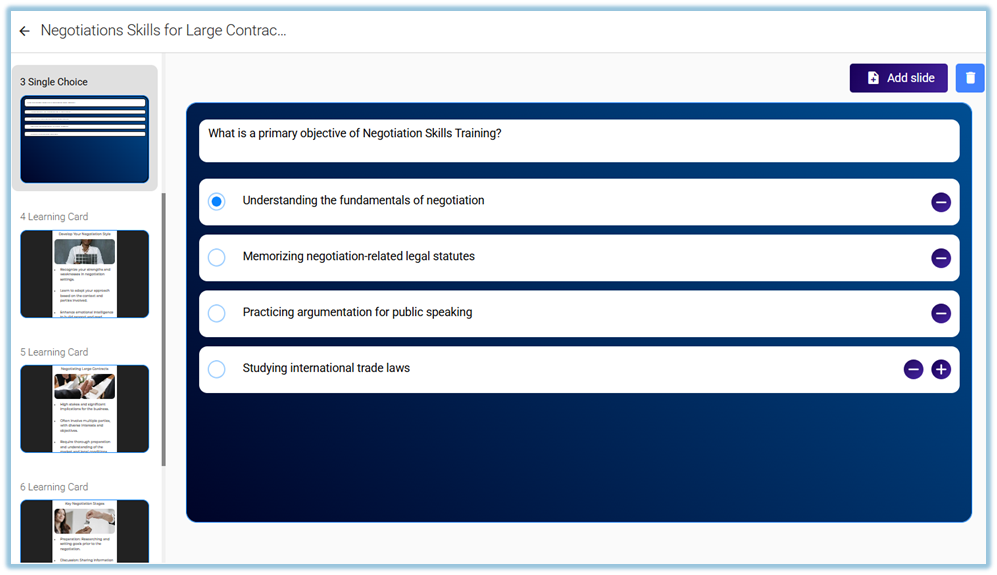
4. Configure quiz settings:
- Points
- Timer
- Feedback
- Shuffle options
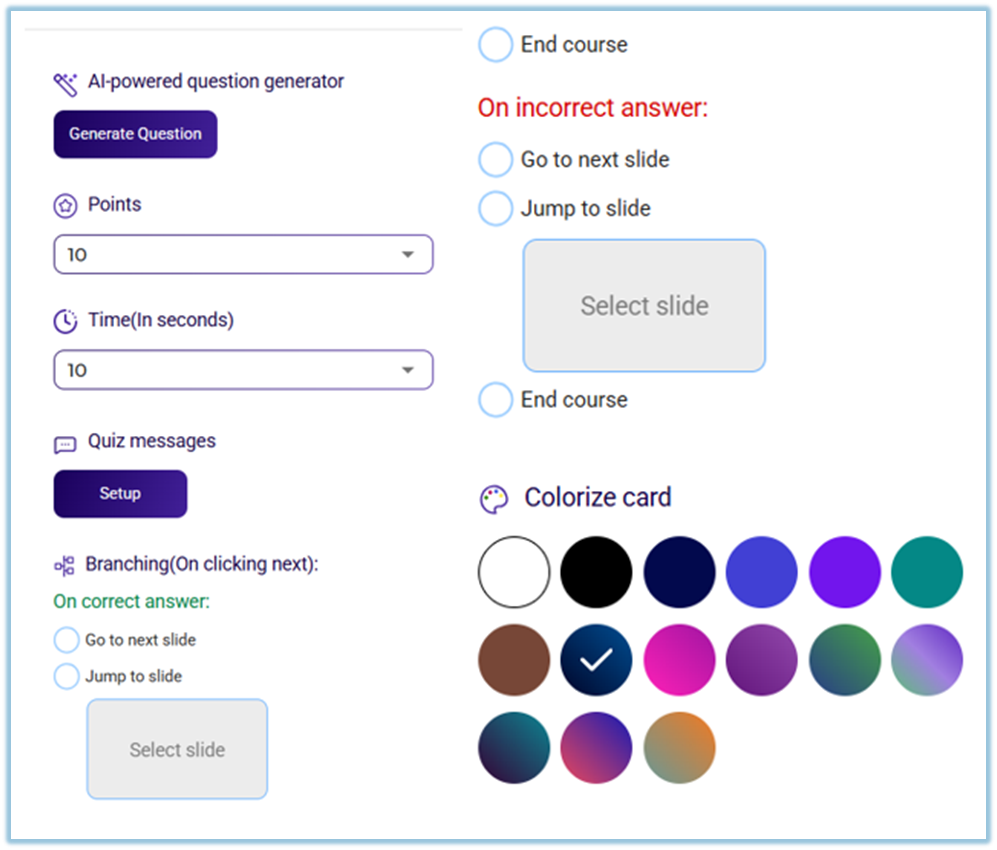
5. Save the quiz slide.
##### Step 7: Preview and Publish the Topic
1. Click **Preview** to review content.
2. Verify slides, languages, voice-overs, and quizzes.
3. Click **Publish**.

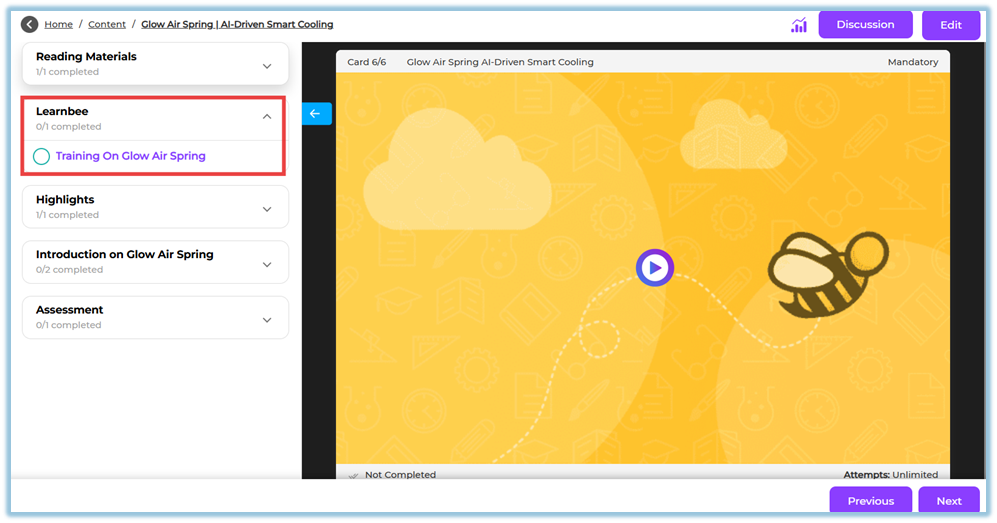
Once published, the topic becomes available inside **Content → Learnbee content selection**.
### **5. User View**
- Learners see the training in their **assigned language**.
- Slides play voice-over automatically.
- Quizzes appear within the learning flow.
- Content follows the order defined by the admin.
### **6. Best Practices**
- Keep one topic focused on one learning objective
- Add quizzes after key learning sections
- Use multilingual voice-over for field and regional teams
- Preview every language before publishing
### **7. Related Links / FAQs**
**Q: Can one slide support multiple languages?**
A: Yes. A single slide can support up to six languages.
**Q: Can Learnbee content be reused?**
A: Yes. Published topics can be reused inside Content modules.
### **8. Version Notes**
Last Updated: 18 Dec 2025
# What content types are supported in Bsharp Converse
### **1. Overview**
The **Content** feature in Bsharp Converse supports multiple content types that help admins build rich, structured training modules. These content types allow you to combine written material, visuals, videos, documents, assessments, AI-generated learning, and standard e-learning packages into a single learning experience.
### **2. When to Use**
Use different content types when you want to:
- Present information in multiple formats for better understanding
- Convert documents into interactive learning content
- Reinforce learning using quizzes and assessments
- Reuse existing training material such as PDFs or SCORM packages
- Create engaging and structured training journeys
### **3. Concepts**
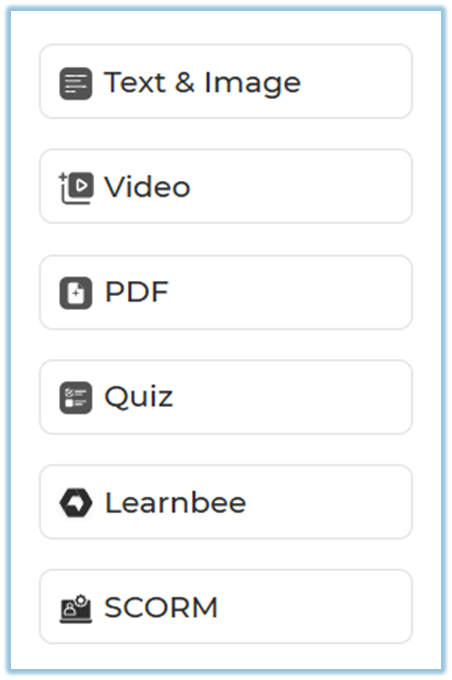
- **Text and Image Content**
- **Video Content**
- **PDF Content**
- **Quiz Content**
- **Learnbee Content**
- **SCORM Content**
### **4. Set Up Guide**
#### Step 1: Open Content Creation
1. Click the **Menu** icon.
2. Select **Content**.
3. Click **+ Module** to create or edit a module.
4. Navigate to the **Content** step.
[https://help.bsharpcorp.com/books/content/page/how-do-we-set-up-content](https://help.bsharpcorp.com/books/content/page/how-do-we-set-up-content)
#### Step 2: Add Content to a Page
1. Create a **Section** and **Page**.
2. Click **Add Content** inside the page.
3. Choose one of the supported content types listed below.
#### Step 3: Supported Content Types and Their Usage
##### **a) Text and Image**
Use this content type to add written learning material with supporting visuals.
- You can manually add your own text and images.
- You can also **prompt the AI Co-pilot** to generate content from:
- Your uploaded documents
- Web-based knowledge
- This helps save time and build diverse, engaging learning formats quickly.
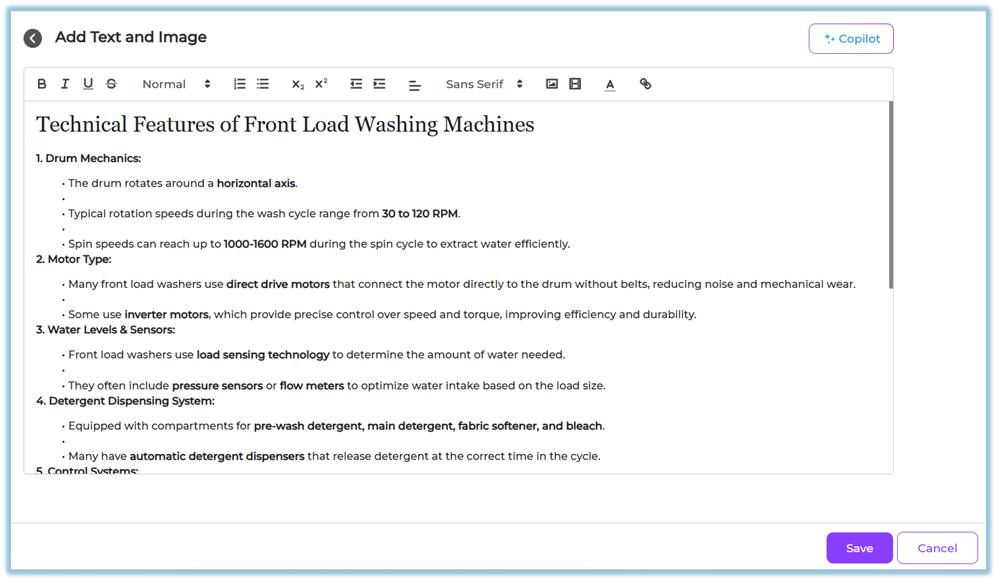
This content type is best suited for explanations, concepts, introductions, and summaries.
##### **b) Video**
Use video content to explain concepts visually.
- Upload your own video files, or
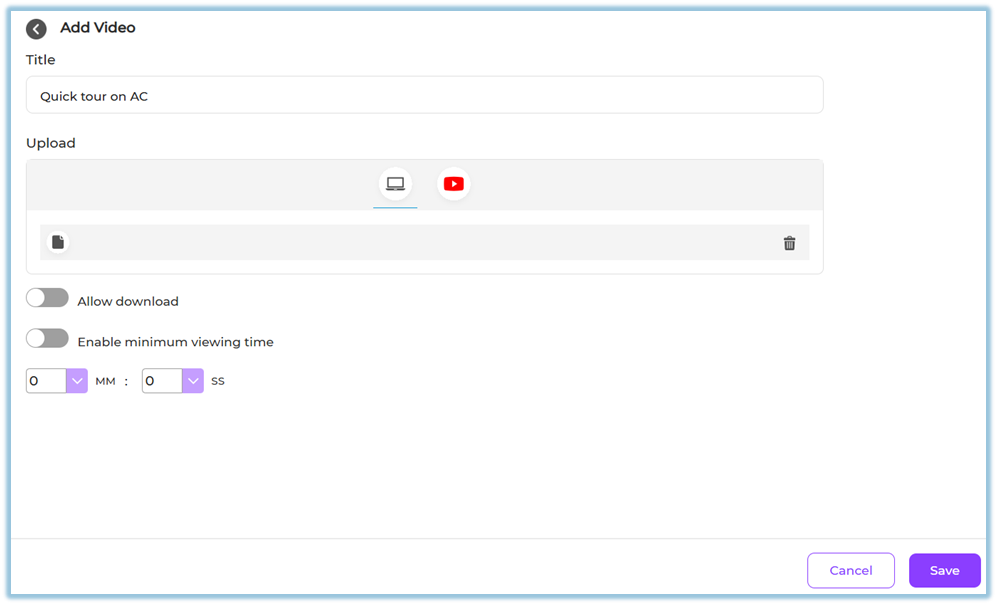
- Add a supported video link
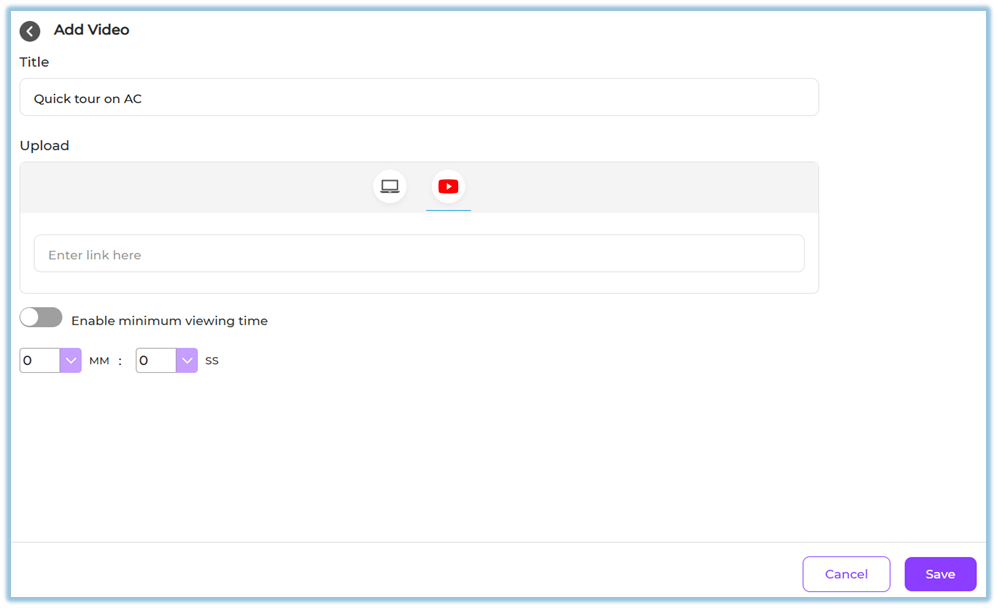
Videos help demonstrate processes, show real-world examples, and improve learner engagement.
##### **c) PDF**
Use PDF content to share documents and reference material.
- Upload a PDF file
- Learners can view the document directly in the module
- Learners can download the PDF if enabled
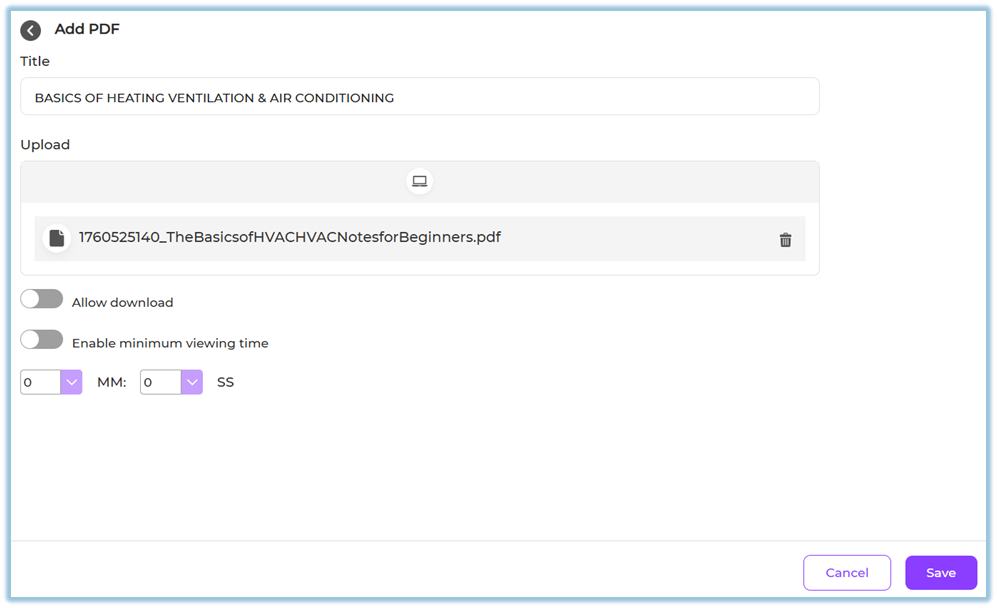
This is useful for manuals, policies, presentations, and detailed reading material.
##### **d) Quiz**
Use quizzes to assess learner understanding.
You can add the following question types:
- Single select questions
- Multi select questions
- Text-based questions
Quiz settings allow you to configure:
- Points
- Attempts
- Feedback options
- Time limits
- Question and answer shuffling
Quizzes help validate learning and reinforce key concepts.
##### **e) Learnbee**
Learnbee is the built-in AI authoring tool in Bsharp Converse.
Using Learnbee, you can:
- Convert training documents into interactive learning content
- Generate learning cards and flipcards
- Auto-generate quizzes
- Add voiceovers
- Translate content into multiple languages
[https://help.bsharpcorp.com/books/content/page/make-content-for-training-in-learnbee](https://help.bsharpcorp.com/books/content/page/make-content-for-training-in-learnbee)
Learnbee content is ideal for fast, scalable, and multilingual content creation.
##### **f) SCORM**
SCORM content allows you to upload standard e-learning packages.
- Upload a SCORM package file
- Use it as a structured learning unit within the module
- Track learner completion through standard SCORM reporting
This is useful when reusing content created in external authoring tools.
### **5. User View**
Learners experience content in a structured flow:
- Sections and pages displayed in sequence
- Text, images, videos, and PDFs shown inline
- Quizzes appear as interactive assessments
- Learnbee content opens as interactive cards
- SCORM packages launch as learning activities
### **6. Reporting**
Reporting for content types includes:
- Page and content completion status
- Quiz scores and attempts
- SCORM completion tracking
- Learner progress across sections and pages
Reports are available in the **Reporting** section of Converse.
### **7. Best Practices**
- Combine multiple content types for better engagement
- Use Text & Image for concepts and explanations
- Add quizzes after key learning sections
- Use Learnbee for multilingual and AI-assisted content
- Use SCORM only when standardized tracking is required
### **8. Related Links / FAQs**
**Q: Can I use multiple content types on one page?**
Yes. A single page can contain multiple content items.
**Q: Can AI-generated content be edited?**
Yes. You can review and edit content before saving.
**Q: Is multilingual support available for all content types?**
Multilingual support is available through Learnbee-generated content.
### **9. Version Notes**
**Last Updated:** 12 Dec 2025
# Module Completion Reports
### [**Single Module Completion Report**](https://help.bsharpcorp.com/books/reports/page/single-module-completion-report)
- Shows completion status for a specific learning module at an individual user level.
- Helps track who has completed, started, or not started the selected module.
- Available in **Company** view for admins and **Team** view for managers, trainers, and mentors.
### [**Module Completion Report – Summary**](https://help.bsharpcorp.com/books/reports/page/modules-completion-report-summary)
- Provides an overall summary of completion status across multiple modules.
- Displays aggregated completion metrics to understand learning progress at a glance.
- Accessible based on role, with **Company** and **Team** level visibility.
### [**Module Completion Report – Detailed**](https://help.bsharpcorp.com/books/reports/page/modules-completion-report-detailed)
- Displays detailed, user-wise completion data for multiple learning modules.
- Helps analyze individual learner progress, completion dates, and status.
- Supports both **Company** view (admins) and **Team** view (managers, trainers, mentors).
# Quiz Maker
### **1. Overview**
Quiz Maker allows admins to create and manage quizzes that are linked to learning modules within the platform.
It provides a complete workflow to create quizzes using AI or manual input, translate them into multiple languages, configure settings, and deploy them for learners.
### **2. When to Use**
- When you want to create quizzes for a learning module
- When you want to generate questions using AI from documents
- When you need quizzes in multiple languages
- When you want to configure quiz rules like attempts, timing, and scoring
- When you want to review and deploy quizzes to learners
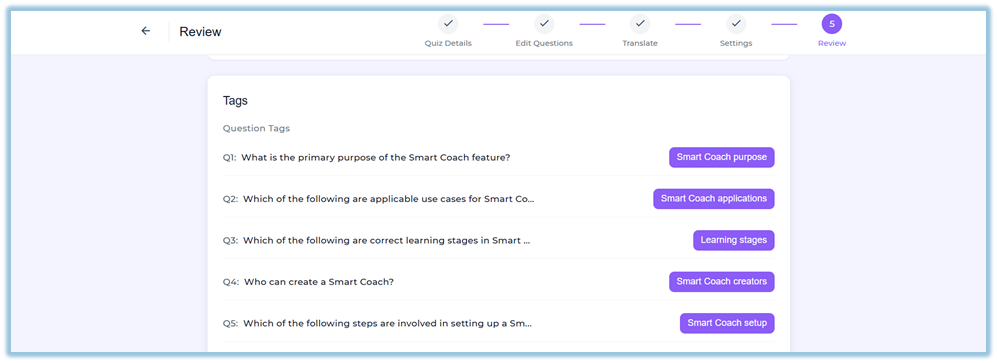
### **3. Concepts**
- **Quiz Workflow** – 5-step process: Quiz Details → Edit Questions → Translate → Settings → Review
- **Generation Mode** – Create quiz using AI or manually
- **Document Upload** – Upload files used for AI-based question generation
- **Translation** – Convert quiz into multiple languages
- **Settings** – Configure quiz behavior (attempts, timing, etc.)
- **Tags** – Automatically generated to categorize questions
- **Deployment** – Makes the quiz available inside the module
### **4. Set Up Guide**
##### **Step 1: Navigate to Quiz Maker**
1. Go to **Content**
2. Open the required **Module**
3. In the content section, click on ****Quiz Maker**** 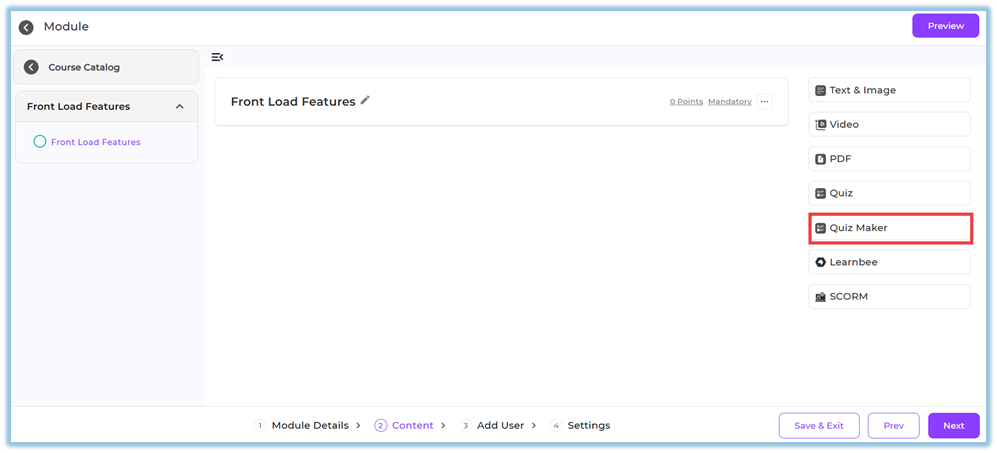
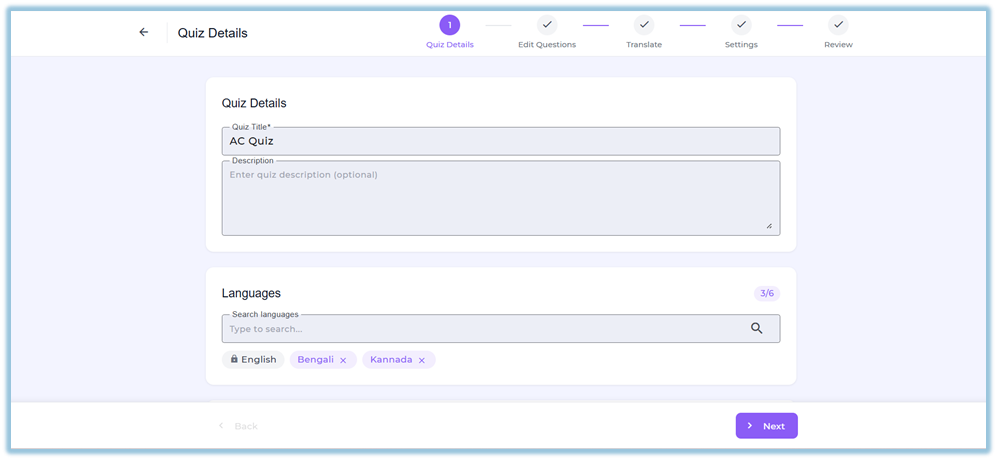
##### **Step 2: Quiz Details**
4. Enter:
- Quiz Title
- Description (optional)
5. Select **Languages** (up to 6)
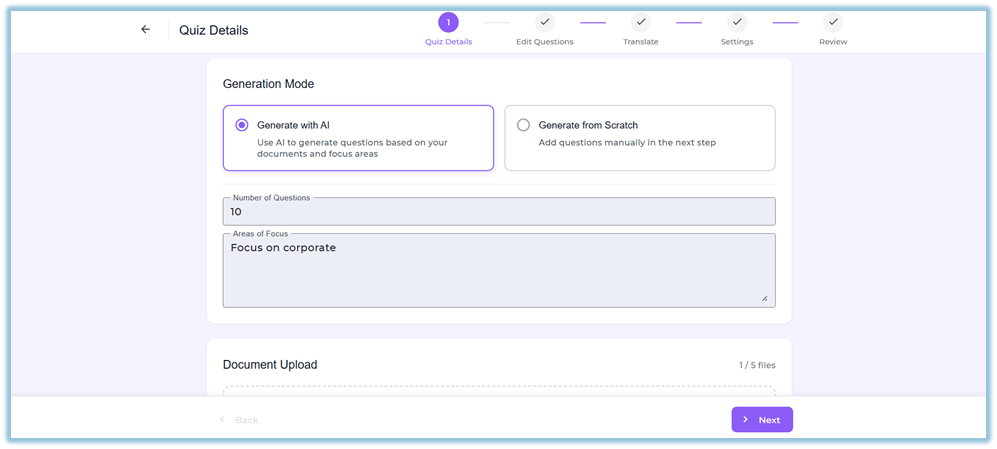
##### **Step 3: Select Generation Mode**
6. Choose one:
Generate with AI
7. Enter **Number of Questions**
8. Enter **Areas of Focus
**
9. Upload documents (Max 5 files)
10. Click **Next** to generate questions
Generate from Scratch
11. Click **Generate from Scratch**
12. Click **Next** to manually create questions

##### **Step 4: Edit Questions**
13. Review or create questions
14. You can:
- Add questions
- Edit question text and options
- Select correct answers
- Assign points
- Add media (optional)
- Add tags and explanations
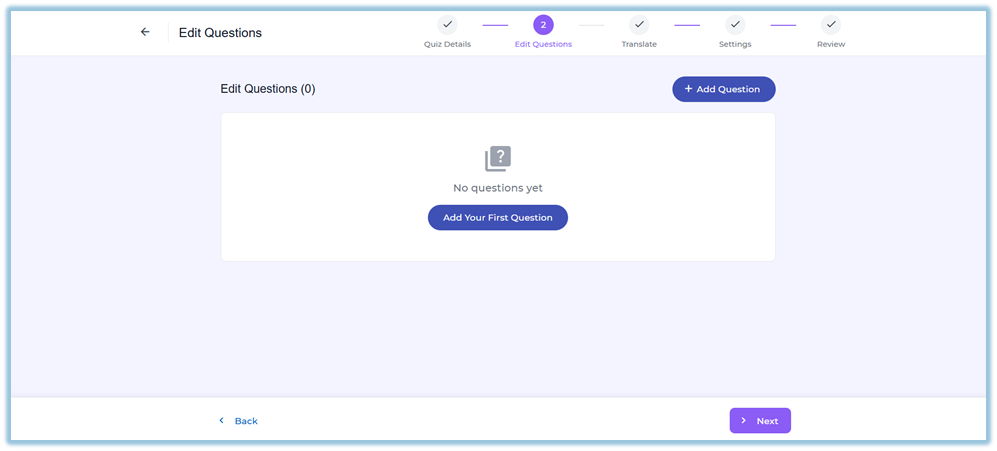
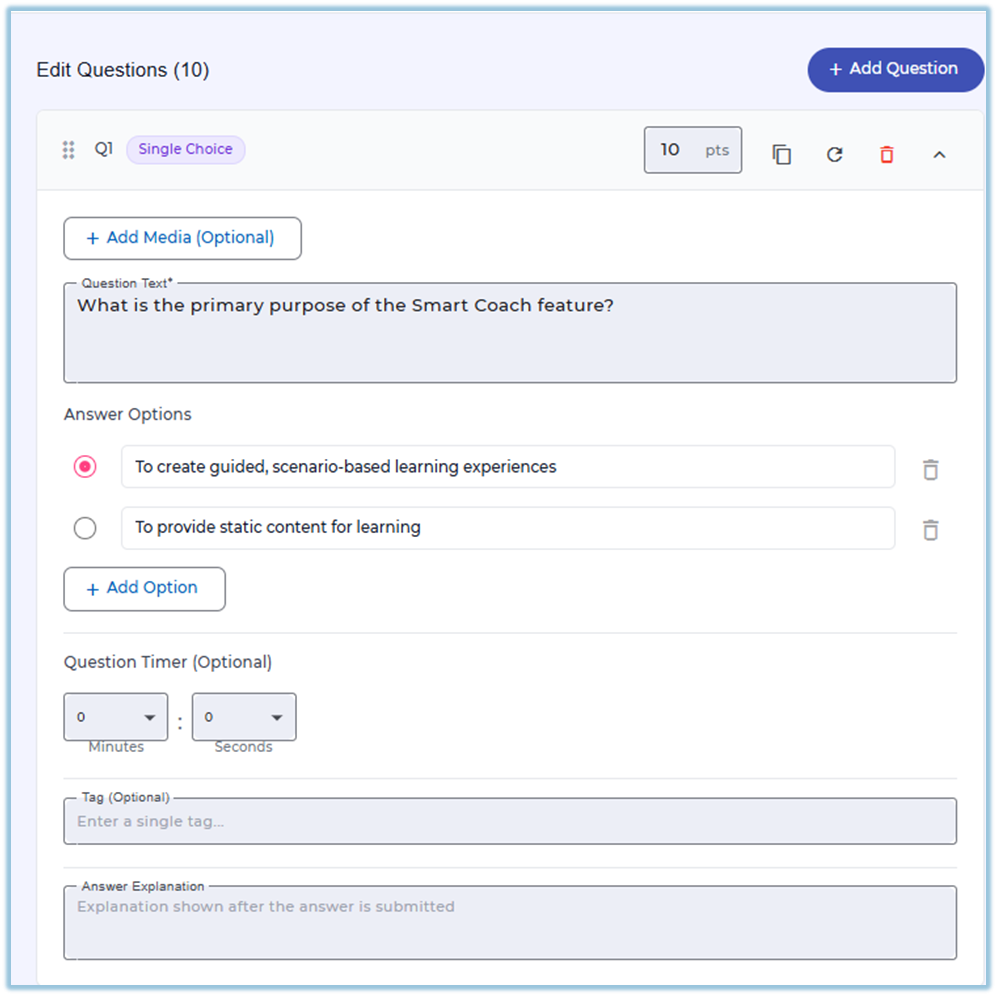
15. Click **Next**
##### **Step 5: Translate**
16. Select each language
17. Click **Auto Translate
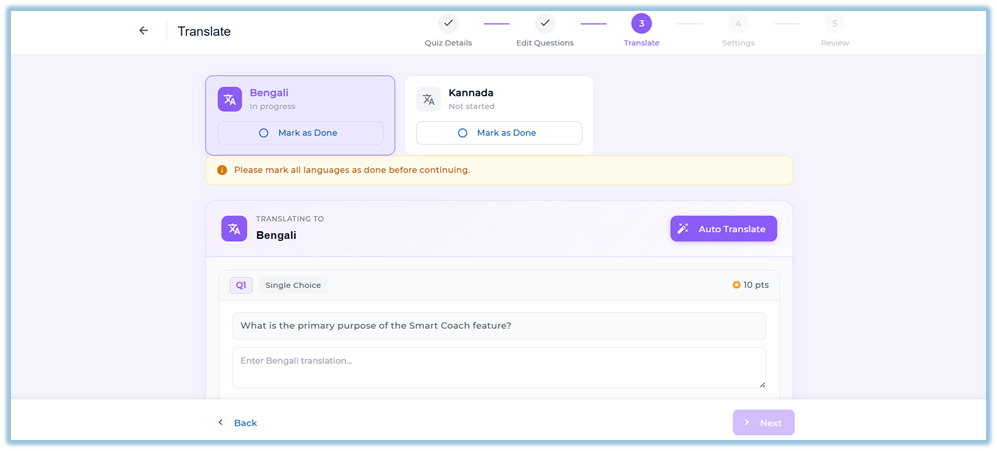**
18. Review translations
19. Click **Mark as Done** for each language
20. Ensure all languages are marked done
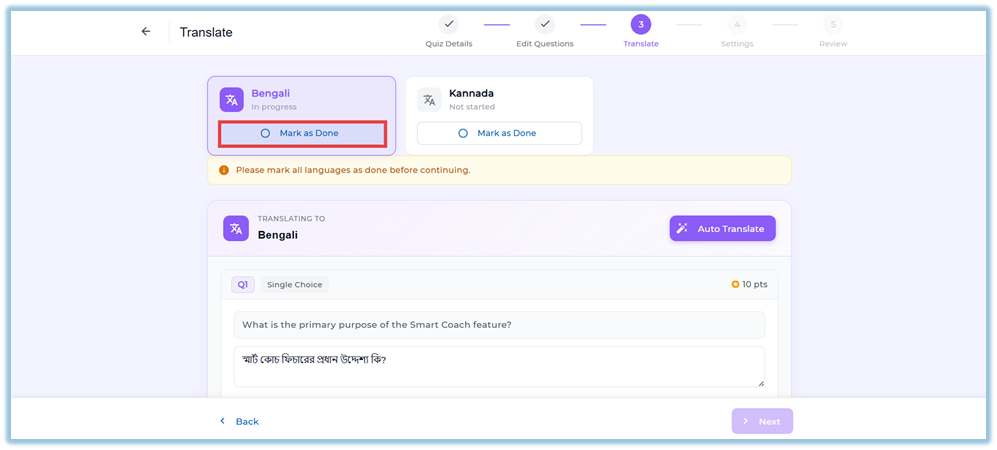
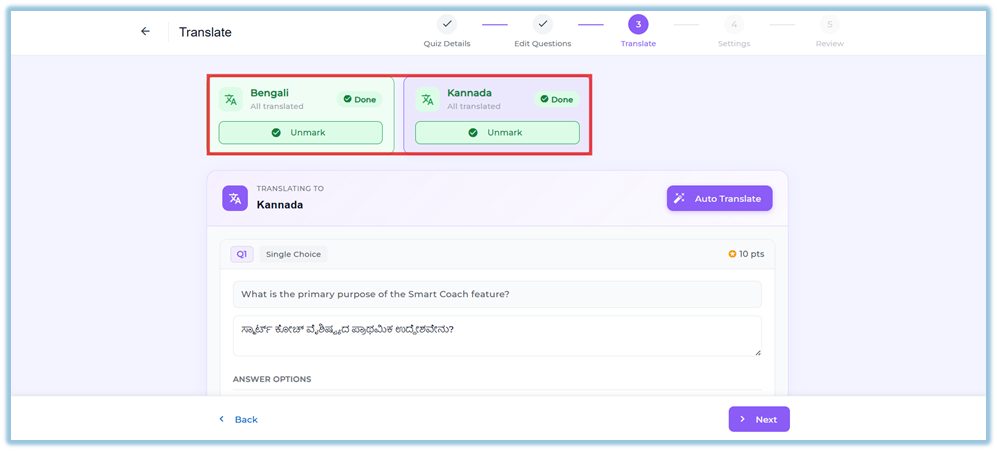
21. Click **Next**
##### **Step 6: Settings**
22. Configure:
- Pass Percentage
- Number of Attempts
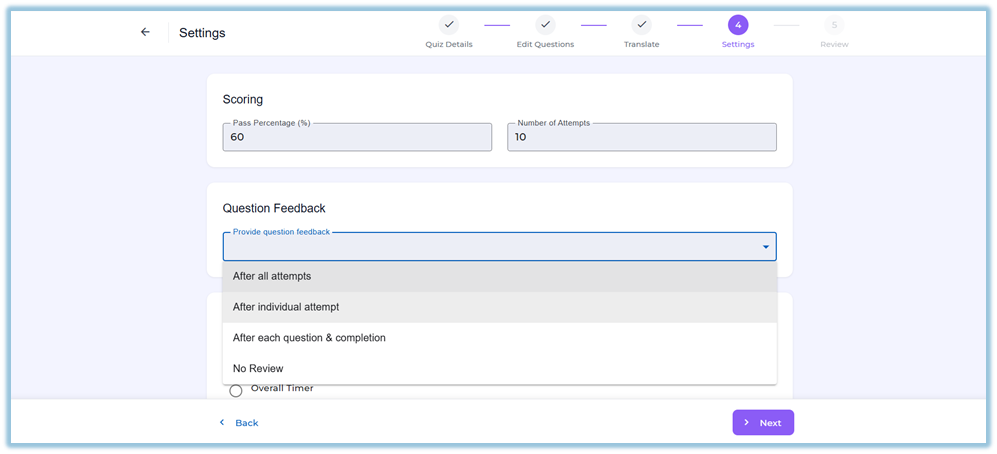
23. Select **Question Feedback** option
24. Configure **Timing**:
- No Timer
- Overall Timer
- Per Question Timer
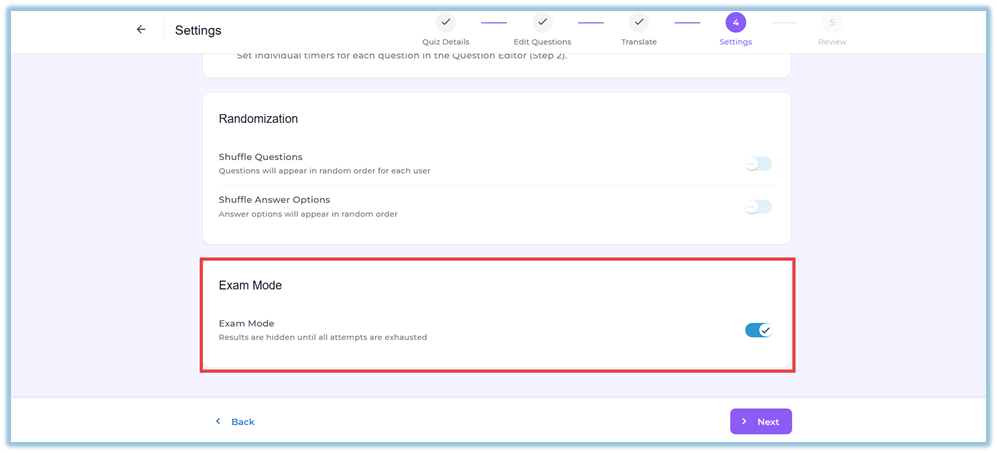
25. Configure:
- Shuffle Questions
- Shuffle Answer Options
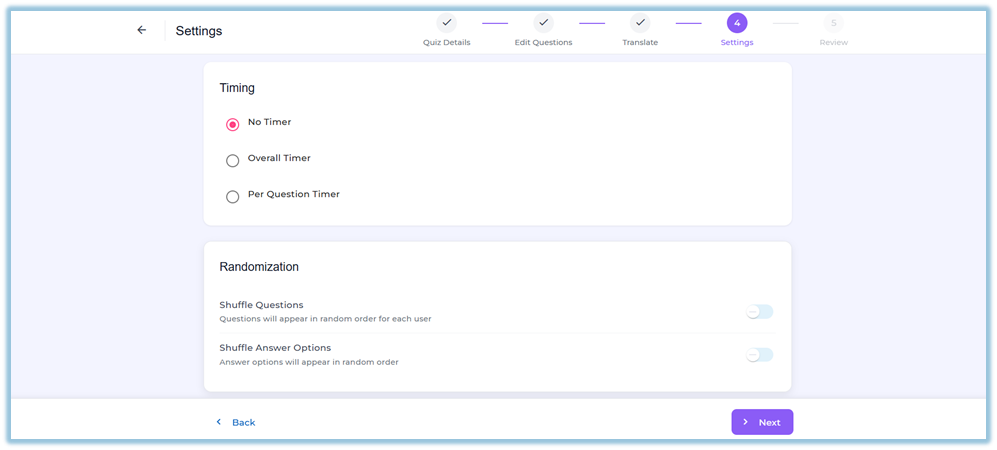
26. Enable **Exam Mode** if required
(Results hidden until completion)
27. Click **Next**
##### **Step 7: Review & Deploy**
28. Review:
- Quiz summary
- Settings
- Questions
- Tags
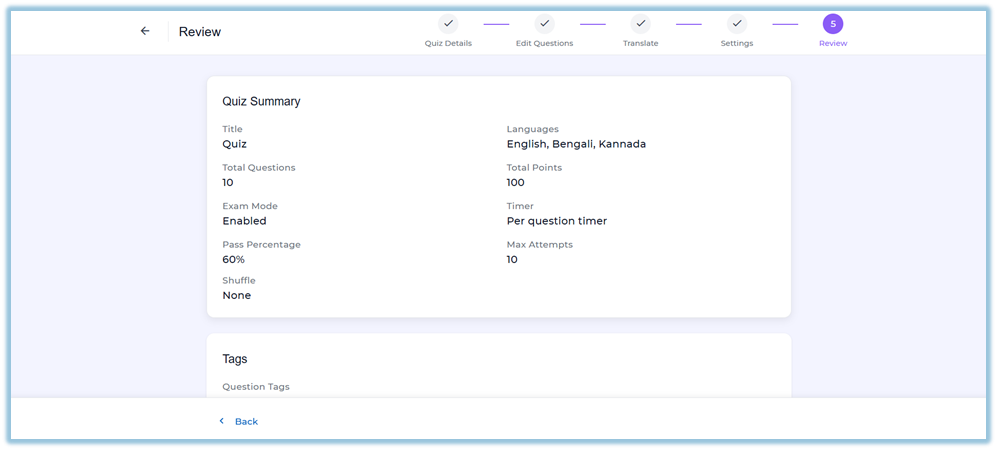
29. Click **Deploy Quiz

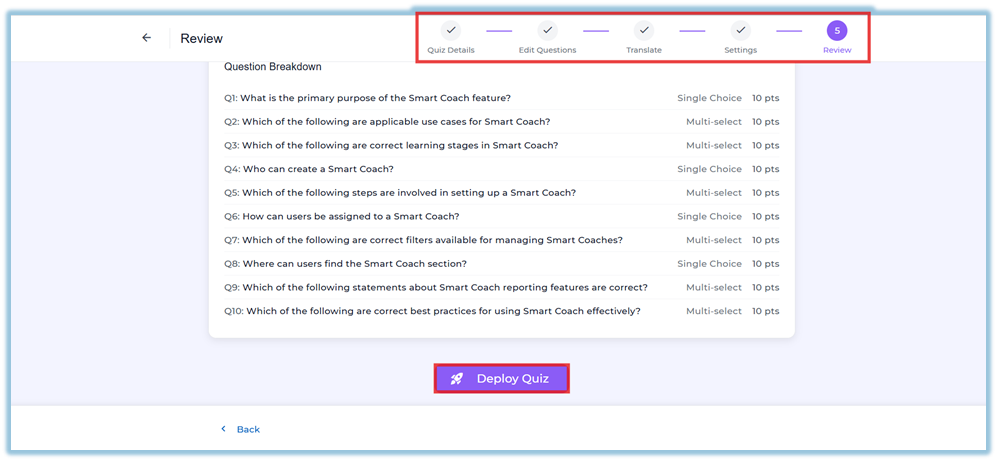**
30. Add users and deploy the module
### **5. User View**
- Trainers and admins can create and manage quizzes
- Learners can access quizzes inside modules
For learners:
- Quiz behavior depends on configured settings
- Questions may be shuffled
- Attempts and scoring rules are applied
- In Exam Mode, answers are hidden until completion
### **6. Reporting**
- Quiz performance is tracked as part of module activity
- Shows completion, scores, and attempts
- Helps evaluate learner performance
### **7. Best Practices**
- Provide clear **focus areas** for better AI-generated questions
- Review AI-generated questions before publishing
- Use translations carefully and verify content
- Set proper **pass percentage and attempts**
- Use **Exam Mode** only for assessments
### **8. Related Links / FAQs**
**Q: How many documents can be uploaded?**
A: Up to 5 documents.
**Q: How many languages are supported?**
A: Up to 6 languages per quiz.
**Q: Can I edit AI-generated questions?**
A: Yes, all questions can be edited.
**Q: Is English translated automatically?**
A: No, English is the source language.
**Q: Can I publish a quiz without questions?**
A: No, at least one question is required.
### **9. Version Notes**
Last Updated: 13 Apr 2026
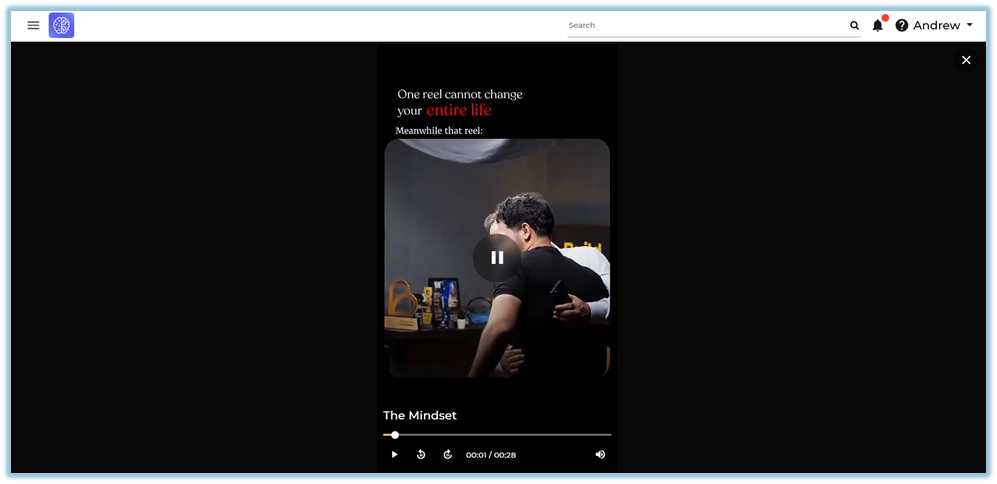
# How to use Shorts in content?
### **1. Overview**
The Shorts feature is a video-focused module type within the Content section that allows admins to create and publish short-form video content. It provides a simplified structure with a single section, a single page, and one video per page to support a clean Shorts experience across desktop and mobile devices.
### **2. When to Use**
- When you want to share short-form video learning content within a module.
- When you need a simplified content structure focused only on video playback.
- When you want learners to consume quick video-based learning content in a carousel or vertical swipe format.
- When creating mobile-friendly learning experiences similar to YouTube Shorts or Instagram Reels.
### **3. Concepts**
- **Shorts Module Type** – A dedicated module type for short-form video content.
- **Single Content Structure** – Allows only one section, one page, and one video content item.
- **Video Upload Interface** – Supports uploading videos in multiple formats.
- **Carousel View** – Displays Shorts content in horizontal card format.
- **Play Shorts Page** – Opens Shorts videos in a focused playback view.
- **Vertical Swipe Experience** – Allows users to swipe through Shorts videos on mobile and desktop.
- **Seen Status** – Tracks whether the learner has completed watching the video.
- **Content Views** – Displays total view count using the eye icon.
### **4. Set Up Guide**
##### Step 1: Create a Shorts Module
1. Navigate to the **Module** page.
[https://converse.bsharpcorp.com/content](https://converse.bsharpcorp.com/content)
2. Create a new module or open an existing module.
3. Select the module type as **Shorts**.
##### Step 2: Configure Module Structure
4. Review the default section and single page created automatically.
5. Edit the **Section Title** if required.
6. Edit the **Page Name** if required.
##### Step 3: Add Shorts Content
7. Open the page inside the Shorts module.
8. Use the video upload interface displayed on the page.
9. Upload a video file.
10. Upload videos in supported formats such as:
- MP4
- MOV
- WebM
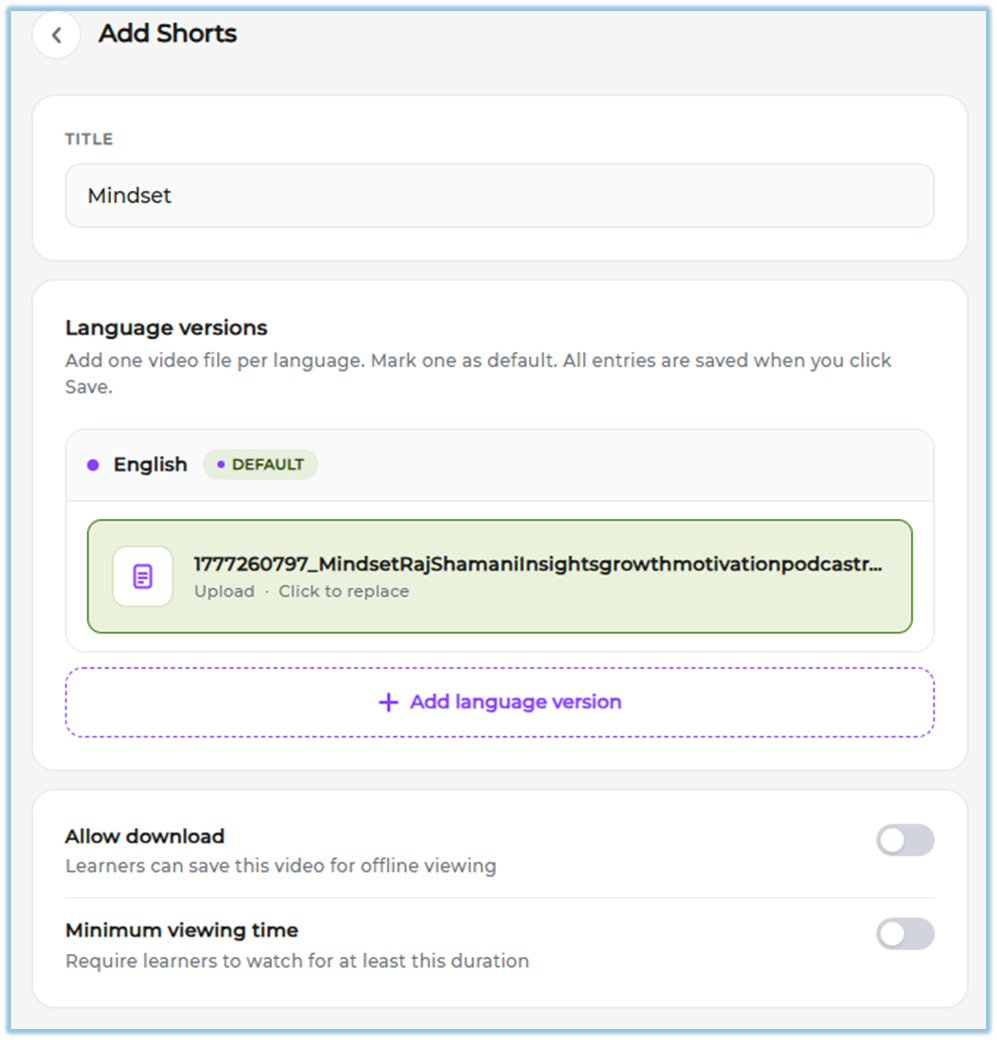
11. Wait for the upload process to complete.
##### Step 4: Configure Module Access
12. Add users to the module.
13. Configure the required module settings.
##### Step 5: Publish the Shorts Module
14. Review the uploaded Shorts content.
15. Click **Publish** to publish the Shorts module.
### **5. User View**
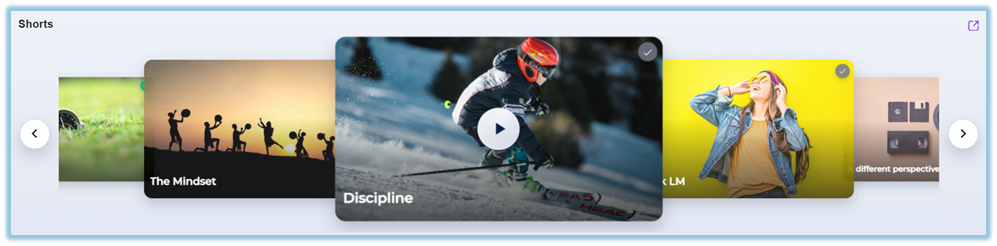
- Shorts content appears in a carousel format with video thumbnails and titles.

- Desktop users can scroll through Shorts using:
- Mouse scroll
- Arrow controls
- Touchpad gestures
- Mobile users can swipe horizontally through Shorts cards.
- Clicking a Shorts card opens the **play-shorts** page directly without showing the standard landing page.
- Videos are displayed in a vertical swipe format similar to YouTube Shorts or Instagram Reels.
- Desktop users see video controls on hover.
- Mobile users always see video controls.
- Videos automatically start preview playback when users hover over the active card on desktop.
- If no Shorts videos are available, the message **“No Shorts Available”** is displayed.
- Videos that do not match the container aspect ratio are displayed with black background spacing to maintain original dimensions without distortion.
- Videos are marked as **Seen** after users complete watching them.
### **6. Reporting**
- **Content Views** displays the total number of views across the organization using the eye icon.
- Shorts completion data is stored after users complete watching the video.
- View tracking is recorded when the Shorts video becomes visible on the user’s screen.
### **7. Best Practices**
- Upload videos in supported formats for better compatibility.
- Use clear titles for easier identification in the carousel view.
- Review video aspect ratios before upload to improve viewing consistency.
- Keep Shorts videos concise and focused on a single learning topic.
### **8. Related Links / FAQs**
**Q: How many content items can be added inside a Shorts page?**
A: Only one video content item is allowed per page.
**Q: Can additional sections or pages be added to a Shorts module?**
A: No. Add New Section and Add New Page options are removed.
**Q: What happens when users click a Shorts card?**
A: The content opens directly in the play-shorts page without showing the standard landing page.
**Q: What happens if no Shorts videos are available?**
A: The message “No Shorts Available” is displayed.
### **9. Version Notes**
**Last Updated:** 19 May 2026