# Data Sources
# How do I upload an Excel or CSV file as a source?
### **Overview**
Lets you upload an Excel (.xlsx) or CSV (.csv) file as a data source for dashboards. Vantage reads the file's columns and rows and makes the data available to widgets. You can upload multiple files and later join them using relationships.
### **When to Use**
Use this feature when:
- You want to turn spreadsheet data into charts and KPIs
- You have data exported from another system (ERP, HRMS, POS)
- You need a one-time or periodic snapshot instead of a live connection
- You want to prototype a dashboard quickly with real data
### **Concepts**
- **Data Source** – A named data set inside Vantage that widgets query
- **Connector** – The method used to bring data in (Excel/CSV, API, or internal forms)
- **Ingest** – Automatic process that loads your file into Vantage's analytics engine
- **Column Mapping** – Vantage's detected name and type for each column; editable before saving
- **Replace vs Append** – Replace overwrites existing rows; Append adds new rows to them
- **Typed Columns** – Each column's data type (String, DateTime, Int64, etc.) for correct filtering and aggregation
### **Set Up Guide**
From the Home Page, click the **Vantage Dashboard** widget to open Vantage. If you have not added this widget yet, follow the [Custom Widget help doc](https://help.bsharpcorp.com/books/other-features/page/custom-widget) to set it up.
1. Go to **Data Sources
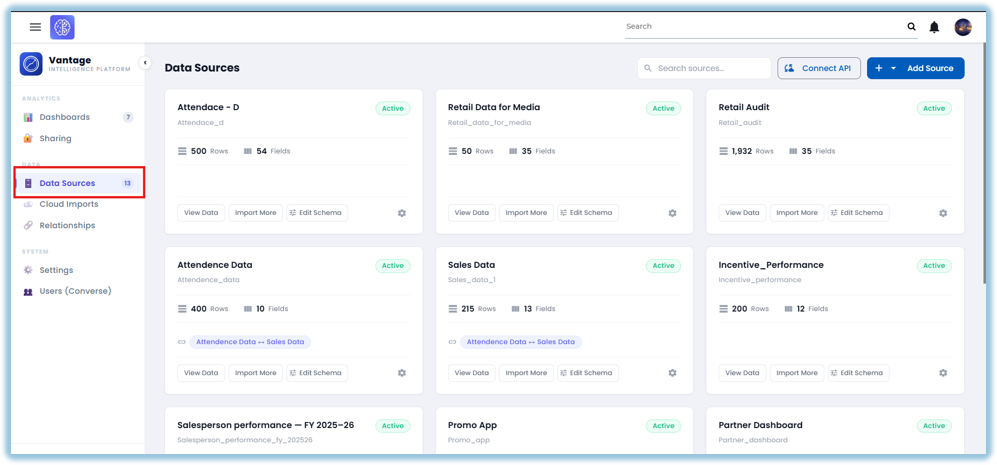**
2. Click **+ Add Source** → select **Excel / CSV
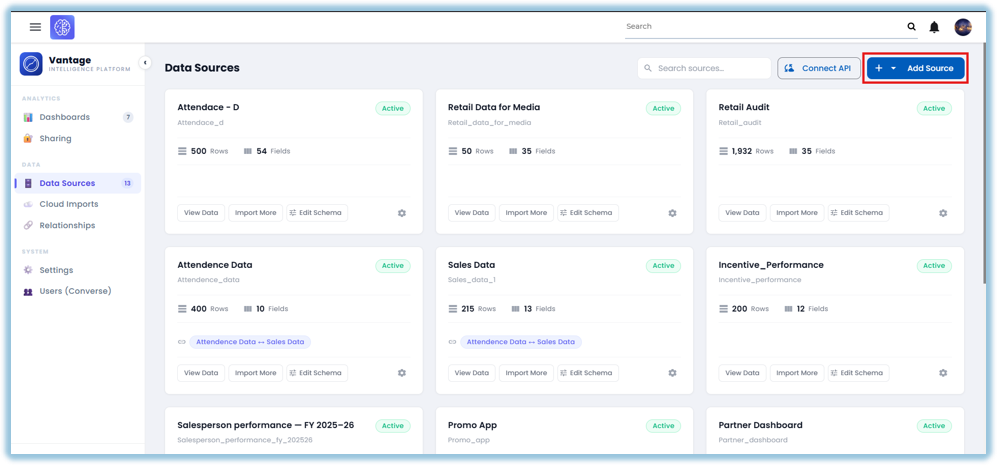**
3. Choose your Source
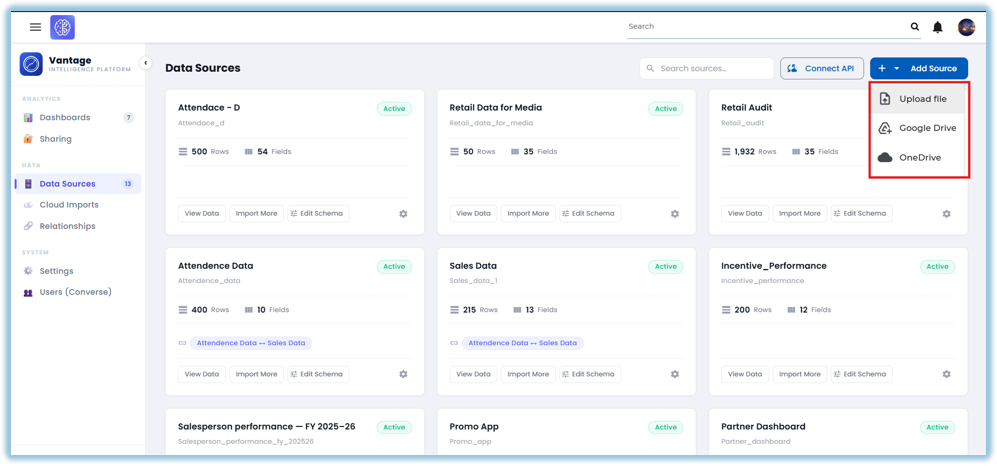
4. Name the data source
5. Choose your .xlsx or .csv file
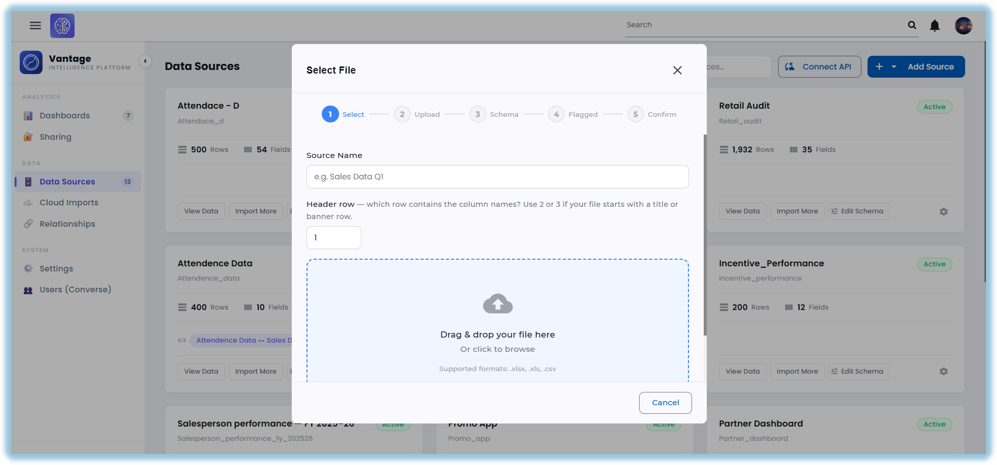
6. Review the column mapping
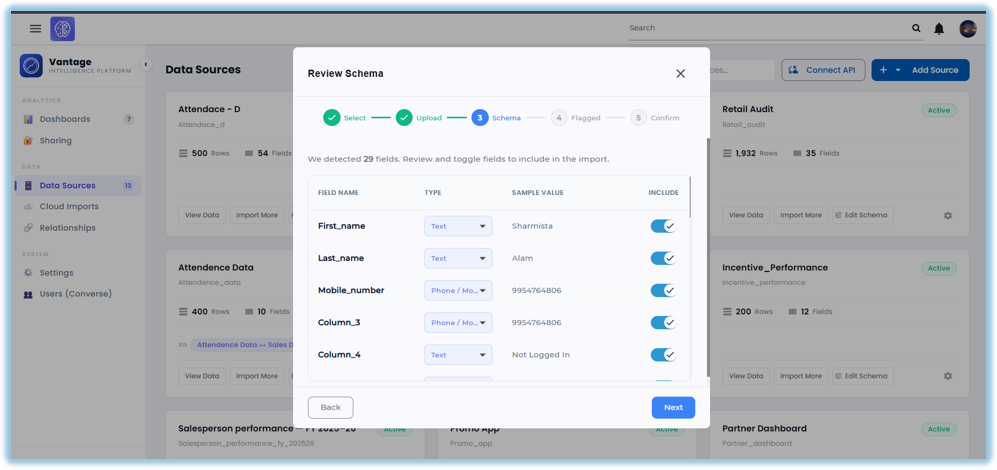
7. Click **Next** and **Review the Data**.
8. Click **Confirm Import
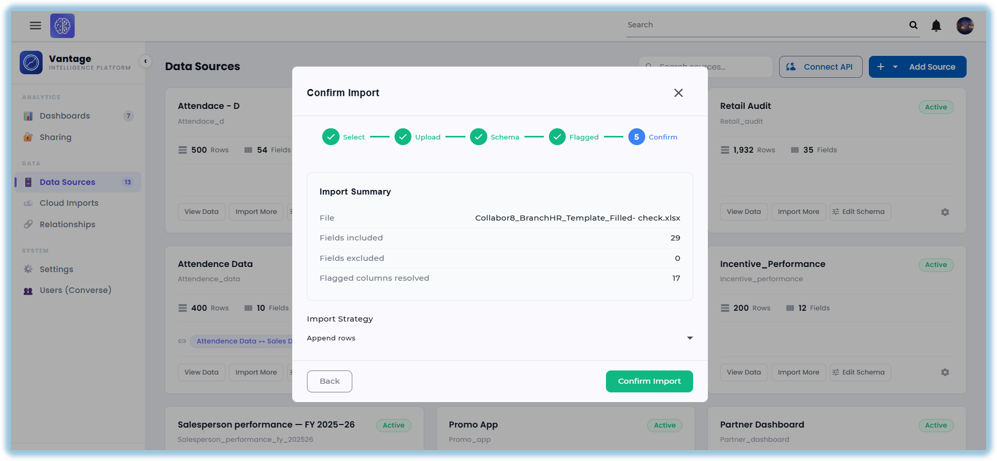**
### **Best Practices**
- Use a header row — Vantage names columns from it
- Remove blank rows and columns before uploading
- Keep dates in a consistent format
- Avoid merged cells in Excel files
- Re-upload and choose Replace to keep data current
- Use one sheet per file — Vantage reads the first sheet
- Keep file sizes manageable
### **Related Links / FAQs**
Related pages in this book:
- [How do I connect a REST API as a data source?](https://help.bsharpcorp.com/books/data-sources/page/how-do-i-connect-a-rest-api-source)
- [How do I connect internal Converse forms as a data source?](https://help.bsharpcorp.com/books/data-sources/page/how-do-i-sync-converse-forms-into-vantage)
- [How do I view and edit data in a source?](https://help.bsharpcorp.com/books/data-sources/page/how-do-i-view-and-edit-data-in-a-source)
- How do I create a relationship between data sources?
##### FAQs
**Can I upload more than one file?**
Yes, each file becomes its own data source.
**What file formats are supported?**
Excel (.xlsx) and CSV (.csv).
**Can I update the data after uploading?**
Yes — re-upload and choose Replace or Append.
**What if my column names change between uploads?**
Vantage may create new columns; keep names consistent.
### **Version Notes**
Last Updated: Oct 2026
# How do I connect a REST API source?
### **Overview**
Lets you pull data from any external system with a REST API (ERP, CRM, HRMS, IoT). Syncs automatically on a schedule — no manual re-uploads needed. Uses a Connection → Dataset → Run model: one connection, multiple datasets, each sync tracked as a run.
### **When to Use**
Use this feature when:
- You want live data from a CRM, ERP, HRMS, or IoT platform
- You need dashboards to update automatically on a schedule
- The API supports incremental updates (cursor or date filter)
- You want to combine external data with Converse forms
### **Concepts**
- **Connection** – Saved link to an external API with base URL and encrypted credentials
- **Dataset** – A specific API endpoint with its own schedule, pagination, and mapping
- **Run** – A single sync execution; tracked as running, success, partial, or failed
- **Sync Schedule** – How often a dataset syncs — interval in minutes or a cron expression
- **Cursor** – High-water mark that tracks the last synced record for incremental sync
- **Date Tokens** – Placeholders like {today} or {yesterday} resolved at sync time
- **Pagination** – How Vantage walks multi-page API responses (page, offset, cursor, link header)
- **Import Strategy** – Append, Replace, or Upsert — how new data is written into the source
- **Auto-Disable** – Dataset disables itself after 5 consecutive failed syncs
### **Set Up Guide**
Open Vantage from the Vantage Dashboard widget on the Home Page.
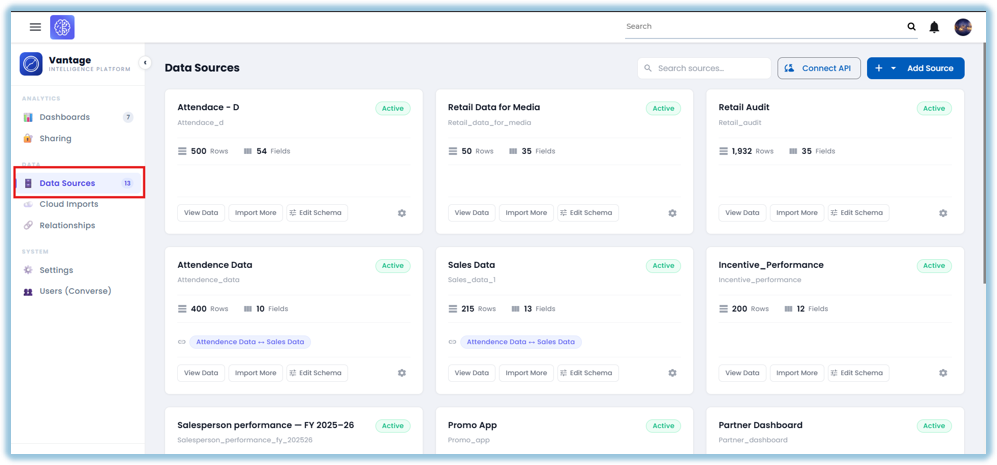
1. Go to Data Sources
2. Click **Connect API
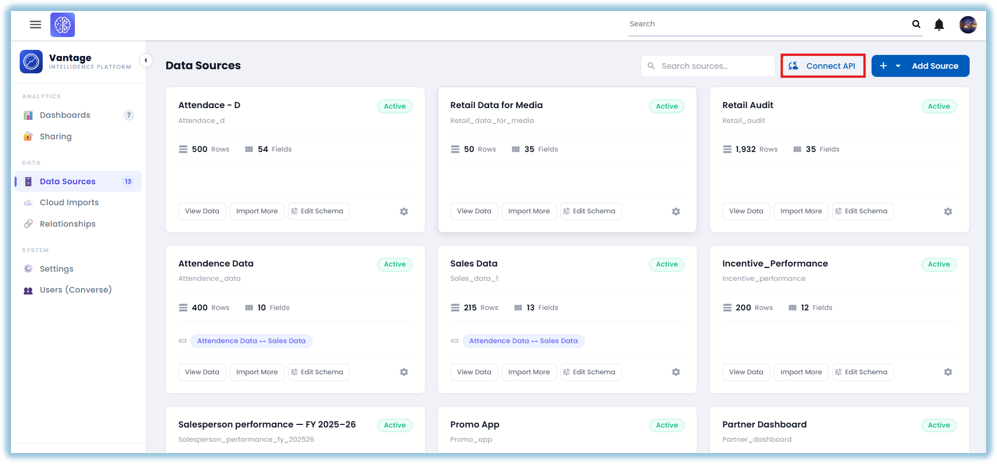**
3. Click New
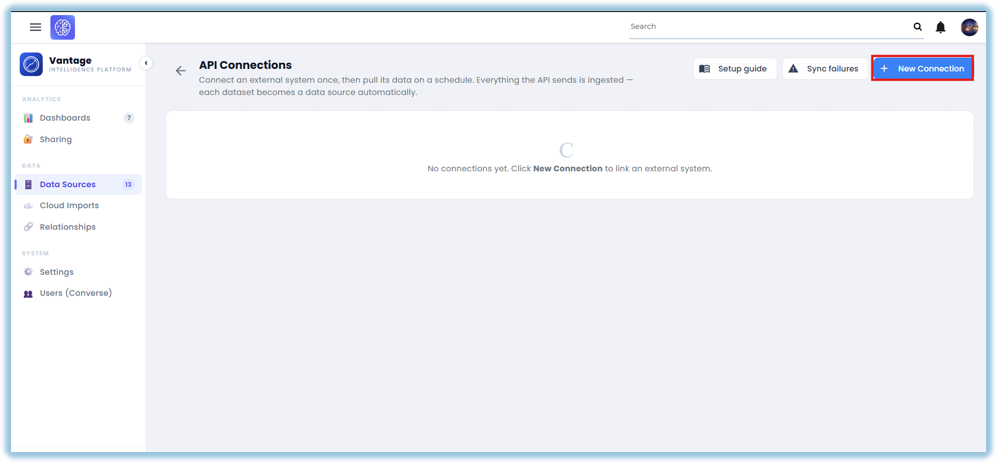
4. Enter the base URL
5. Add credentials (API key, token, or basic auth)
6. Click **Save** to create the connection
7. Click **+ Add Dataset** → enter the endpoint path and parameters
8. Configure pagination
9. Set the sync schedule (interval or cron) and time zone
10. Choose the import strategy — Append, Replace, or Upsert (Upsert needs a key field, so pick which column uniquely identifies each row)
11. Review the column mapping \[TODO: confirm this screen exists — not found in the audit\]
12. Click Save — the first sync runs at the next scheduled check (within 5 minutes), or click **Run Now** to sync immediately
### **Best Practices**
- Use a cursor or date token for incremental sync
- Match the sync schedule to how often the data actually changes
- Test with Run Now before enabling a schedule
- Use Replace for full-snapshot APIs, Upsert for changed-records-only APIs
- Keep credentials at the connection level so rotation updates all datasets
- Monitor Sync Failures — 5 consecutive failures auto-disables the dataset
- Enable pagination with a reasonable page size for large responses
### **Related Links / FAQs**
Related pages in this book:
- How do I connect an Excel or CSV file as a data source?
- How do I connect internal Converse forms as a data source?
- How do I view and edit data in a source?
- How do I create a relationship between data sources?
##### FAQs
What response formats are supported?
JSON, NDJSON, XML, CSV, and TSV.
Can I connect to an API that requires OAuth?
Only via a token — browser-redirect OAuth flows aren't supported.
What happens if a sync fails?
The run is marked failed and the cursor doesn't advance; after 5 consecutive failures the dataset auto-disables.
Can I have multiple datasets on one connection?
Yes — they share the base URL and credentials but each has its own schedule and settings.
What are date tokens?
Placeholders like {today} or {month\_start} that resolve to real dates at sync time.
### **Version Notes**
Last Updated: Oct 2026
# How do I sync Converse forms into Vantage?
### **Overview**
Syncing a Converse form into Vantage turns its submissions into a Vantage data source, so you can build dashboards and widgets from them. Once set up, new submissions keep flowing in on their own.
### **When to Use**
Use this feature when:
- You want to build dashboards or widgets from a Converse form's submissions
- You need form data available as a Vantage data source
- You want new submissions to keep syncing in without manual work
### **Concepts**
- Add to Analytics – The action that turns a form's submissions into a Vantage data source
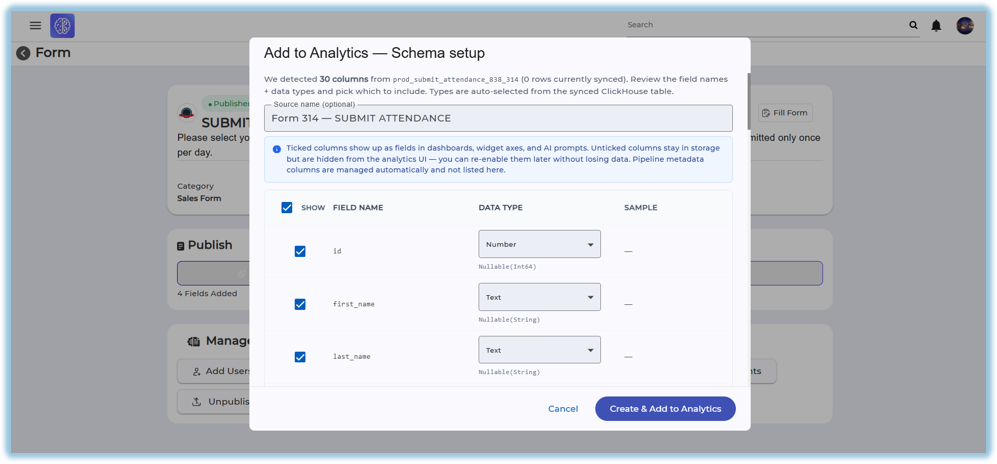
- Schema – The list of fields from the form and their data types, shown before the first sync
- DDE Columns – Store list, product catalogue, and other DDE (Dynamic Data) columns attached automatically during sync
- Resync – Manually pulls in submissions received since the last sync
- Published Form – Only published forms can be synced; drafts don't appear
### **Set Up Guide**
1. Go to the Forms section.
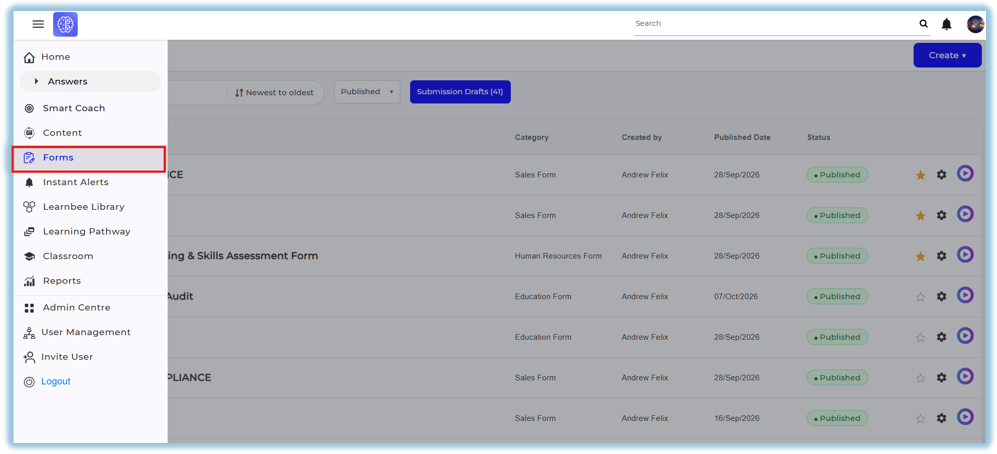
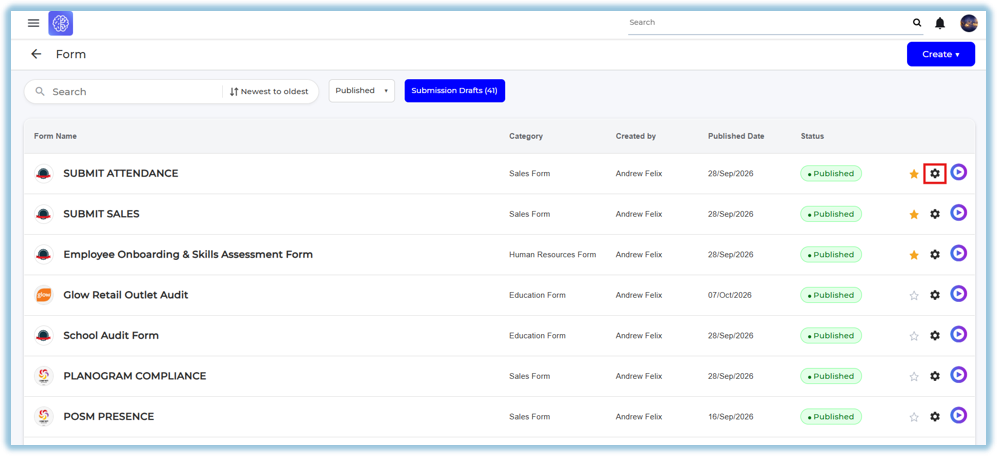
2. Click the form you want to pull data from
3. Click the form's Settings icon
4. Click Add to Analytics
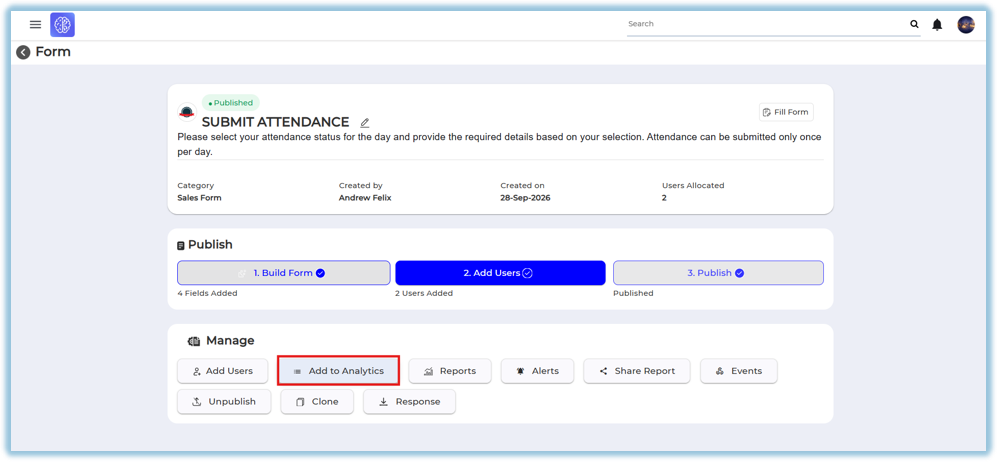
5. Review the schema that's shown — check the field types and update any that need fixing
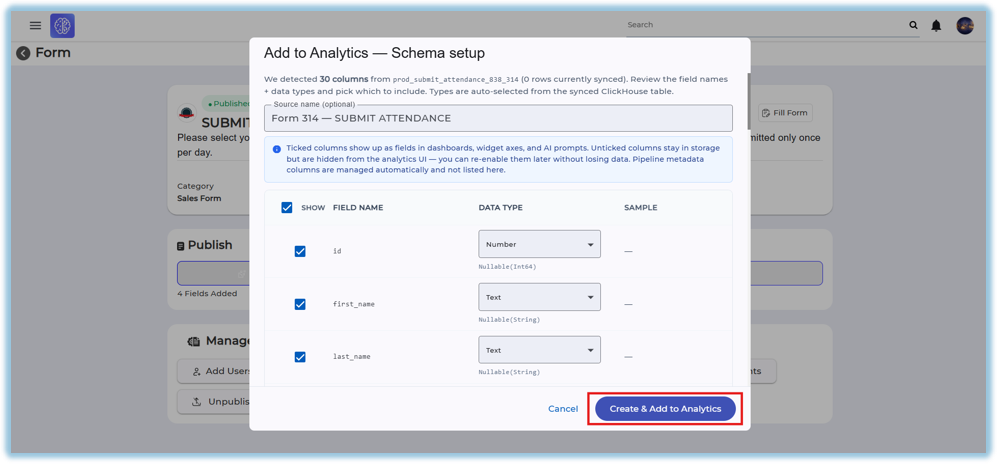
6. Click Create Entry to send the form's data to Vantage
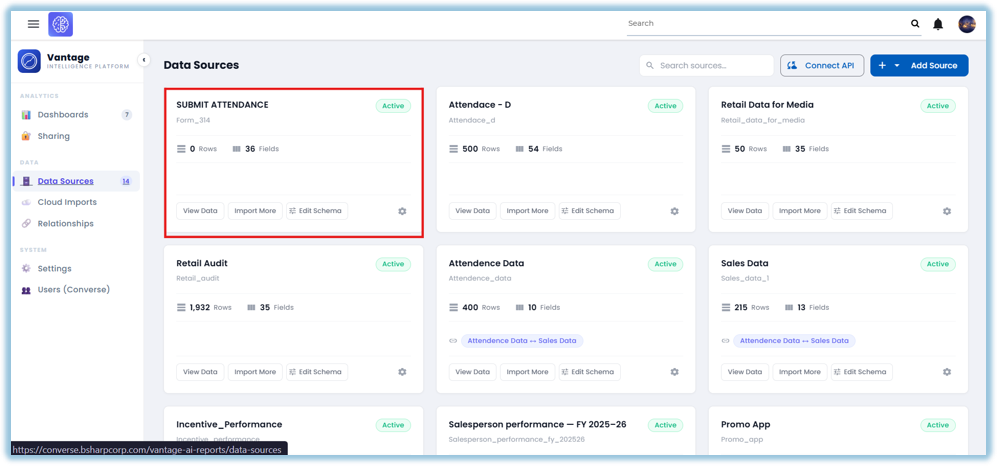
7. The form now appears as a data source in Vantage, named after the form — its submissions show up there automatically
### **Best Practices**
- Only published forms can be synced — publish the form first if it's still a draft
- Check the schema carefully before creating the entry — it's harder to fix field types after data has started syncing
- Use Resync if you need the latest submissions right away instead of waiting for the next automatic sync
### **Related Links/FAQs**
Related pages in this book:
- [How do I upload an Excel or CSV file as a source?](https://help.bsharpcorp.com/books/data-sources/page/how-do-i-upload-an-excel-or-csv-file-as-a-source)
- [How do I connect a REST API source?](https://help.bsharpcorp.com/books/data-sources/page/how-do-i-connect-a-rest-api-source)
##### FAQs
**Can I sync a draft form?**
No — only published forms can be synced.
**Do I need to resync manually every time?**
No — new submissions sync in automatically once the form is set up. Resync is only for pulling in a submission right away instead of waiting.
### **Version Notes**
Last Updated: **Oct 2026**
# How do I use DDE (Dynamic Data) tables as a source?
### **1. Overview**
DDE (Dynamic Data Engine) tables are data tables managed within the Converse platform. They are commonly used as master lists — store directories, product hierarchies, partner details, region mappings — and as the backend for form dropdowns. You can bring any DDE table into Vantage as a source, making its data available for dashboards, widgets, and AI queries alongside your other sources.
When you sync a DDE table, Vantage uses a truncate-and-reload approach: it drops the existing rows and reloads the full table from DDE, so the analytics data always matches the current state of the DDE table.
### **2. When to Use**
- When you maintain reference or master data in DDE tables and want to use it for analytics.
- When you want to join a DDE lookup table (e.g., store master) with form submissions or uploaded files using relationships.
- When you have DDE tables powering form dropdowns and want the same data available in dashboards.
### **3. Concepts**
- **DDE Table** – A dynamic data table managed within Converse. DDE tables can power live dropdowns in forms (including dependent and cascading dropdowns) and serve as operational reference data.
- **Truncate-and-Reload** – Each sync replaces the entire dataset in ClickHouse with the current contents of the DDE table. This ensures your analytics always reflect the latest master data.
### **4. Set Up Guide**
Open Vantage from the Vantage Dashboard widget on the Home Page.
1\. Click Sources from the navigation, then click Add Source
2\. Select Dynamic Data as the connector type
3\. Choose the DDE table you want to bring in from the list of tables available in your organisation
4\. Vantage reads the table and loads it into ClickHouse — the source appears in the Sources list with a row count once complete
5\. The DDE source is now available for widgets, relationships, and AI queries like any other source
6\. To combine DDE data with form or Excel data, define a relationship between the two sources (see the Relationships book)
### **5. Best Practices**
- Keep DDE table column names stable. Renaming or removing columns requires a resync and may break widgets that reference those columns.
- If the DDE table also feeds form dropdowns, keep the data clean and consistent — the same values will appear in both forms and analytics.
- After updating a DDE table, resync the source in Vantage so dashboards reflect the changes.
### **6. Related Links / FAQs**
**Does Vantage keep DDE data in sync automatically?**
No. DDE source syncs are manual. Click Resync in the source settings whenever the DDE table has been updated.
**Will resyncing a DDE source break my existing dashboards?**
As long as column names haven't changed, widgets continue working after a resync. If columns were renamed or removed in the DDE table, affected widgets may need reconfiguration.
**Can I use a DDE table as a lookup to enrich form data?**
Yes. Add both the DDE table and the form as separate sources, then define a relationship between them using a shared key column (e.g., store ID). This is covered in the Relationships book.
### **7. Version Notes**
Last Updated: 04 Sep 2026
# How do I refresh a source?
### **1. Overview**
Source data in Vantage does not stay in sync with upstream changes automatically. When new form submissions come in, a DDE table is updated, an API endpoint has fresh data, or you have a new version of an Excel file — you need to resync the source so that dashboards and widgets reflect the latest data.
Resyncing is a manual action available on every source type.
### **2. When to Use**
- When new form submissions have come in and you want them visible in dashboards.
- When you have an updated Excel or CSV file to replace the previous version.
- When a DDE table has been modified and you want Vantage to pick up the changes.
- When an API endpoint has fresh data and you want to pull it in.
- When row counts in the Sources listing look stale and you want to confirm current volumes.
### **3. Concepts**
- **Resync** – Re-runs the ingest pipeline for a source. For Excel/CSV, this means uploading a new file. For API, internal form, and DDE sources, it re-fetches data from the upstream system and reloads ClickHouse.
- **Live Row Counts** – The Sources listing shows the current row count for each source. Counts on the general listing refresh approximately every 60 seconds. The individual source detail page always shows the live count.
- **Widget Cache** – Widget query results are cached for 5 minutes. After a resync, you may need to wait a few minutes or refresh the dashboard page to see updated numbers.
### **4. Set Up Guide**
1\. Open Vantage from the Vantage Dashboard widget on the Home Page, and click Sources from the navigation
2\. Locate the source you want to refresh in the list and open it
3\. For Excel / CSV: upload a replacement file with the updated data — Vantage re-ingests it and replaces the previous dataset
4\. For API / Internal Form / DDE: click Resync — Vantage re-fetches from the upstream system and reloads it
5\. Wait for the source status to update once the sync finishes — the row count updates accordingly
6\. Open dashboards and widgets using this source to confirm the data looks correct
7\. If numbers still look stale, wait a few minutes for the widget cache to clear, then refresh the page
### **5. Best Practices**
- Resync before important reviews or demos to ensure data is current.
- When resyncing an Excel/CSV source, always upload the complete updated file — Vantage replaces the entire dataset, not just the changes.
- If you have added new columns to a form or DDE table, resync so the new columns appear in ClickHouse and become available for widgets.
- Watch the row count after a resync. A sudden drop might indicate a data issue in the upstream file or table.
### **6. Related Links / FAQs**
**Will resyncing disrupt live dashboards?**
No. Widgets continue to work during a resync. Once the ingest completes, widgets serve the updated data on the next load.
**Can I schedule automatic resyncs?**
Not currently. All resyncs are admin-initiated. Automatic scheduled syncs are planned for a future release.
**How do I know if a resync succeeded?**
The source status in the Sources listing updates and the row count reflects the new data volume. If ingest fails, the source shows an error state.
**My dashboard still shows old numbers after a resync. Why?**
Widget results are cached for up to 5 minutes. Wait a few minutes and refresh the dashboard page. The updated data will appear once the cache clears.
### **7. Version Notes**
Last Updated: Oct 2026
# How do I view and edit data in a source?
### **Overview**
View Data shows you every row of information inside a source, like opening a table and looking through it. From here you can also search the data, download it, or fix a wrong value everywhere it appears.
### **When to Use**
Use this feature when:
- You want to check what data actually came into a source
- You need to download the data as a CSV or Excel file
- You spot a wrong or inconsistent value and want to fix it everywhere at once
- You want to check how many rows a source has
### **Concepts**
- View Data – The screen where you can see every row in a source, like opening a spreadsheet
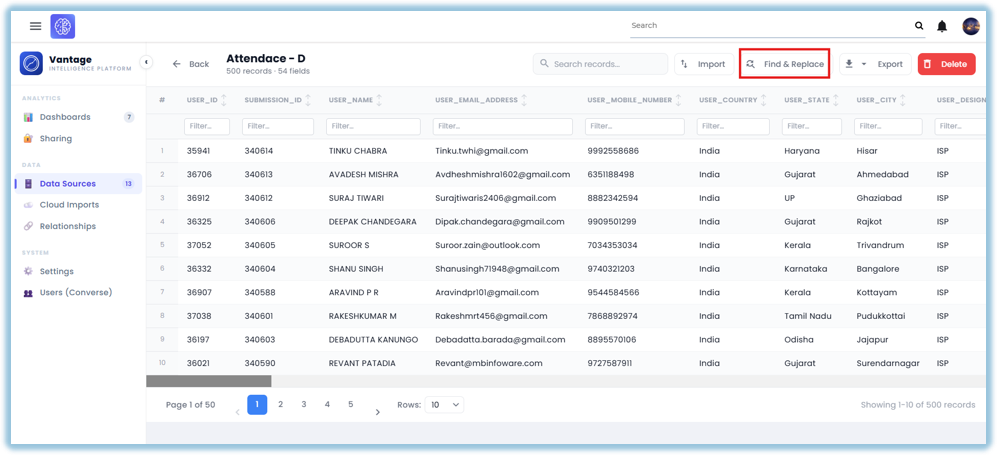
- Find & Replace – A tool that changes a value everywhere it appears in a source, in one step (for example, changing "Banglore" to "Bangalore" everywhere at once)
- Export – Downloading the source's data as a file you can open in Excel
- Row Count – The total number of rows in a source
### **Set Up Guide**
1. Go to Data Sources
2. Click the source you want to check
3. Click View Data
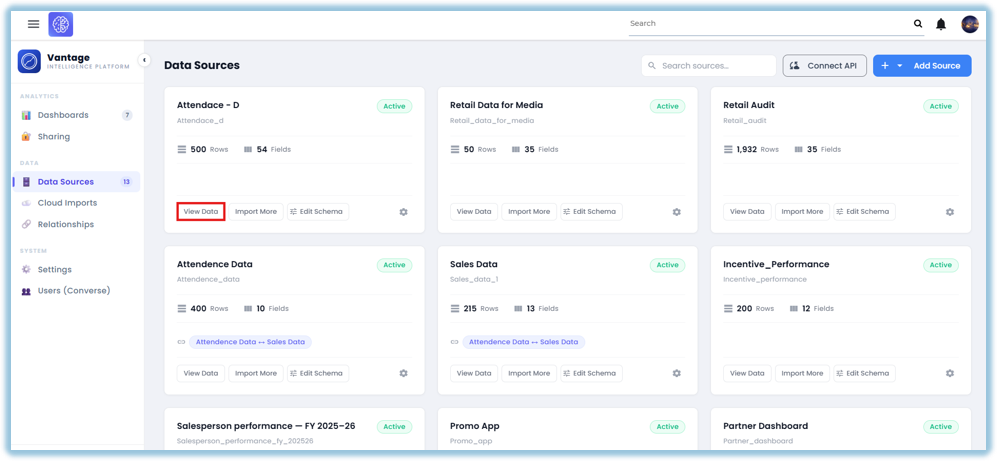
4. Use search or filters to find the rows you need
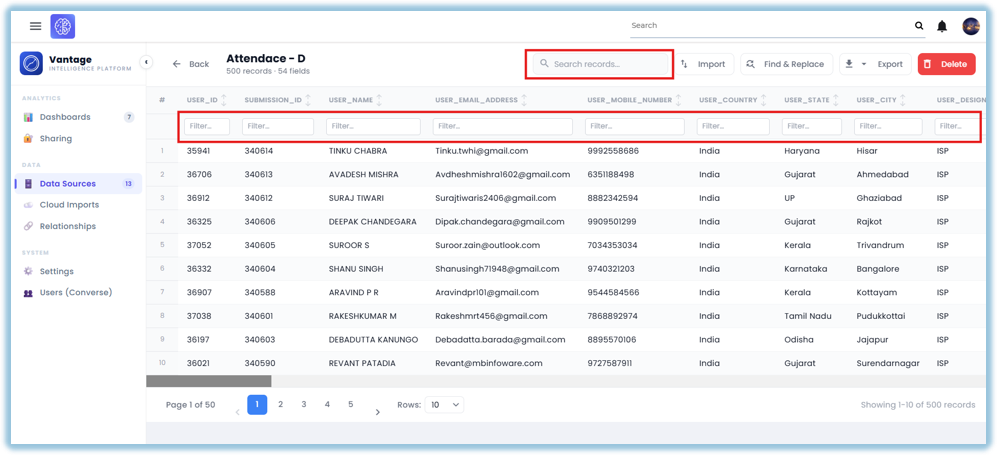
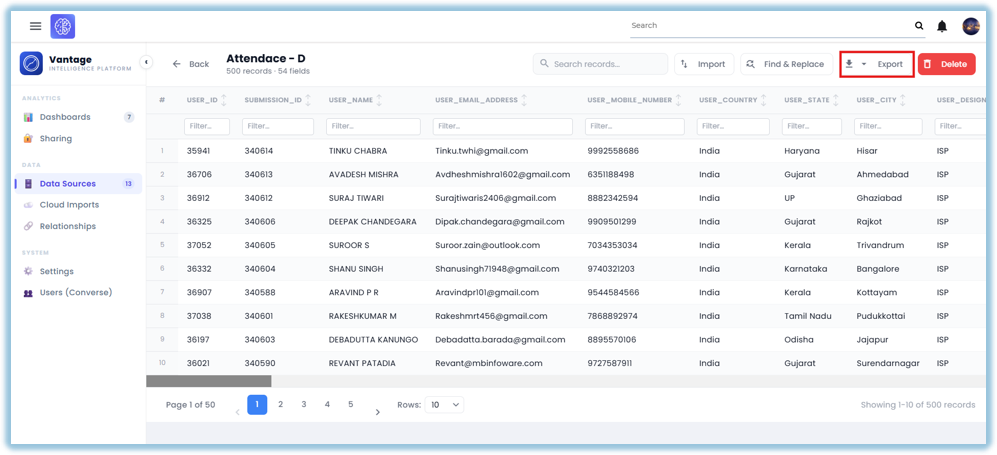
5. To download the data, click Export and choose CSV or Excel
6. To fix a value, click Find & Replace
7. Type the value you want to find (for example, "Banglore")
8. Choose whether to match the full value or just part of it
9. Turn on "match case" only if the fix should apply just to that exact spelling (capital or small letters)
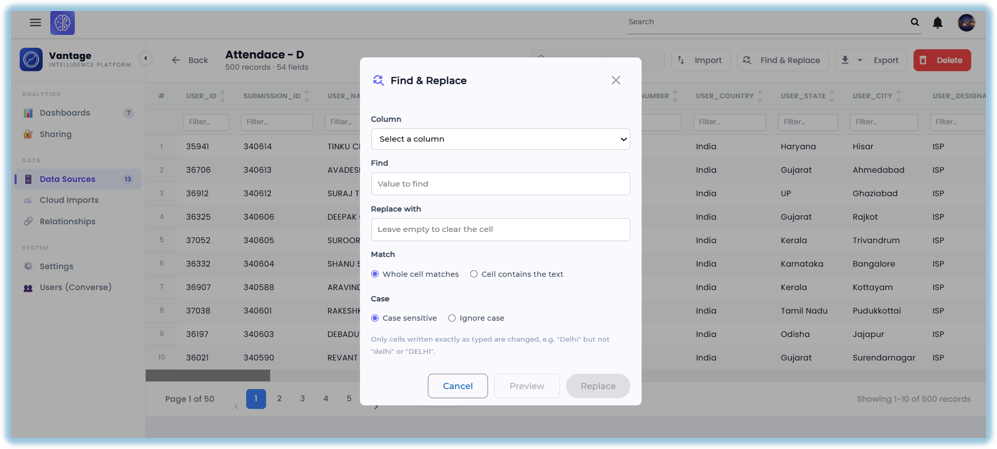
10. Click Preview to see how many rows will be affected
11. Click Apply to make the change
### **Best Practices**
- You can't undo a Find & Replace, so always check the Preview count first
- Find & Replace only works on Excel and API sources, not on forms, DDE tables, or combined sources
- Number and date columns only match the full value, not part of it
- Row counts can take up to a minute to update
- For large sources, download only the rows you need instead of the whole file
### **Related Links/FAQs**
Related pages in this book:
- How do I resync or refresh a source?
- How do I define a relationship between two sources?
##### FAQs
**Can I undo a Find & Replace?**
No. Always check the Preview count before applying.
**Can I use Find & Replace on any source?**
No — only Excel and API sources support it.
**Why didn't my download include everything?**
Large files are limited to keep things fast — try downloading a filtered set instead.
### **Version Notes**
Last Updated: **Oct 2026**