# Learnbee++
# How to Create Content from Scratch in Learnbee++
### **1. Overview**
Creating content from scratch in Learnbee++ allows admins to manually build learning content starting from an empty topic. This option is used when content needs to be created without using templates or AI.
### **2. When to Use**
- When creating completely new content without any reference
- When full control over content structure is required
- When templates or AI-generated content are not needed
- When building custom training modules manually
### **3. Concepts**
- **Learnbee++ Library** – Stores all created topics
- **Create Topic** – Option to start creating new content
- **Create from Scratch** – Starts content creation without any predefined structure
- **Training Setup Page** – Initial page to configure topic details
### **4. Set Up Guide**
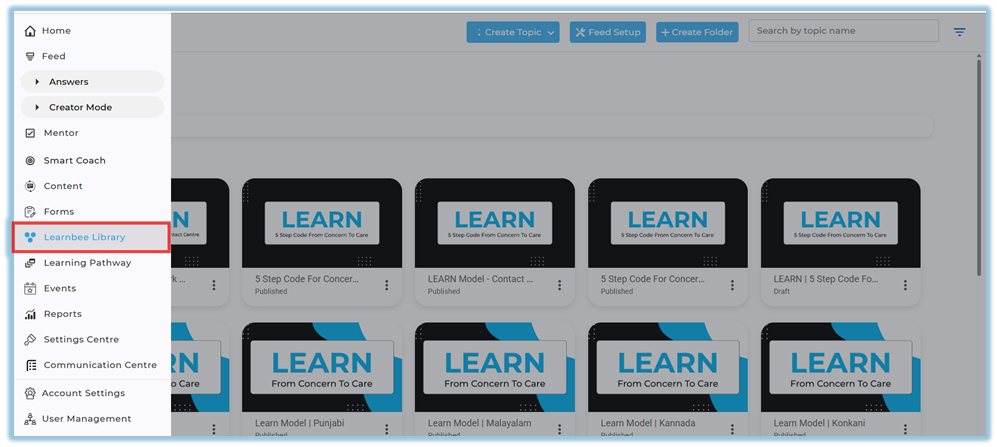
1. Go to the **Home Page**
2. Click the **menu bar** on the left side
3. Select **Learnbee++ Library**
- This opens the Learnbee++ Library page
- All previously created topics are displayed here
4. Click **Create Topic**
- Located at the top of the Learnbee++ Library page
5. Select **Create from scratch**
- This option starts a new topic without using templates
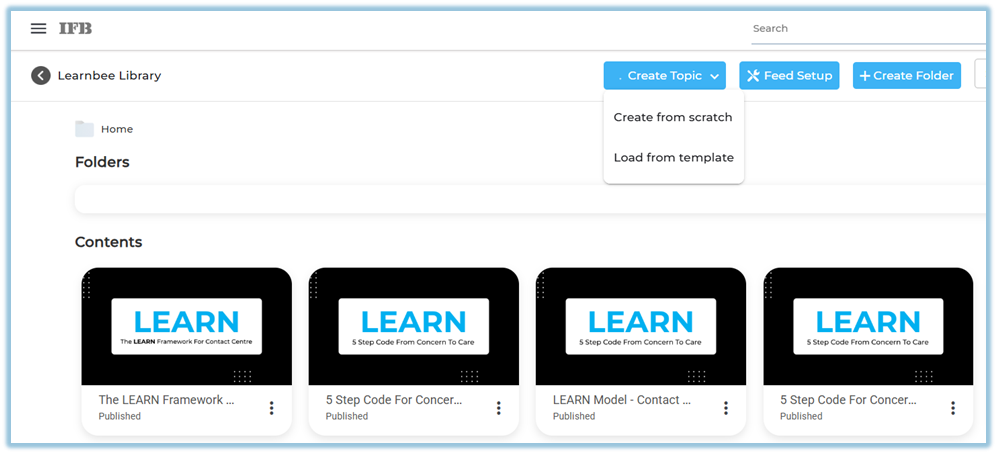
- No predefined content or structure is added
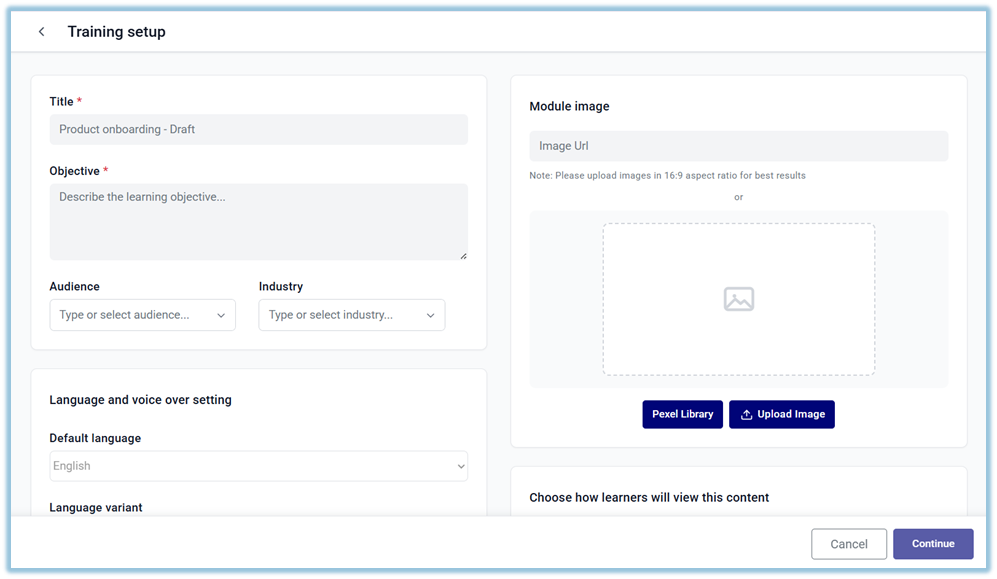
6. You will be redirected to the **Training Setup Page
**
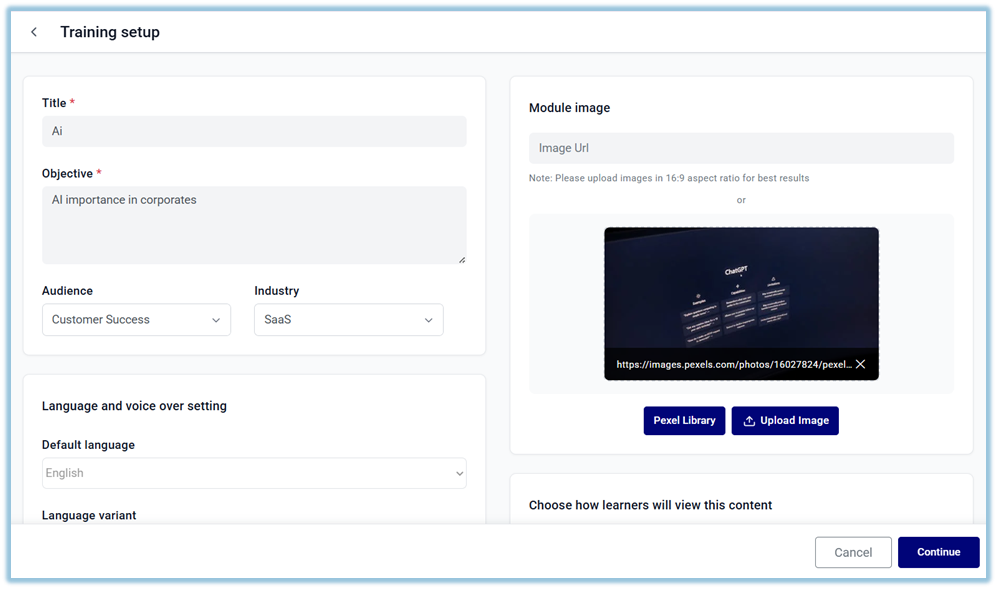
7. Enter the required topic details
- **Title**
- **Objective**
- **Audience**
- **Industry / Domain**
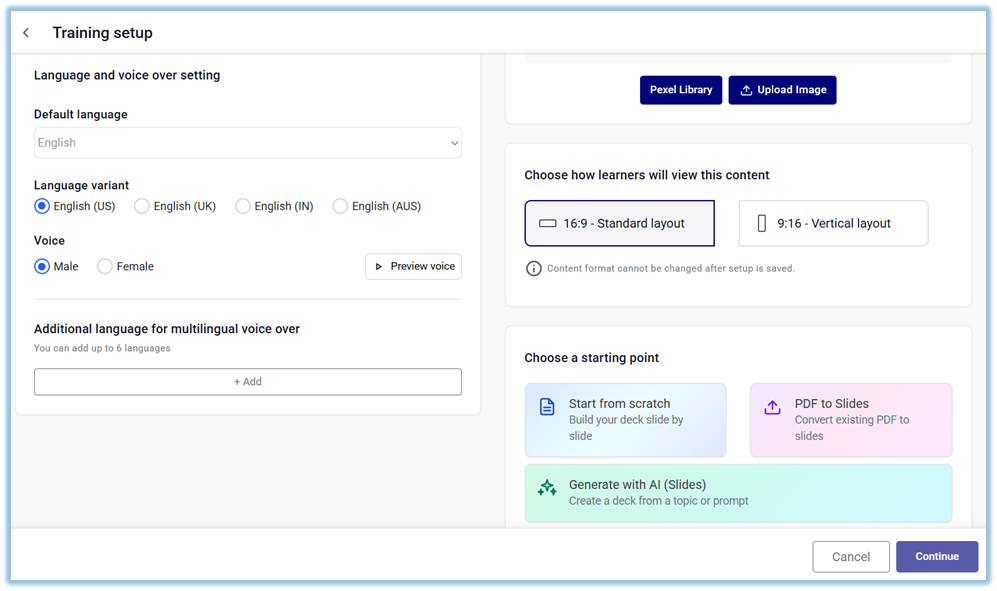
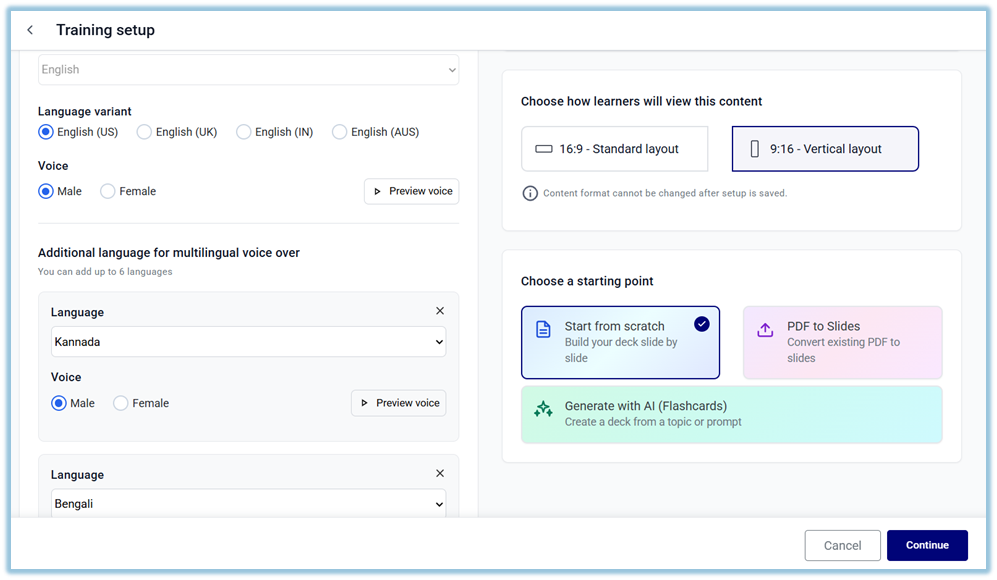
8. Configure content settings
- Select **Language**
- Select **Voice**
- Choose **Content Format** (e.g., 16:9 or 9:16)
9. In the **Starting Point** section, select **Start from scratch
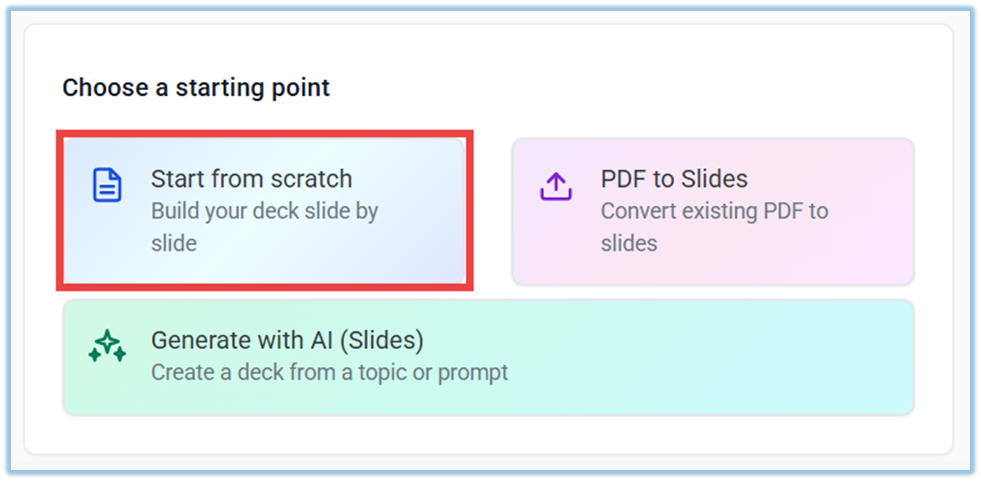**
10. Complete all required fields
11. Proceed to the next step to enter the **Topic Editor**
12. Click **Add Slide
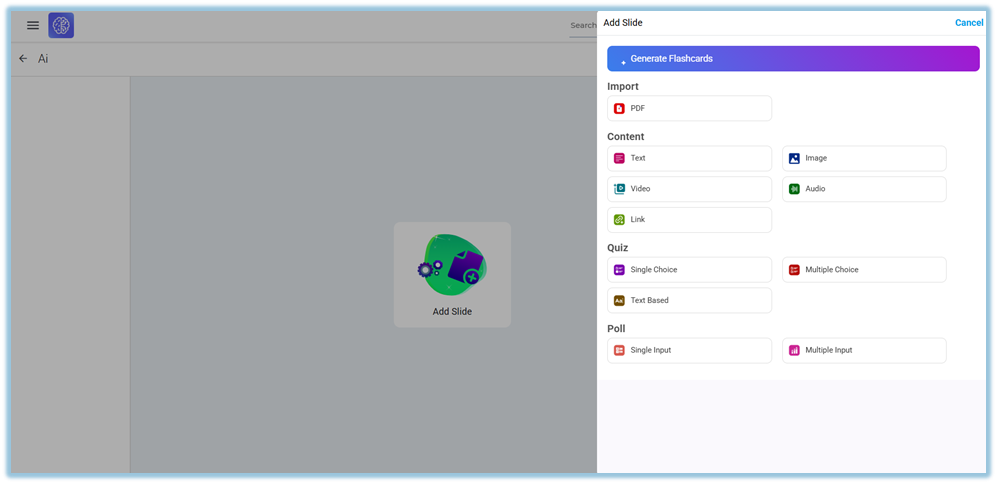**
13. Add learning content using available slide types
14. Translate content
15. Add **Voiceover**
16. Click **Preview**
17. Click **Publish**
### **5. User View**
##### **Admin View**
- All created topics are visible in the **Learnbee++ Library**
- Topics are displayed as cards with details like name and status
- Admin can open and edit any topic
##### **End User View**
- Learnbee++ content is **not directly visible in the Library**
- Users can access the content **only when it is used inside Content (modules)**
- Once assigned, users can view and consume the content as part of training
### **6. Best Practices**
- Use this option when full customization is required
- Clearly define objective before creating content
- Organize content into sections for better flow
- Review and validate content before publishing
### **7. Related Links / FAQs**
**Q: Does this option generate content automatically?**
No, content must be created manually.
**Q: Who can create topics in Learnbee++?**
Admins can create topics.
### **8. Version Notes**
Last Updated: 09 Apr 2026
# How to Convert a PDF into Slides in Learnbee++
### **1. Overview**
The PDF to Slides option in Learnbee++ allows admins to convert existing PDF documents into slide-based learning content. This helps reuse existing training material and transform it into structured slides inside the topic editor.
### **2. When to Use**
- When existing training content is available in PDF format
- When converting documents into structured slide content
- When reducing manual content creation effort
- When reusing existing learning materials
### **3. Concepts**
- **PDF to Slides** – Converts PDF content into slide format
- **Source Document** – The uploaded PDF used for conversion
- **Slide Output** – Generated slides from the PDF
- **Training Setup Page** – Page where conversion is configured
### **4. Set Up Guide**
1. Go to the **Home Page**
2. Click the **menu bar** on the left side
3. Select **Learnbee++ Library**
4. Click **Create Topic**
5. Select **Create from scratch**
6. You will be redirected to the **Training Setup Page**
7. Enter the required topic details
- **Title**
- **Objective**
- **Audience**
- **Industry / Domain**
8. Configure content settings
- Select **Language**
- Select **Voice**
- Choose **Content Format**
9. In the **Starting Point** section, select **PDF to Slides**
10. Upload the **PDF document**
11. Complete all required fields
12. Proceed to generate slides from the uploaded PDF
13. Navigate to the **Topic Editor**
14. Review the generated slides
15. Edit and adjust content if required
16. Add additional slides if needed
17. Add **Voiceover**
18. Translate content into required languages
19. Click **Preview**
20. Click **Publish**
- The topic becomes available for selection in **Content**
### **5. User View**
##### **Admin View**
- Converted slides are visible inside the topic editor
- Admin can edit and manage all slides
##### **End User View**
- Users cannot access Learnbee++ Library directly
- Content is visible only when used inside **Content (modules)**
### **6. Best Practices**
- Use clear and well-structured PDF documents
- Review slides after conversion
- Adjust formatting for better readability
- Validate content before publishing
### **7. Related Links / FAQs**
**Q: Can I edit slides after conversion?**
Yes, all generated slides can be edited.
**Q: What happens if the PDF is not structured properly?**
Output quality may vary and requires manual refinement.
### **8. Version Notes**
Last Updated: 10 Apr 2025
# How to Generate Slides Using AI in Learnbee++
### **1. Overview**
The Generate with AI option in Learnbee++ allows admins to create slide-based learning content by providing basic course details. The system first generates a structured outline and then creates slide content, which can be edited and finalized in the topic editor.
### **2. When to Use**
- When creating content quickly using AI
- When only basic course details are available
- When a structured first draft is required
- When reducing manual content creation effort
### **3. Concepts**
- **Generate with AI** – Creates content automatically using AI inputs
- **Content Format** – Defines output type (slides or flashcards)
- **Knowledge Source** – Source of content (Internet or Channel)
- **Outline Generation** – Creates structure before slide content
- **Content Generation** – Converts outline into full slides
### **4. Set Up Guide**
1. Go to the **Home Page**
2. Click the **menu bar** on the left side
3. Select **Learnbee++ Library**
4. Click **Create Topic**
5. Select **Create from scratch**
6. You will be redirected to the **Training Setup Page**
7. Enter the required topic details
- **Title**
- **Objective**
- **Audience**
- **Industry / Domain**
8. Configure content settings
- Select **Language**
- Select **Voice**
- Choose **Content Format as 16:9**
9. In the **Starting Point** section, select **Generate with AI**
10. Enter AI generation inputs
- **Number of Content Slides**
- **Number of Quiz Slides** (optional)
11. Select **Knowledge Source**
- **Internet** → Uses general knowledge
- **Channel** → Uses documents from selected channel
12. Complete all required fields
13. Click **Generate Course**
- The system generates a course outline
14. Review the generated outline
15. Refine the outline if required
- Edit section names
- Remove sections
- Regenerate outline
16. Click **Generate Content**
- The system generates slide content
17. Wait for content generation to complete
18. Navigate to the **Topic Editor**
19. Review generated slides
- Content
- Structure
- Quiz slides (if selected)
20. Edit and refine content if required
21. Add **Voiceover**
22. Translate content into required languages
23. Click **Preview**
24. Click **Publish**
- The topic becomes available for selection in **Content**
### **5. User View**
##### **Admin View**
- Outline appears first after generating course
- Slides are generated after content generation
- All slides are available inside the topic editor
- Admin can edit, refine, and manage content
##### **End User View**
- Learnbee++ content is not directly visible in the Library
- Users can access the content only when used inside **Content (modules)**
### **6. Best Practices**
- Provide clear and specific inputs for better results
- Use appropriate slide counts
- Select correct knowledge source
- Always review outline before generating content
- Refine generated slides before publishing
### **7. Related Links / FAQs**
**Q: What happens if required details are missing?**
Generation is blocked until required fields are completed.
**Q: Can I edit AI-generated slides?**
Yes, all generated content can be edited.
**Q: What happens if no documents are available in Channel?**
Generation will not proceed until valid documents are available.
### **8. Version Notes**
Last Updated: 10 Apr 2026