# User Setup
### **1. Overview**
User Setup is used to add, manage, and organize users in the platform. It allows administrators to invite users, control access, assign roles, and define reporting relationships such as Manager, Trainer, and Coach. Administrators can also delegate scoped user management to Regional Admins and organize users into Groups for targeted communications and content. This ensures structured user data, accurate reporting, and controlled access across the system.
### **2. When to Use**
Use User Setup when you need to:
- Invite new users (single or bulk)
- Track user login and access status
- Block users who have exited the organization
- Assign Managers, Trainers, and Coaches
- Configure user attributes for reports
- Maintain designations and roles consistently
- Delegate user management to Regional Admins with scoped access
- Organize users into Groups for targeted actions
### **3. Concepts**
- **Registered** – User account has been created
- **Logged In** – User has logged into the platform at least once
- **Not Logged In** – User account created but login not completed
- **Blocked** – User access is disabled
- **Pending Requests** – Users waiting for approval
- **Role** – Access level (All, User, Admin, Creator)
- **Attributes** – User details used for filtering and reporting
- **Regional Admin** – A user granted scoped admin permissions limited to users matching selected attribute values
- **Attribute Group** – A rule-based group where members are automatically included based on attribute values
- **Flex Group** – A group with manually selected members
### **4. Set Up Guide**
**Path:** Menu → Settings Centre → User Setup
[https://converse.bsharpcorp.com/celebrate/settings\_center](https://converse.bsharpcorp.com/celebrate/settings_center)
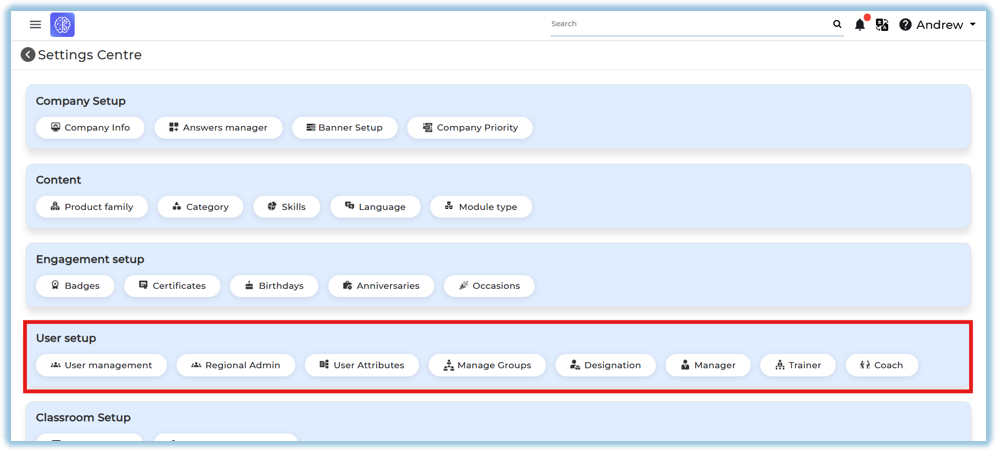
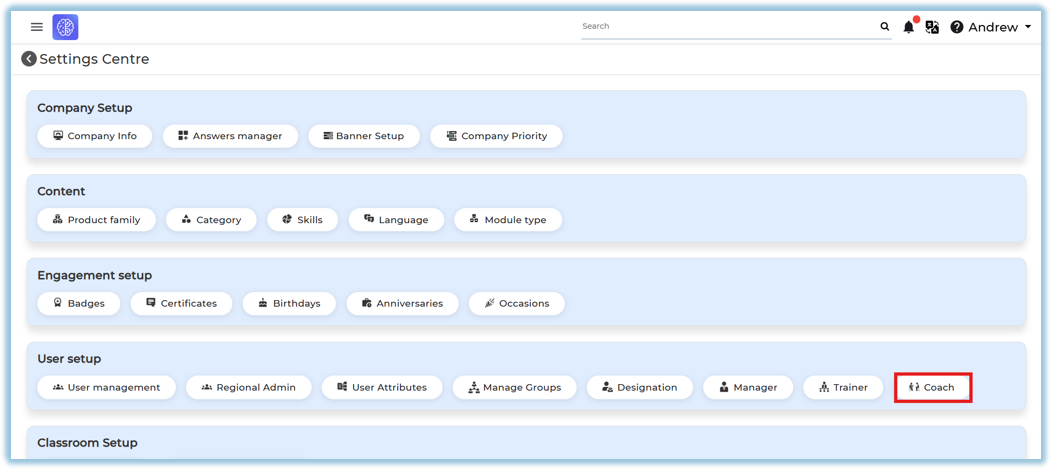
Under User Setup, you will see:
- User Management
- Regional Admin
- User Attributes
- Manage Groups
- Designation
- Manager
- Trainer
- Coach
#### **4.1. User Management**
##### View User Status
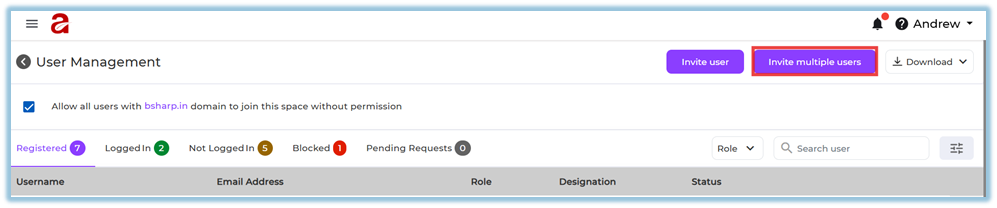
The User Management page displays users under different tabs:
[https://converse.bsharpcorp.com/celebrate/user\_management](https://converse.bsharpcorp.com/celebrate/user_management)
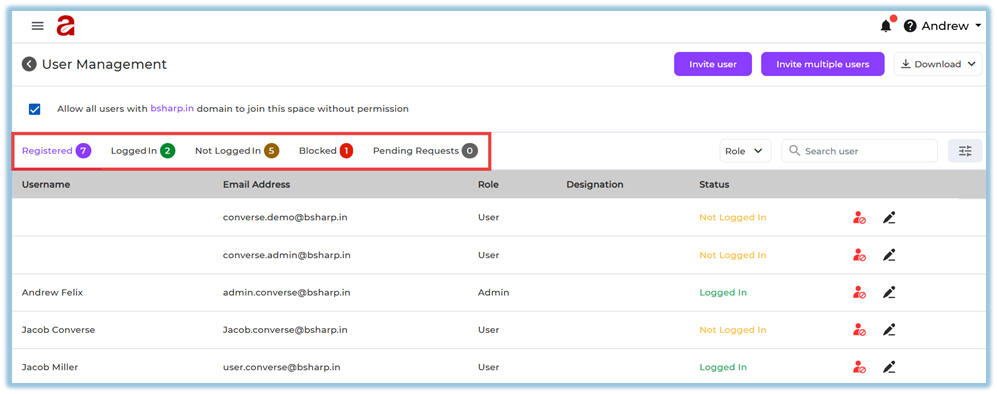
- **Registered**
- **Logged In**
- **Not Logged In**
- **Blocked**
- **Pending Requests**
Each tab shows the count of users in that category.
##### Search & Filter Users
You can:
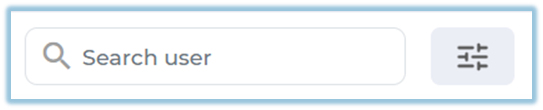
- Search users by name or email
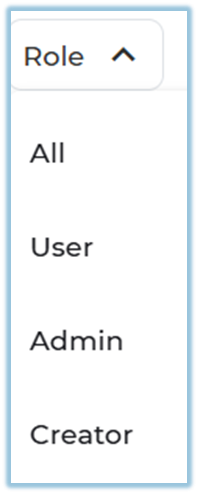
- Filter users by **Role** (All, User, Admin, Creator)
- Use advanced filters to search by:
- First Name
- Last Name
- Email ID
- Mobile Number
- Designation
- Country
- Date of Birth
- Date of Joining
- Manager
- Trainer

##### Invite a Single User
1. Click **Invite User
**
2. Enter user details:
- First Name
- Last Name
- Mobile Number
- Date of Birth
- Email ID
- Hired On date
- Country, State, City
- Designation
- Manager Email Address
- Trainer Email Address (optional)
- Coach Email Address (optional)
3. Click **Send Invite
**
4. User receives an invitation notification
##### Invite Multiple Users (Bulk Upload)
1. Click **Invite Multiple Users
**
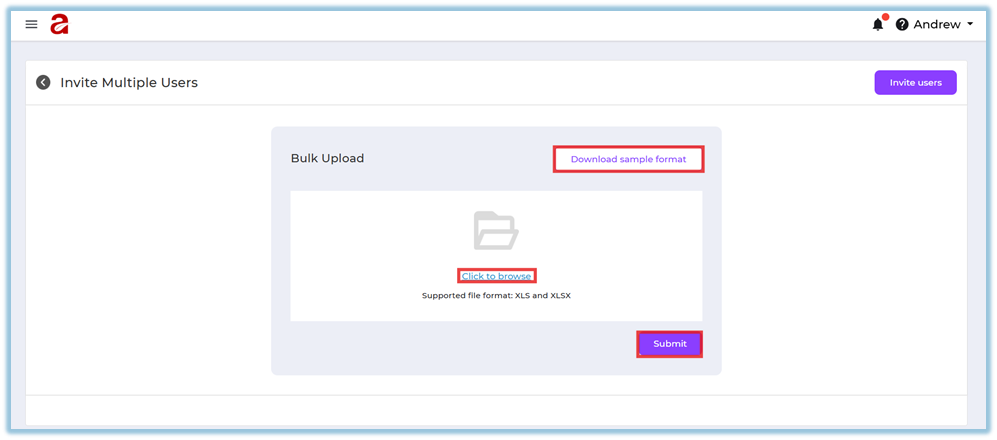
2. Download the sample format
3. Fill in user details in the file
4. Upload the completed file
5. Click **Submit
**
6. System displays:
- Success message if upload is valid
- Error details if any records fail
7. The error file can be downloaded.
##### Download User Data
Admins can download:
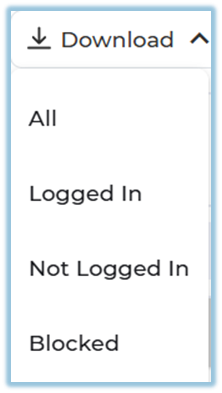
- All users
- Logged-in users
- Not logged-in users
- Blocked users
#### **4.2 Regional Admin**
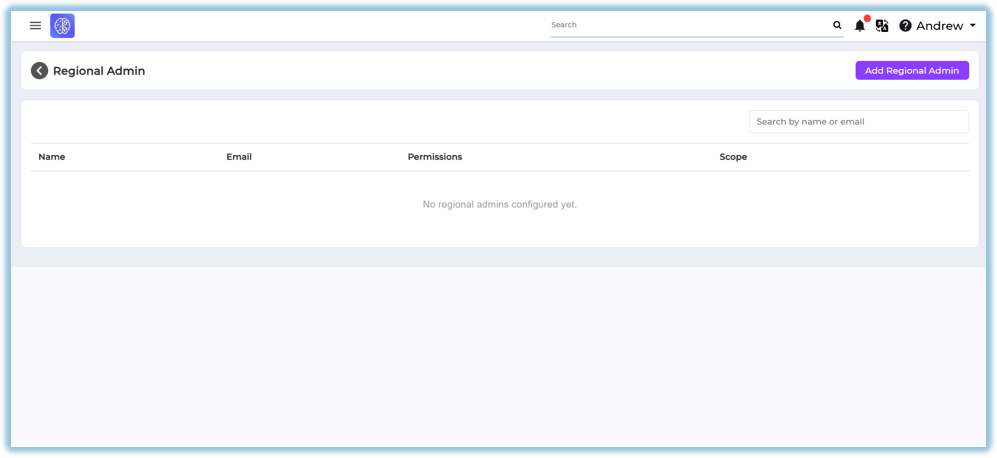
Regional Admin allows administrators to grant scoped admin access to a user. A Regional Admin can only see and manage users who match the selected attribute values.
Path: Settings Centre → User Setup → Regional Admin
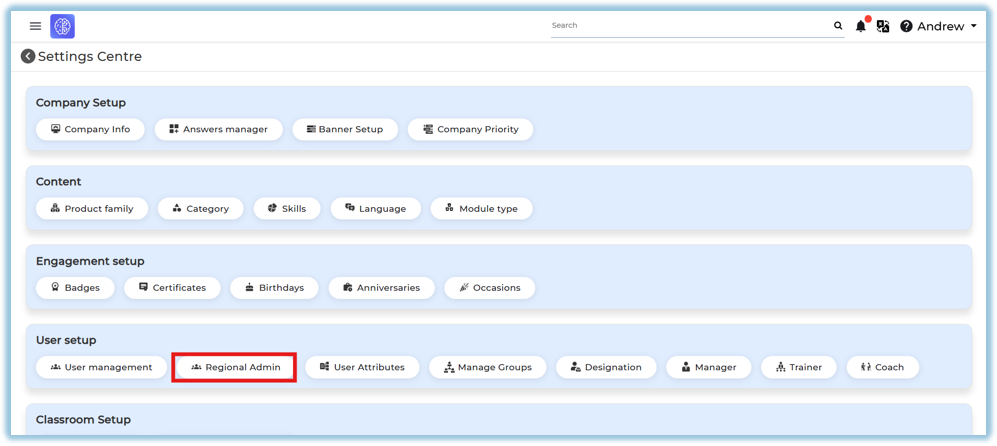
Add a Regional Admin
1\. Click Add Regional Admin
2\. Under Select user, choose the user from the dropdown
3\. Under Define scope, add attributes and select their options. The Regional Admin will only see users matching the selected values:
◦ Select an attribute from Select Attribute
◦ Choose values from Select Options
◦ Use the + button to add more attribute rules
◦ Use the × button to remove a rule
4\. Under Grant permissions, toggle on the permissions to grant:
◦ Manage users – View and manage the in-scope users (block, unblock, edit)
◦ Communications – Send communications to in-scope users
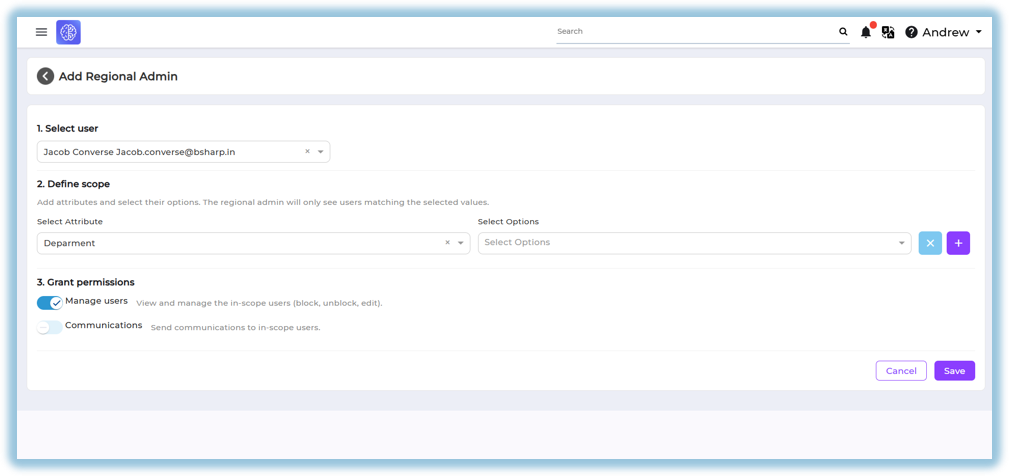
5\. Click Save
Regional Admin List View
The Regional Admin page displays configured Regional Admins with the following columns:
• Name
• Email
• Permissions
• Scope
If no Regional Admins are configured, the page displays: "No regional admins configured yet.
#### **4.3 User Attributes**
User Attributes control what user information is available for reports.
##### Attribute Visibility
- **Green eye icon** → Attribute included in reports
- **Red eye icon** → Attribute excluded from reports
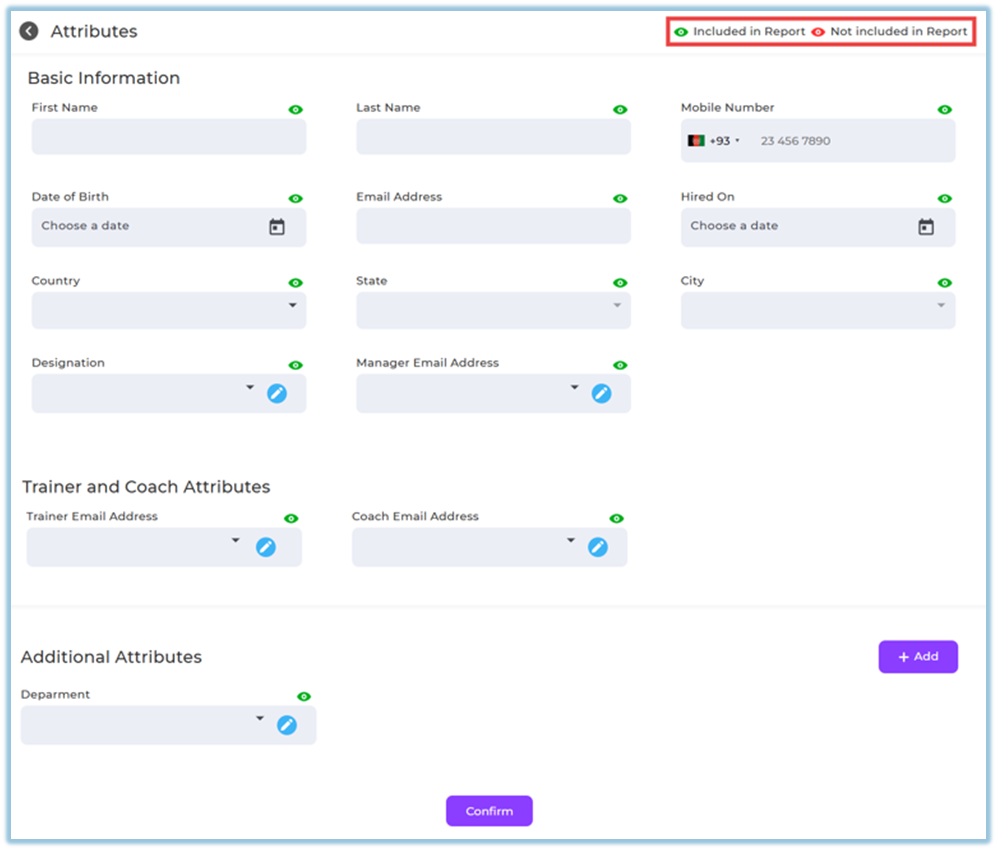
This applies to:
- Basic attributes
- Trainer and Mentor attributes
- Additional attributes
##### Add Additional Attributes
1. Click **Add** under Additional Attributes
2. Enter:
- Attribute Name
- Attribute Type
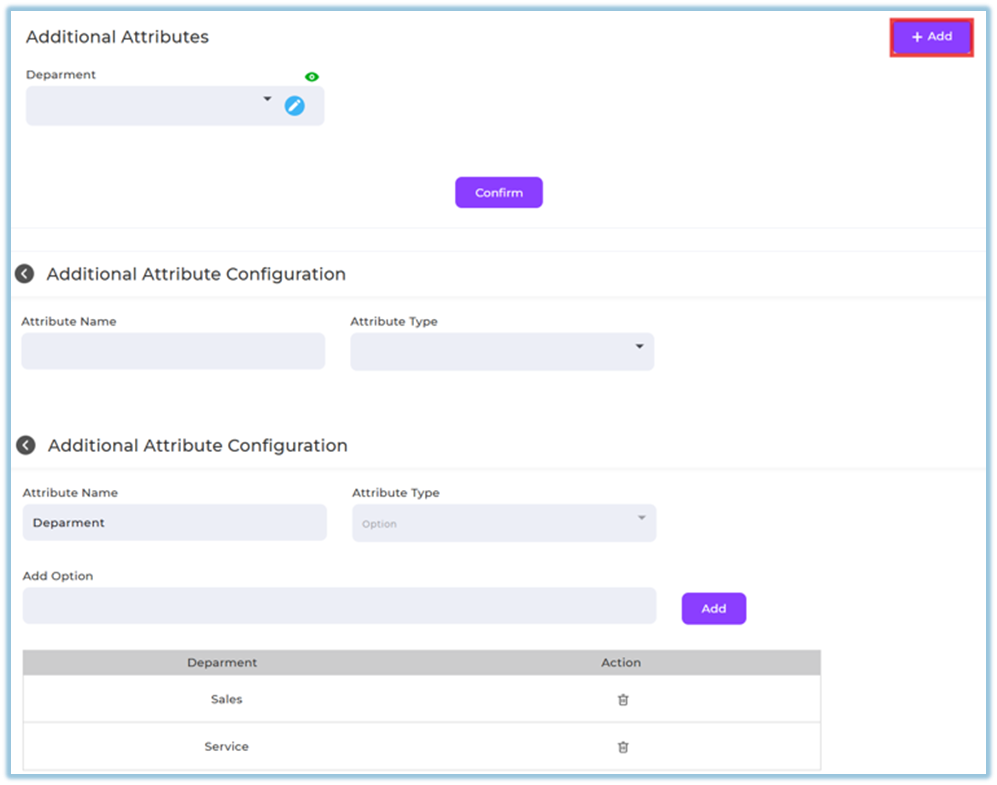
3. Save and confirm
#### **4.4 Manage Groups**
Manage Groups allows administrators to organize users into groups for targeted actions. Two types of groups are supported: Attribute Groups (rule-based) and Flex Groups (manually curated).
Path: Settings Centre → User Setup → Manage Groups
Attribute Groups
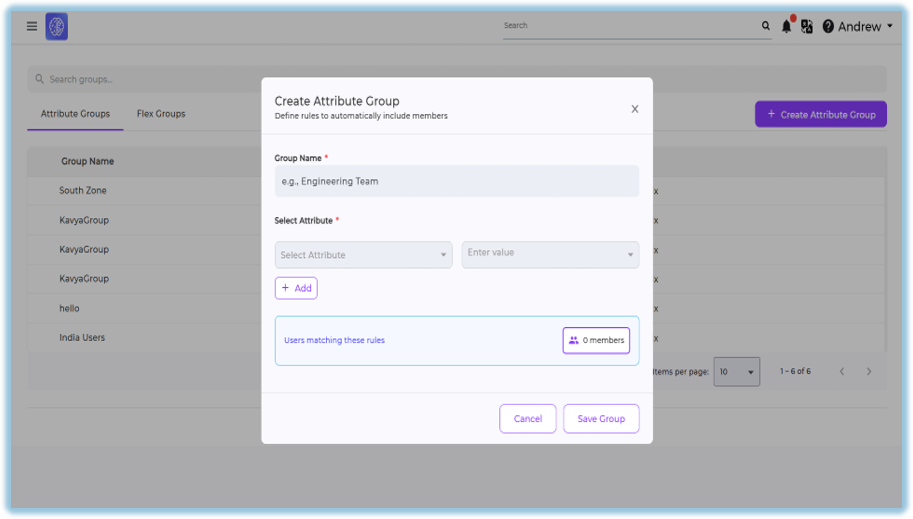
An Attribute Group defines rules that automatically include members based on their attributes. Any user matching the defined rules becomes part of the group.
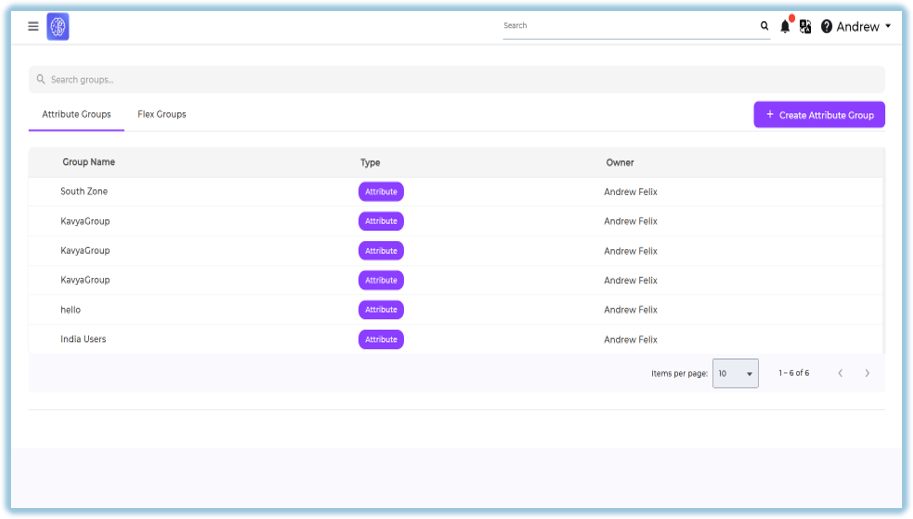
The Attribute Groups tab displays: Group Name, Type (Attribute), Owner.
To create an Attribute Group:
6\. On the Manage Groups page, open the Attribute Groups tab
7\. Click + Create Attribute Group
8\. Enter a Group Name
9\. Under Select Attribute:
◦ Choose an attribute
◦ Enter a value under Enter value
10\. Click + Add to add more attribute rules
11\. Review users matching these rules under Users matching these rules
12\. Click Save Group
##### Flex Groups
A Flex Group is a manually curated group where members are individually selected.
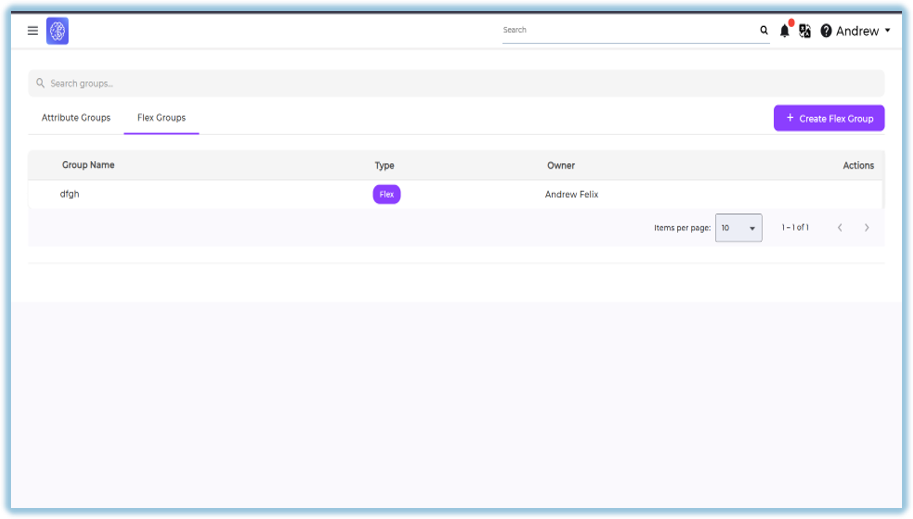
The Flex Groups tab displays: Group Name, Type (Flex), Owner, Actions.
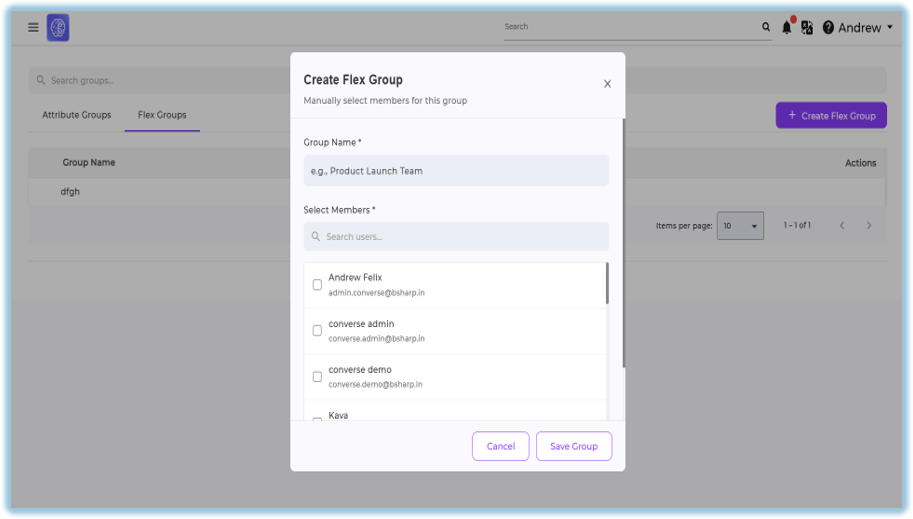
**To create a Flex Group:**
13\. On the Manage Groups page, open the Flex Groups tab
14\. Click + Create Flex Group
15\. Enter a Group Name
16\. Under Select Members, search and select users using the checkboxes
17\. Click Save Group
#### **4.5 Designation**
Designations define user roles shown across the platform.
[https://converse.bsharpcorp.com/celebrate/settings\_center](https://converse.bsharpcorp.com/celebrate/settings_center)
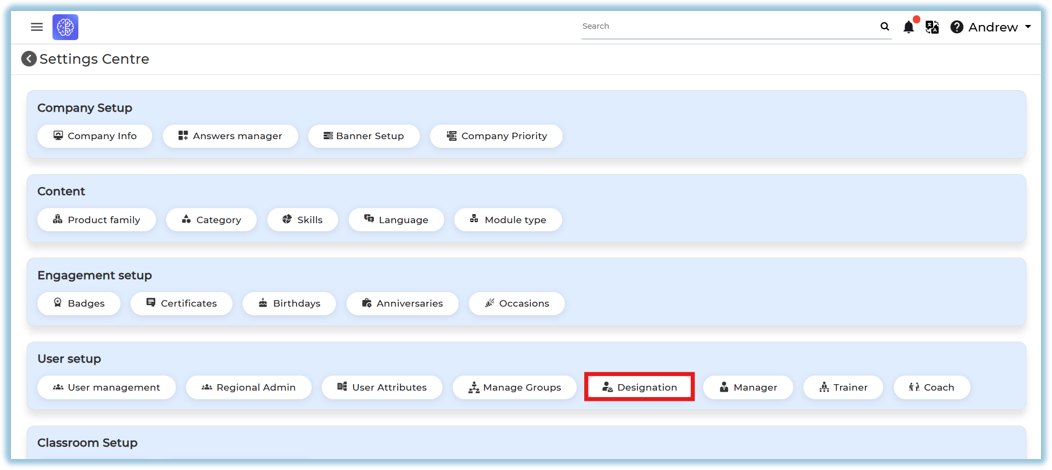
##### Add Designation
1. Enter designation name
2. Click **Add**
****
##### Usage Notes
- Designations appear in user creation dropdowns
- For bulk uploads, designation text must exactly match what is configured
- Designations can be reordered or removed if needed
#### **4.6. Manager Setup**
1. Go to **Settings Centre → User Setup → Manager
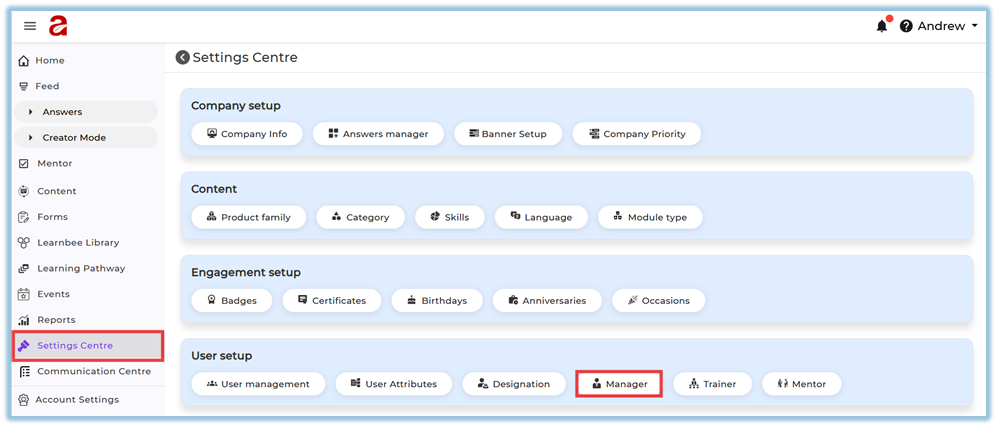**
2. Click **Select Manager**
3. From the dropdown, select a **logged-in user who should act as a Manager**
4. Click **Add **
This action **makes the selected user a Manager** in the system.
#### **4.7. Trainer Setup**
1. Go to **Settings Centre → User Setup → Trainer
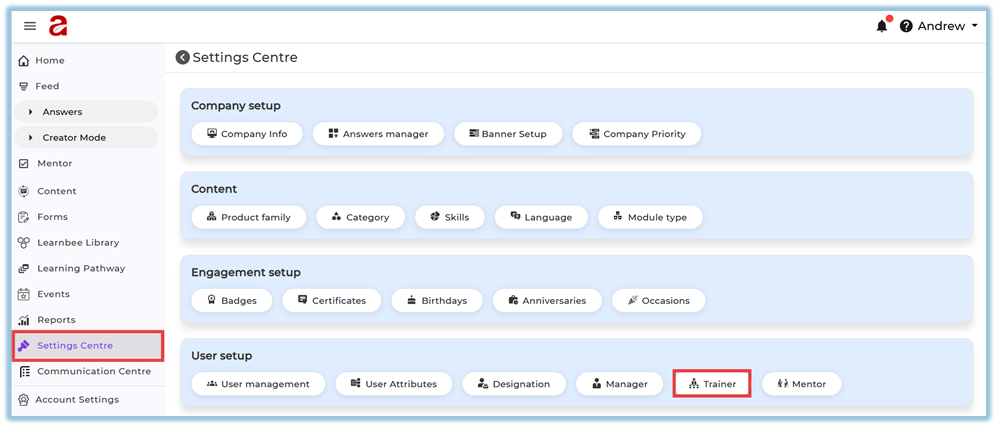**
2. Click **Select Trainer**
3. From the dropdown, select a **logged-in user** who should act as a Trainer
4. Click **Add
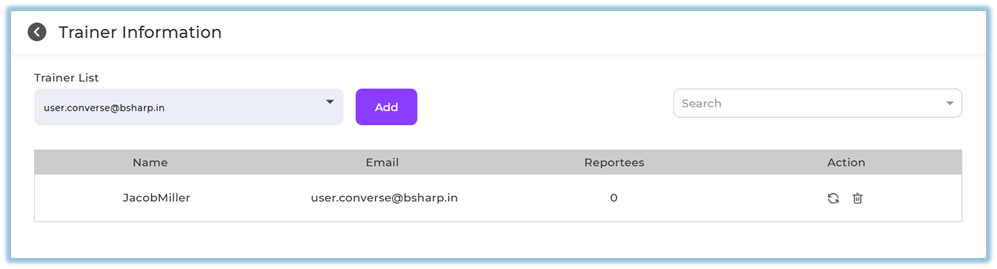**
The selected user is now enabled as a **Trainer**.
#### **4.6. Mentor Setup**
1. Go to **Settings Centre → User Setup → Coach
**
2. Click **Select Coach**
3. From the dropdown, select a **logged-in user** who should act as a Mentor
4. Click **Add
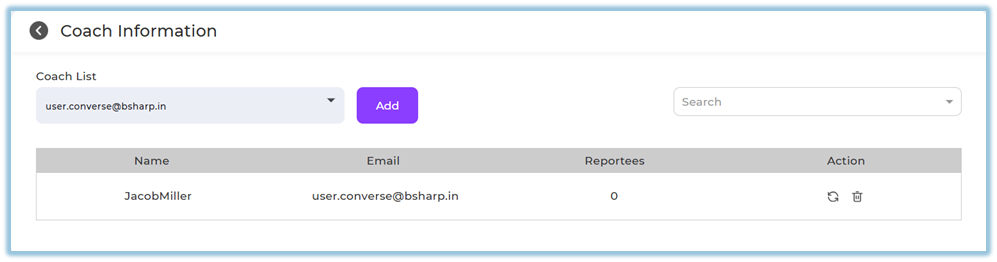**
The selected user is now enabled as a **Mentor**.
#### **How to Assign Manager / Trainer / Coach to Users**
You can assign roles in **two ways**:
**Option A: While Creating a New User**
1. Go to **User Management → Invite User**
2. Fill in user details
3. Select **Manager / Trainer / Coach email** as required
4. Click **Send Invite**
**Option B: For Existing Users**
1. Go to **User Management**
2. Open the user profile
3. Select Manager / Trainer / Coach under the respective fields
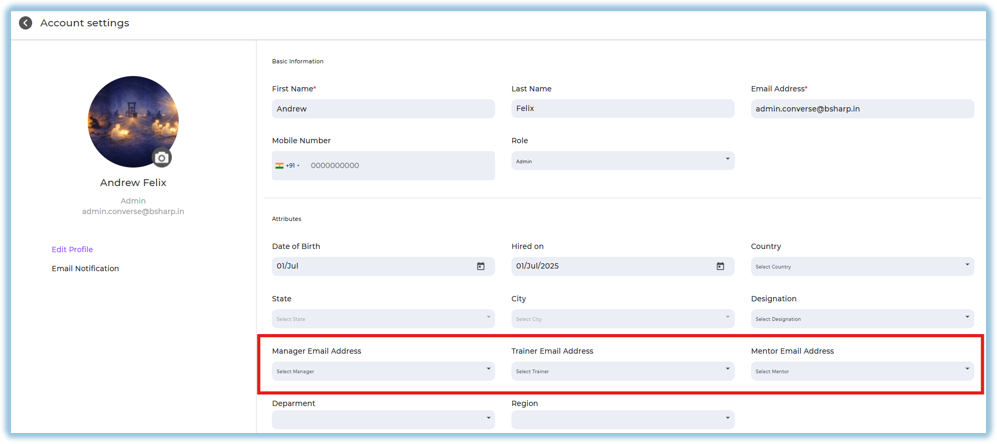
4. Click **Save**
### **5. User View**
##### Admin View
Admins can view and manage user details from:
- **User Management → User Profile**
- **Account Settings → Profile**
From here, admins can:
- View full user details
- Edit profile information
- Assign or change Manager / Trainer / Coach
- Block or unblock users
Regional Admin View
Regional Admins see only users who match the scope defined for them. Based on the permissions granted:
• Manage users permission allows viewing and managing in-scope users (block, unblock, edit)
• Communications permission allows sending communications to in-scope user
##### End User View
Users can view their details under **Profile → Account Settings
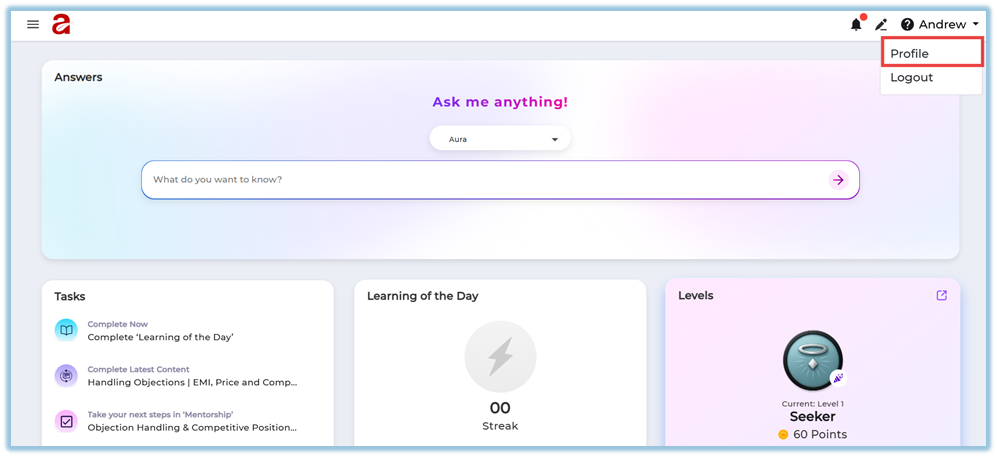**
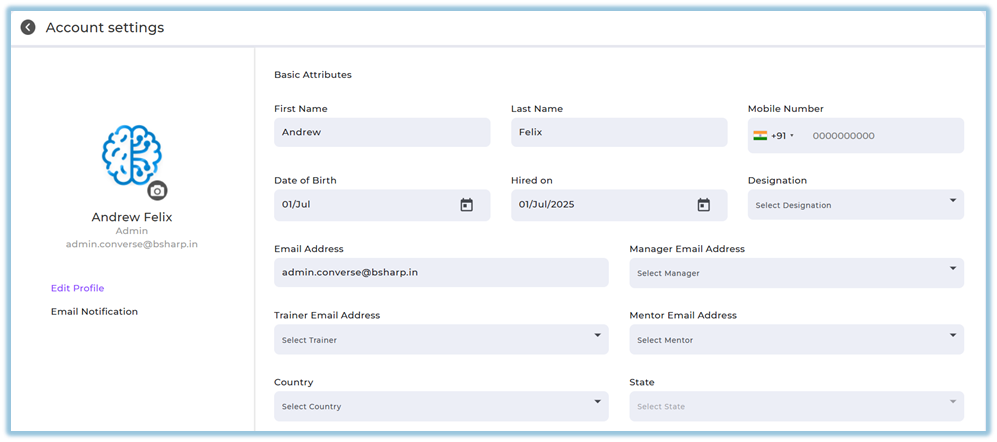
- Basic information
- Designation and role
- Manager, Trainer, Coach
- Country, state, city
- Additional attributes
### **6. Reporting**
- Only attributes marked with 🟢 (Included in Report) will appear in reports.
- Reporting accuracy depends on proper user setup and assignments.
### **7. Best Practices**
- Keep user attributes clean and consistent
- Block users who have exited the organization
- Ensure designations match during bulk uploads
- Assign managers, trainers, and mentors before launching learning
### **8. Related Links / FAQs**
- [User Management](https://converse.bsharpcorp.com/celebrate/user_management)
- [User Attributes](https://converse.bsharpcorp.com/celebrate/attribute-setup)
- [Designation Setup](https://converse.bsharpcorp.com/celebrate/designation-setup)
- [Manager Setup](https://converse.bsharpcorp.com/celebrate/attribute-setup/1)
- [Trainer Setup](https://converse.bsharpcorp.com/celebrate/attribute-setup/2)
- [Coach Setup](https://converse.bsharpcorp.com/user-management/attribute-setup/3)
- [Regional Admin](https://converse.bsharpcorp.com/user-management/regional-admin-setup)
- [Manage Groups](https://converse.bsharpcorp.com/celebrate/manage_users)
### **9. Version Notes**
Last Updated: 06 Aug 2026