
How to create and configure a Board?
1. Overview
Boards allows admins and publishers to create structured communication spaces within Converse. It supports configurable templates, audience management, publishing workflows, viewer interactions, reporting, and board management for sharing announcements, opportunities, updates, or other structured posts.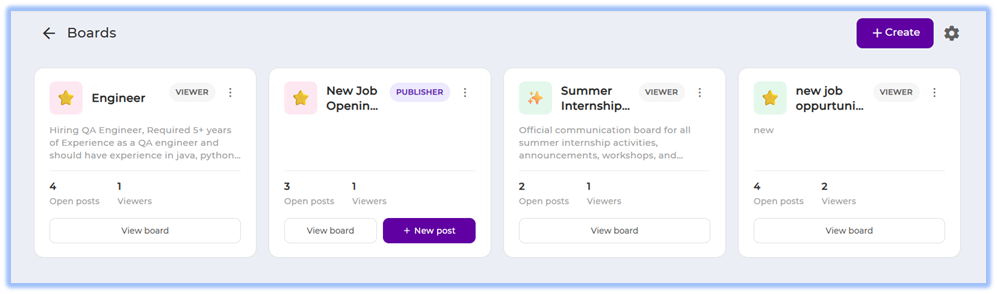
2. When to Use
- When your organization needs a centralized space to publish announcements or opportunities.
- When different teams or users need separate publishing and viewing access.
- When publishers need structured post formats with predefined fields.
- When viewers need to interact with posts using forms or interest actions.
- When admins need visibility into board engagement and post activity.
3. Concepts
4. Set Up Guide
Step 1: Open Boards
- Open the Converse platform.
- Navigate to Boards from the main menu.
- Click + Create.
Step 2: Configure Board Details
- Select the board icon and color.
- Enter the Board name.
- Select the Category.
- Enter the Description.
- Review the preview section displayed on the right side.
Step 3: Configure the Template Builder
- Review the default template fields:
- Title
- Description
- Image
- Drag additional field types into the template area if required.
- Configure field settings using the settings icon beside each field.
- Reorder template fields if required.
- Click Next.
Available field types:
- Text input
- Rich text
- Dropdown
- Multi-select
- Date picker
- File upload
Step 4: Configure Audience
Configure Publishers
- Select users under:
- Individual Users
- By Attributes
- Groups
- Click Assign To All Users or Add Participants if required.
Configure Viewers
- Select users under:
- Individual Users
- By Attributes
- Groups
- Click Assign To All Users or Add Participants if required.
- Review the selected viewer count.
- Click Next.
Step 5: Configure Call to Action
- Enable or disable I'm interested if viewers should express interest in posts.
- Enable or disable Respond with a form if viewers should submit forms.
- Select the required form from the dropdown if form response is enabled.
- Enable or disable Email alert on new post.
- Click Save & exit.
Step 6: Create a Post
- Open the required board.
- Click + New post.
- Enter the Title.
- Enter the Description.
- Upload an image using:
- Computer
- Pexels library
- Image URL
- Fill the configured template fields.
- Upload attachments if required.
- Click Submit & publish.
Step 7: Manage Boards
- Open the required board from the Boards page.
- Click the three-dot menu.
- Select:
- Edit
- Reports
- Delete
Step 8: View Board Reports
- Open the required board.
- Click the three-dot menu.
- Select Reports.
- Review the report details:
- Post
- Published by
- Seen by
- Interested
- Click Download to export the report.
5. User View
Viewers can access assigned boards from the Boards page. Each board displays the board title, description, number of open posts, and viewer count.
Inside a board, viewers can:
- View published posts
- Open post details
- View uploaded images and formatted content
- Access configured template fields
- Express interest using the I'm interested option
- Access linked forms when configured
- View attachments uploaded by publishers
Publishers can additionally:
- Create new posts
- Publish updates inside assigned boards
- View board reports when available
- Manage existing boards based on access
6. Reporting
Board Reports
Board reports display:
- Post name
- Published by
- Seen by count
- Interested count
Reports can be accessed from the board actions menu using the Reports option.
Users can download reports using the Download button available in the report table.
7. Best Practices
- Use clear board names to help users identify the purpose of the board.
- Configure only the required template fields to simplify post creation.
- Assign publishers and viewers carefully to maintain controlled access.
- Use categories consistently across boards for easier organization.
- Review call-to-action settings before publishing the board.
- Use structured field labels to maintain consistency across posts.
- Review audience configuration before enabling email alerts.
8. Related Links / FAQs
Can multiple publishers be assigned to a board?
Yes. Multiple users can be assigned as publishers.
Can viewers submit forms from a board?
Yes. This depends on whether the Respond with a form option is enabled.
Can attachments be uploaded in posts?
Yes. Publishers can upload attachments while creating posts.
Can audience be configured using groups?
Yes. Audience can be configured using Individual Users, By Attributes, or Groups.
Can reports be downloaded?
Yes. Reports can be downloaded using the Download option in the Reports page.
Can boards be edited after creation?
Yes. Boards can be updated using the Edit option from the board actions menu.
9. Version Notes
Last Updated: 27 May 2026